How to Make a Half Mandala Wall Hanging Using 5 Basic Knots of Macrame
Table of Contents
- What is Macrame?
- Macrame Knots You Need to Know to Make a Macrame Half Mandala Wall Hanging Pattern
- Macrame Mandala Cord & Supplies
- Macrame Half Mandala Wall Hanging Pattern Details
- Important Macrame Terms for Beginners
- DIY Macrame Half Mandala Wall Hanging Step-by-Step Instructions
- Step 1:
- Step 2:
- Step 3:
- Step 4:
- Step 5:
- Step 6:
- Step 7:
- Step 8:
- Step 9:
- Step 10:
- Step 11:
- Step 12:
- Step 13:
- Step 14:
- Step 15:
- Step 16:
- Step 17:
- Step 18:
- Step 19:
- Step 20:
- Step 21:
- Step 22:
- Are you looking for more fun and simple DIY macrame patterns?
- Are you looking to turn knots into exquisite macrame designs?
Welcome back to Bochiknot, your go-to place for all things macrame! From DIY pattern tutorials and helpful tips to the best knotting practices, we've got you covered on your macrame journey.
In this exciting DIY macrame tutorial, we'll walk you through creating a breathtaking half-mandala wall hanging that will infuse your living space with bohemian charm and elegance.
And here's the best part: this pattern is perfect for beginners! It's not only beautiful when displayed on your wall, but crafting it will also bring you lots of joy and a sense of accomplishment! Get ready for a fun and rewarding macrame adventure!

What is Macrame?
Before we jump in, let's take a moment to learn what Macrame is all about.
Macrame is a form of art or craft that creates decorative knots and patterns with cords or ropes.
Macrame has surged in popularity and become mainstream due to its nostalgic appeal, the rise of bohemian and vintage trends in fashion and home decor, and the active promotion and sharing of macrame creations on social media platforms, sparking a renewed interest in this ancient craft among world wide.
And today, we'll demonstrate how you can turn basic knot-tying techniques into a stunning macrame mandala, so get ready to create something wonderful!
Macrame Knots You Need to Know to Make a Macrame Half Mandala Wall Hanging Pattern
Getting familiar with the fundamentals of macrame knots is essential for mastering the art of Macrame. For this project, you will need to know the following knots.
These knots for macrame are found in almost all macrame designs.
- Lark's head knot
- Double half-hitch knot
- Square Knot
- Berry Knot
- Reverse Lark’s Head Plus Half Hitch knot
The above knots are basic knots widely used in many macrame projects.
By learning popular knots like the lark's head knot, double half hitch knot, and gathering knot, you'll have a solid foundation for creating a wide range of macrame projects, including wall hangings.
- Lark's Head knot serves as a fundamental mounting knot for various projects. As a mounting knot, it provides a reliable and secure attachment point for your macrame design to a dowel, ring, or other supporting structure. This knot allows you to easily hang cords onto your macrame creation, providing a stable foundation for further knotting and design elements.
- Double Half Hitch knot is a fundamental and highly versatile knot in Macrame. It is the building block for many intricate knot patterns, making it an essential technique for creating beautiful macrame designs.
- Square Knot is one of the most basic knots in Macrame, formed by alternately crossing two cords over each other. It holds a significant role in Macrame as a key decorative knot. It is the foundation for numerous patterns and designs, both on its own and with other types of knots.
- Berry Knot, also known as the modern iteration of the vintage Square knot button, features a textured design formed by transforming Square knots into a charming berry-like shape. This stylish and decorative knot is widely used in contemporary macrame projects, adding a touch of elegance to your creations.
- Reverse Lark's Head Plus Half Hitch knot is a variation of the Lark's Head mounting knot. Its primary function is to occupy more space on your mounting object compared to a regular Lark's Head or Reverse Lark's Head knot. This variation allows for a fuller and more substantial appearance when applied in your macrame projects.
If you need help making the knots above, click on the names above to practice and familiarize yourself with the knots before starting this pattern.
Practice and repetition will help you become more confident in executing these knots, allowing you to explore more intricate patterns and designs.
I have compiled a FREE EBOOK guide, "50 Macrame Knots & Sennit Guide," that goes over step by step with pictures on how to make 50 different knots and sennits.

This guide will assist you in learning the knots and provide insights into creating unique knot sequences and pattern designs.
Macrame Mandala Cord & Supplies
Choosing the cord
The most crucial material is the cord. Macrame cords can be made from various materials such as cotton, jute, or nylon, each offering a different texture and appearance.
Choosing a cord that is soft, sturdy, and suitable for your desired keychain design is essential, ensuring durability and functionality.
- Our Rainbow cord line is certified 100% chemical free and eco-friendly, made from recycled cotton materials.
- The single-strand type of cord, in particular, comes in various colors.
- We love it because it's smooth, soft, and sturdy, making it easy to work with.
If you can't get your hands on our single-strand Rainbow cotton cord, try substituting it with our 3-ply Rainbow cotton cord, which will also work well for this pattern and offer a more textured aesthetic.
Other Supplies
- 12" dowel – You can find this in your local craft store, Amazon, or on our website, bochiknot.com. If you prefer a more bohemian aesthetic, you can use a 12" driftwood instead. Other materials are not needed besides a wooden dowel or a stick to mount the cords onto to make the pattern.
Essential tools
You will also need some essential tools:
Macrame Half Mandala Wall Hanging Pattern Details
Skill level:
- Easy / Beginner
Completion time:
- This project will take approximately 1 hour to 2 hours to complete depending on skill level.
Completed size:
- 12” wide by 6” length
Materials:
- 3mm or 4mm cord – I will be using a 3 mm single-strand cord from our Rainbow cord line. The color is steel blue, which is pale and beautiful.

- 12" dowel – You can find this in your local craft store, Amazon, or bochiknot.com.
Cord Lengths Needed:
- 10 x 170 cm (67)
- 1 x 150 cm (59)
- 2 x 120 cm (47)
- 12 x 50 cm (20)
- 2 x 70 cm (28)
Important Macrame Terms for Beginners
Here are some helpful macrame terms you should know when following this pattern:
- Knots: Macrame involves various types of knots, such as the square knot, half hitch, Lark's head knot, and spiral knot. Understanding these basic knot patterns creates the foundation of macrame.
- Cords: Cords are the primary material used in macrame. They are made of different materials like cotton, jute, nylon, or synthetic fibers. Macrame cords come in various thicknesses and colors.
- Fringe: Fringe refers to the loose ends of cords that hang down, adding a decorative element to beginner projects. The fringe can be left as is or trimmed to a desired length.
- Anchor cord: This refers to the fixed cord or structure to which other cords are attached or knotted, providing stability and support to the design.
- Working cord: This is the piece of cord that is actively used to create knots and patterns, manipulated and moved throughout the project to form the desired design.
DIY Macrame Half Mandala Wall Hanging Step-by-Step Instructions
To get started, you have to hang the dowel or pin it down.
Step 1:
- Attach 10 x 170 cords onto the dowel's center using Lark's Head Knots.
Step 2:
- Make a V-shaped/upside-down Square Knot pattern. Make a row of 5 x Square Knots, 4, 3, 2, and finally, 1 Square knot at the bottom.
Step 3:
- Make a diagonal row of a Double Half Hitch (DHH) Knots on the left side.
Step 4:
- Taking the 4th cord down from the top left, as the anchor cord, make another 6 x DHH to the right.
Step 5:
- Repeat the same pattern on the right side.
Step 6:
- Take a strand of 150 cm cord and attach it loosely on the left side using a Lark’s Head Knot. Then measure the left cord end to 58 cm (23) and tighten the knot.
Step 7:
- Use the right cord end as the cord for a row of DHH knots diagonally to the right then all the way back to the right side.
Step 8:
- Attach the cord on the right side with a Vertical Lark’s Head knot.
Step 9:
- Take a 120 cm strand of cord and attach it onto the empty loop on the right side with a Reverse Lark’s Head plus Half Hitch (“RLHPHH”) knot.
- Then repeat on the left side.
Step 10:
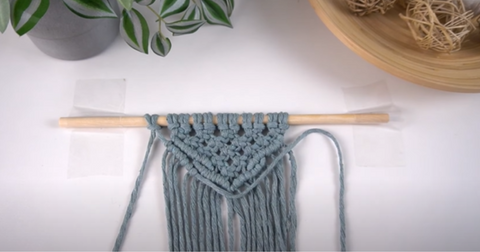
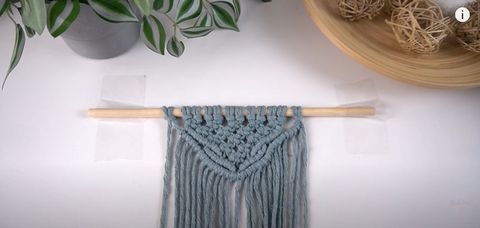
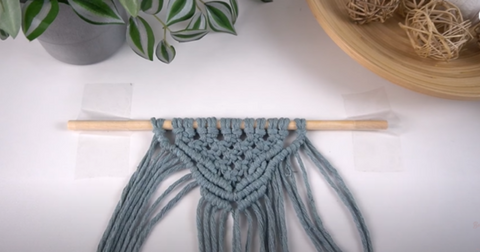
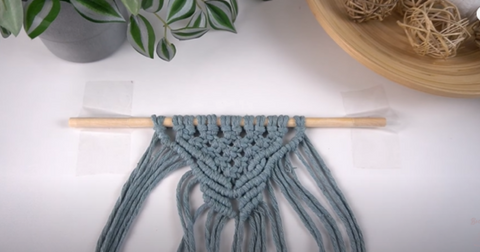
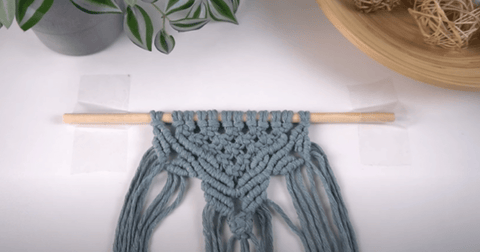
- With the middle 10 cord section, make 2 rows of V-shaped DHH knots.
Step 11:
- With the left 8 cords, also make 2x V-shaped DHH knot rows.
- Then repeat the same pattern with the right 8 cords.
Step 12:
- Make a Berry knot with the 4 middle cords at the bottom and then make 2 more V-shaped DHH knots underneath using the adjacent left and right cords as anchor cords.
Step 13:
- With the left section, make a Berry knot in the middle and then make 2x V-shaped DHH knot rows directly underneath.
- Repeat the same on the right section.
Step 14:
- Make a Square knot in between the left 2 sections and the right 2 sections.
Step 15:
- Take 2 x 50 cm cords and attach them on the bottom loop to the left of the Square knot with a Reverse Lark’s Head knot.
- Then attach another 2 cords to the right of the Square knot.
Step 16:
- Repeat the same on the left side.
Step 17:
- Attach a 70 cm cord onto the right side of the dowel with a Lark’s Head knot. Then make a Square knot with 2 cords to the left.
Step 18:
- Attach one 50 cm cord to the left and one to the right of the Square knot with a Reverse Lark’s Head knot.
- Repeat the same pattern on the left section.
Step 19:
- With the middle-right section, skip the left 2 cords and make 2 Square knots and 1 Square knot underneath.
- Then make 2 V-shaped DHH knot rows.
Step 20:
- Repeat the same pattern on the middle-left section.

Step 21:
- With the far-left section, make 2 Square knots and 1 underneath. Then add 2 V-shaped DHH knot rows.
- Repeat the same pattern on the far-right section.
Step 22:
- Trim and comb through the fringe.
Wrapping Up How to DIY Macrame Half-Mandala Wall Hanging | Beginner-Friendly Pattern
Congratulations! You have just finished making your own Half Mandala Wall Hanging.
As we wrap up this mandala macrame wall hanging pattern tutorial, I hope you enjoyed making it, just like I did share it with you!
Macrame is full of endless possibilities, and I encourage you to keep trying out new patterns and designs. It's not just about the final product but your memorable and creative journey.
Whether you're a seasoned macrame pro or a newbie, every knot and twist you make adds your special touch to the finished piece.
So, go ahead and let your imagination soar! Add your favorite colors, beads, or even charms to your future macrame projects.
I hope this tutorial inspired you to keep exploring the world of gorgeous Macrame and try out more exciting projects.
And hey, remember to show off your beautiful creations to us and the macrame community - we're so eager to see what you come up with!
Until we meet again, happy knotting and creating! 🌼
Are you looking for more fun and simple DIY macrame patterns?
Looking for more handmade macrame wall hangings pattern to try?
I have numerous diverse DIY macrame patterns that you can explore, ranging from distinctive wall hangings for home decor to timeless plant hangers suitable for all skill levels.
Browse my collection of DIY macrame patterns on Etsy.
The patterns come complete with step-by-step photos, written instructions, and helpful tips and tricks to assist you throughout your macrame journey.
Are you looking to turn knots into exquisite macrame designs?
Discover the art of macrame like never before!
Join our exclusive community of passionate macrame enthusiasts and unlock a world of creativity.
Gain access to a treasure trove of unique patterns, expert guidance, and a supportive network of fellow artists.
Whether you're a beginner or a seasoned knotter, our community is your gateway to mastering the art of macrame.
Elevate your skills, share your creations, and embark on a journey of inspiration together.
Don't miss out on this incredible opportunity.
Join our exclusive macrame community today!









Leave a comment