 Skip to content


Unlock the Secrets: 9 Important Macrame Tips and Hacks You Probably Don't Know
Table of Contents
- Why These Tips Are Important for Macrame Beginners
- My Top 9 Tips For Beginners
- Tip 2: How to Create a Straight Line of Macrame Double Half-Hitch Knots
- Tip 3: Macrame Fringe Cutting
- Tip 4: Untying Knots for Beginners
- Tip 5: Measuring Cord Length
- Tip 6: How to Deal With Unravelling Cord When Working on a Macrame Project
- Tip 7: How to Manage Large Amounts of Cord for a Macrame Project.
- Tip 8: How to Create Evenly-Spaced Macrame Knots
- Tip 9: Preventing Unraveling: How to Secure Your Completed Macrame Cord-Ends
- Wrapping Up My Top 9 Tips for Macrame Beginners
- Looking for Fun & Simple DIY Macrame Projects to Try?
- Looking to Advance Your Skillset and Create Gorgeous Macrame Projects?
- Grab My Free 50 Knot Ebook Guide

As a macramé beginner, it can be overwhelming to figure out where or how to begin learning the craft.
I'm thrilled to share my top 9 tips for macrame beginners today.
Macrame is a captivating art form that allows you to create beautiful macrame projects using basic knots and strands of cords.
Whether you're new to Macrame or looking to refine your skills, these nine tips will provide valuable insights and guidance to enhance your Macrame skills.
From measuring and cutting the appropriate macrame cord lengths to techniques for untying common macrame knots, each tip is carefully curated to help you create beautiful and balanced macrame projects.
So, let's dive in and unlock the secrets to success in the world of Macrame with my top 9 tips for Macrame beginners.
Why These Tips Are Important for Macrame Beginners
Knowing macrame tips is vital for beginners because they provide a solid foundation for learning the craft.
Macrame is a popular craft that is surprisingly easy to learn, but there are some tips and tricks that every beginner should know.
Whether you're just starting or you've been trying your hand at Macrame for a while, these top 9 tips will help make your Macrame journey smoother and more enjoyable.
By following these tips, beginners can avoid common mistakes, gain confidence in their abilities, and achieve better results in their macrame projects.
My Top 9 Tips For Beginners

Tip 1: Measuring & Cutting Cord
For measuring short lengths, you can use a ruler or tape measure.
But for large pieces, the dowel stick method is an easy way to ensure all your cords are even and accurate.
It's beneficial when working with multiple colors or patterns – you don't want one cord to be longer than the others!
Tape two to your working surface at half the cord length you need. Now, wrap your cord around these dowels, once for each cord length you need. Cut through all the loops at once.
Voila! There you have all the pieces of cord you need at precisely the right length.
Utilize this helpful tip for projects that involve a substantial number of cords, such as macrame plant hangers and wall hangings.

Tip 2: How to Create a Straight Line of Macrame Double Half-Hitch Knots
To improve your knotting skills, I recommend a knotting weaving technique when creating a series of knots in a straight line; it can be challenging, particularly for those new to macramé.
The example shown below is a row of diagonal double half-hitch knots.
To simplify this process, use a dowel stick to guide you as you create a row of double half-hitch knots.
Start by securely tying the ends of your rope or cord around the dowel stick.
Use a heavy-duty dowel stick that won't bend when pulling the rope or cord.

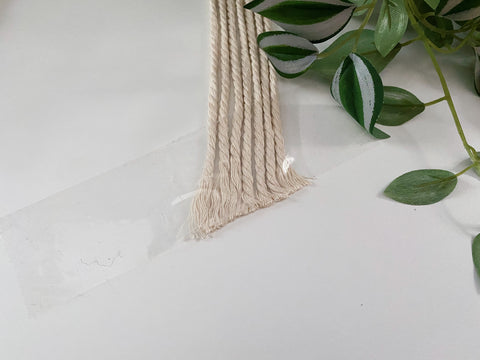
Tip 3: Macrame Fringe Cutting
Cutting the fringe on your latest creation can be challenging due to its constant movement.
To ensure a precise cut, use tape to secure the fringe in place and then cut underneath the tape.
This method will help you achieve a flawless beautiful fringe without any unwanted shifts.
You can apply this technique to boho-style wall hanging Macrame, plant hangers, or any projects with fringe.

Tip 4: Untying Knots for Beginners
Untying knots can sometimes be challenging, but you can get through it with patience and the right approach.
Begin by identifying the knot type and working methodically to loosen it. Tools like a crochet hook or tweezers can assist in untangling and releasing the cords.

Take your time gently unraveling the knots; with practice, you'll become more adept at effectively undoing macrame knots.

Pull on the anchor cord to untie a row of double half-hitch knots. The entire row should loosen up easily.

You can successfully untangle and release knots by understanding various knot types, using appropriate tools, and working methodically.
Tip 5: Measuring Cord Length
Measuring strands of cord for macrame projects can be tricky.
Factors like cord stretch, tension, and desired length affect measurements.
Considering these variables, verifying measurements, and including additional length for unforeseen variations is essential.
Taking the time to measure the cord accurately is vital for a successful macrame project.
One potential mistake to avoid is cutting the cord too short for the project.
It is essential to consider the cord length needed before making any cuts.
Cutting the cord too short can limit your ability to complete the macrame design or result in an unfinished and unbalanced appearance.
Luckily, I have a hack for you.
The number of knots you use determines the cord you need.
A good rule of thumb is to measure cords at least four times the desired length of your project.
- Double the length if you attach these cords with lark's head knots.
- For simple projects with basic knots and lots of fringe and space in the design, 3.5 times the project length will suffice.
- Intricate projects would need 4.5 times the project length.
Tip 6: How to Deal With Unravelling Cord When Working on a Macrame Project
When your cotton rope strands start to unravel during a macrame DIY craft project, it presents several challenges.
Firstly, it can disrupt the overall aesthetic and symmetry of the design, resulting in an unfinished or messy appearance.
Secondly, unraveling strands of the cord can weaken the knots' structural integrity, compromising the piece's stability.
It also creates difficulty maintaining consistent tension, making achieving clean and even knots harder.
Lastly, attempting to fix or reattach unraveled cords can take time and may require unraveling additional sections of the project, leading to frustration and potential setbacks in completing the work.
To prevent this, here is a tip that macrame for beginners should follow.

When working with different types of macrame cords, it is recommended to knot the cord ends or wrap them in tape.

Securing the loose ends with tape or clips helps keep your cords in place and keep your design intact.
Additionally, practicing proper basic knotting techniques and periodically checking for any signs of unraveling can help you catch and address the issue early on.
This simple step provides:
- Stability.
- You are ensuring that your knots remain secure and your project stays intact.
- It also lets you focus on creating and enjoying your macrame artwork without worrying about unraveling cords.
Staying vigilant, practicing good knotting techniques, and addressing any signs of unraveling will help ensure a smoother and more enjoyable experience, allowing you to create beautiful and intact designs.
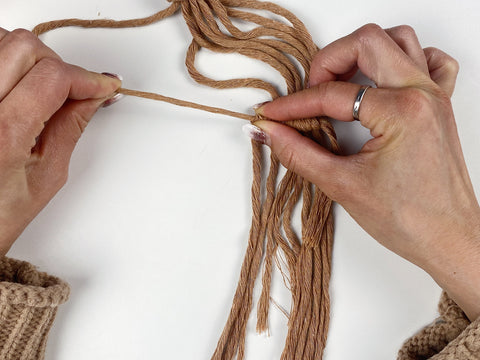
Tip 7: How to Manage Large Amounts of Cord for a Macrame Project.
Maneuvering and managing long cords can be cumbersome, and maintaining consistency throughout the design requires careful attention.
When working on a large project, such as wall hangings, macrame plant hangers, macrame wedding backdrops, or macrame curtains, you will be handling a significant amount of cord, which can result in cords scattered all around.
They tangle easily, so keeping things neat while working is hard.
Fortunately, I have a helpful trick that I like to use: Roll these long cords into balls and secure them with rubber bands.
This technique effectively keeps the cords tidy and keeps them out of the way during the macrame process.
You can conveniently retrieve more from the rolled cord balls as you progress with your macrame project and require additional cords to continue working.

By gently pulling a small amount of cord from the rolled balls, you have a steady and accessible supply to work with.
This method helps maintain organization and prevents tangling or knotting of the cords, allowing you to incorporate the necessary length smoothly without any interruptions or frustrations.
It also ensures that the rest of the cords remain neatly rolled and secured until needed, keeping your workspace clean and efficient.
Tip 8: How to Create Evenly-Spaced Macrame Knots
Achieving even spacing in basic macrame knots and patterns can be one of the most challenging endeavors in this craft.
The truth is, attaining perfect spacing is nearly impossible due to factors such as cord thickness, tension, and the complexity of the design.
These variables impact the overall balance, making it difficult to achieve absolute uniformity.
However, by maintaining consistent tension and practicing careful execution, you can strive for an aesthetically pleasing result with reasonably balanced spacing between your macrame knots and knot patterns.
Here is a simple hack that has helped me: Use a spacer or measuring tape.
Using a spacer or measuring tape is a valuable technique to ensure the even spacing of macrame knots and patterns.
You can maintain consistent intervals by placing a spacer, such as a small piece of dowel or a dedicated macrame tool, between knots or using a measuring tape as a guide.
By employing this method, you can achieve precise measurements and enhance the balance and harmony of your macrame designs.
This approach lets you carefully measure and plan your knots, resulting in a well-proportioned and visually pleasing final piece.
Tip 9: Achieve Straight Fringe with a Steamer and Stiffener
Soft, lush fringe can be easily achieved with some readily available household products.
I recommend using a clothing steamer on the cord ends, and then treating the pieces of rope cord ends with fabric stiffener or hair spray.
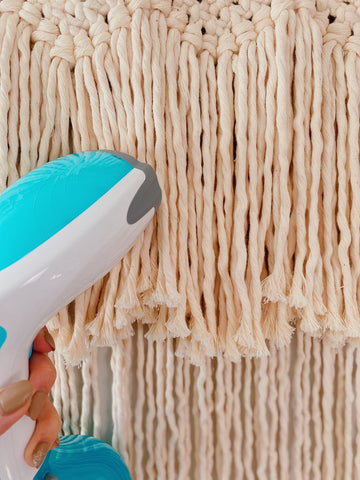
Steaming helps relax the fibers, allowing the fringe to drape naturally and appear more polished.
Then brushing the fringe helps separate and fluff the individual strands, enhancing its overall appearance.
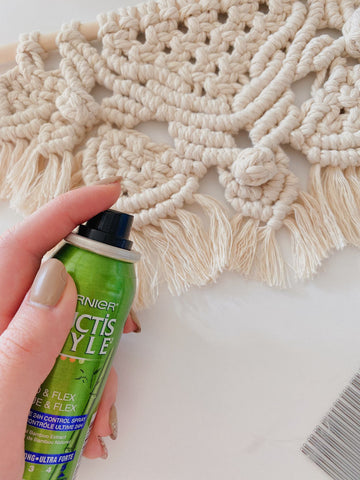
End by using fabric stiffener or hair spray to add an extra layer of protection, preventing fraying and ensuring that the fringe maintains its shape and structure over time.
Wrapping Up My Top 9 Tips for Macrame Beginners
I hope you find these top 9 beginner tips valuable and inspiring as you embark on your creative macrame journey.
Remember, patience and practice are crucial to mastering this intricate art form.
Embrace the beauty of the common knots, experiment with different patterns, and allow your creativity to flourish.
Don't be afraid to make mistakes and learn from them; they are stepping stones towards growth.
With dedication and perseverance, you'll soon create stunning modern macrame pieces that bring joy and beauty into your life.
So grab your cords, follow these tips, and let the art of Macrame weave its magic in your hands. Happy knotting!
Looking for Fun & Simple DIY Macrame Projects to Try?
So you have familiarized yourself with the basic macrame knots - The Lark's Head Knot, Square Knot, Double Half Hitch Knot, and Berry Knot, and now you're looking to get a bit of practice in creating your DIY macrame.
Explore my catalog of beautiful DIY macrame design patterns online that you can make in the comfort of your own home.
From simple knot macrame keychains to intricate macrame plant hanger, I've got you covered with a diverse collection of DIY projects that you can choose from.
Every downloadable macrame project is unique and original, providing a unique experience.
Each project has comprehensive written instructions and step-by-step photo illustrations to guide you.
You'll also find a wealth of helpful tips for beginners to assist you in your DIY macrame endeavors.
Browse my collection of macrame DIY beautiful projects & patterns on Etsy.

These macrame designs I've created will hopefully empower and inspire you as you embark on your journey, ensuring you have the tools and knowledge to create stunning macrame pieces confidently.
Looking to Advance Your Skillset and Create Gorgeous Macrame Projects?
Discover the art of Macrame like never before.
Join our exclusive community of passionate macrame enthusiasts and unlock a world of creativity.
Access a treasure trove of unique patterns, expert guidance, and a supportive network of fellow artists.
Whether you're a beginner or a seasoned knotter, our community is your gateway to mastering the art of Macrame.

Elevate your skills, share your creations, and embark on a journey of inspiration together.
Take advantage of this incredible opportunity.


Grab My Free 50 Knot Ebook Guide
P.S. Looking for different types of knots you can use in your projects?
Our 50 knot eBook is here to help develop and improve new knot-tying skills.
Whether you're a beginner seeking to develop your skills or an experienced macrame artist looking to improve, this eBook is your go-to guide for unlocking the secrets of knot mastery. Don't miss out on this fantastic resource – start your macrame journey today! Get Access Here


Hey! Congratulations for your blog! You have so much helpful information and amazing ideas! :)
Thank you so much for very useful tips. I love Macrame craft.
Leave a comment