18 Tips on Mastering Macrame Fundamentals: Neat Knotting and More

At Bochiknot, we share more than just pattern tutorials.
Our goal is to provide knowledge on all facets of macrame.
In Stage 2 of the macrame journey, we’ve covered choosing macrame cords, embellishments, and advancing from beginner to master with intricate knot patterns.
In this blog post, we’ll be diving into 18 essential tips that will not only help you master the subtle intricacies of macrame but also significantly improve your knowledge and skills.
If you’re a beginner looking to perfect your techniques or a seasoned macrame artist wanting to refine your craft, these tips are designed to enhance your macrame journey.
From knotting techniques to design tricks, we’ll cover a wide range of insights to help you create stunning, professional-looking pieces with ease and confidence.
Let’s get started on taking your macrame skills to the next level!
How to Make Your Macrame Symmetrical (Secrets to Neat Knotting)
Creating symmetrical designs is one of the key secrets to achieving neat and professional-looking macrame pieces.
In this section, we’ll explore how to make your macrame pieces symmetrical, ensuring they not only look beautiful but are also structurally strong and long-lasting.
Macrame symmetrical knotting is essential in macrame for a variety of important reasons:
-
Visual Appeal: Symmetry brings balance and harmony to your designs, creating visually stunning pieces that draw the eye. If you're crafting wall hangings, plant hangers, or jewelry, symmetrical knots give your creations a polished and professional look that stands out.
-
Pattern Consistency: Symmetry ensures that your knots are perfectly aligned, which is especially important for complex patterns. It helps maintain uniformity throughout your project, keeping the design consistent from start to finish. This attention to detail is key in creating macrame pieces that are cohesive and refined.
-
Structural Integrity: Beyond aesthetics, symmetrical knotting also plays a vital role in the durability of your macrame work. By distributing weight and tension evenly, symmetrical knots ensure that your pieces are strong and reliable, whether they're supporting heavy plants or serving as decorative wall art.
By focusing on symmetrical knotting, you elevate your macrame from simple crafting to true artistry. It allows you to express your creativity while ensuring your work is professional, structurally sound, and visually captivating.
Neat Knotting - Square Knots
Square knots are one of the most foundational and frequently used knots in macrame, serving as the backbone for many designs.
Ensuring your square knots are neat and precise is crucial to creating clean, professional-looking pieces.
Here are some essential tips to help you perfect your square knots and take your macrame projects to the next level, whether you're crafting a simple plant hanger or an intricate wall hanging.
These tips will ensure your square knots are tight, consistent, and beautifully executed.
Tip 1: Pull on Inner Anchor Cords

A key tip for making clean square knots is to pull on the inner anchor cords right after finishing each knot.
This helps prevent the cords from getting bunched up, especially around or inside the square knot.
During knotting, the anchor cords can sometimes get tangled with the outer cords, which can mess up the look.
By tugging on the inner cords as soon as you finish the knot, you keep the knots smooth and even.
Tip 2: Adjust After Every Row
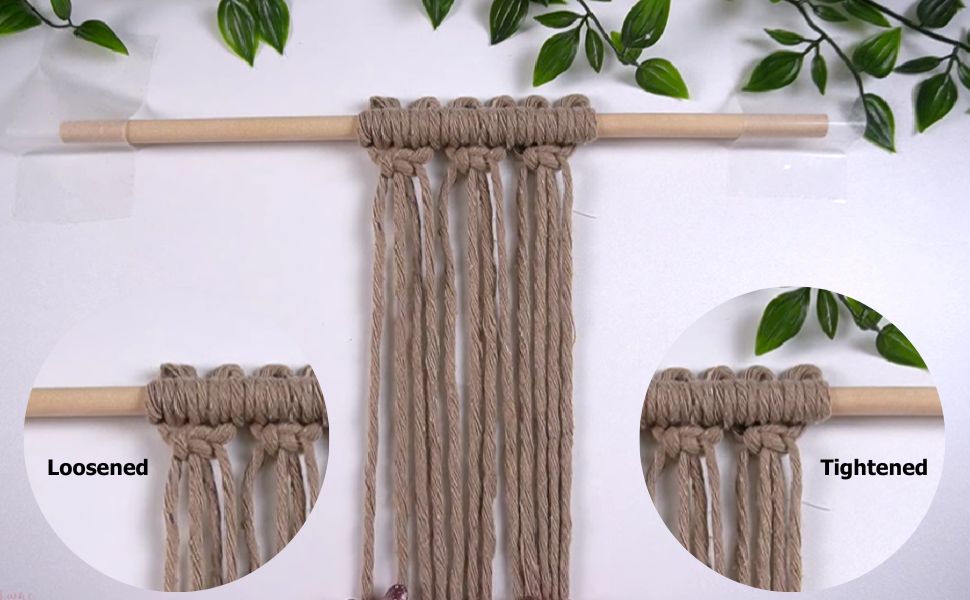
Our second tip is all about adjusting your knots as you go, especially after completing a row or section.
After every few knots, take a moment to check your work and either loosen or tighten each knot to keep them uniform and consistent.
The difference between a loose and tight knot might seem small at first, but over the entire project, it can create noticeable inconsistencies.
By taking the time to refine each knot, you’ll ensure your macrame piece has a clean and polished finish with even knots throughout.
Tip 3: Keep Tension Consistent

Maintaining consistent tension is key to making neat square knots in your macrame projects.
If you prefer to keep your knots loosely tight or snug, it's important to be consistent throughout the project.
We recommend using a slightly tighter tension, as it tends to result in cleaner knots and reduces the need for adjusting each knot afterward.
By keeping your tension even, you'll create a polished and professional-looking piece.
Following these tips will improve the appearance of your square knots and boost your macrame skills.
For more help, check out our video "3 Macrame Neat Knotting Tips for Square Knot Patterns" to follow along step by step.
Now that you understand these techniques, you're ready to create macrame pieces that are neat, clean, and professional!
Neat knotting - Double Half Hitch knots
In this section, we’ll go over techniques and tips to help you make perfect Double Half Hitch knots.
These tips will ensure your knots are straight, even, and neat, giving your macrame projects a polished look and improving the overall quality of your work.
Tip 1: Follow the Anchor Cord
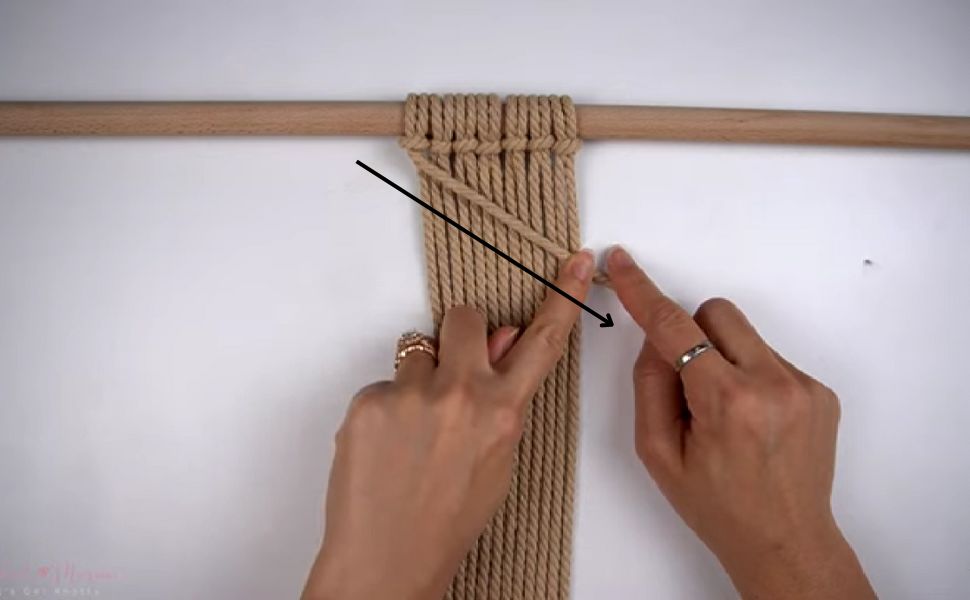
To make sure your Double Half Hitch knots are straight and even, it's important to follow the direction of the anchor cord.
The anchor cord acts as the guide for your knots, so always hold it in the direction you want your knots to go.
If you're working on horizontal or diagonal rows, keep the anchor cord in line with the path of your design.
This simple practice will help you create neat, straight rows of knots without any twists or uneven bumps.
By keeping the anchor cord steady and aligned, you'll avoid any irregularities and achieve a clean, polished look in your macrame projects.
Tip 2: Tighten the First Knot
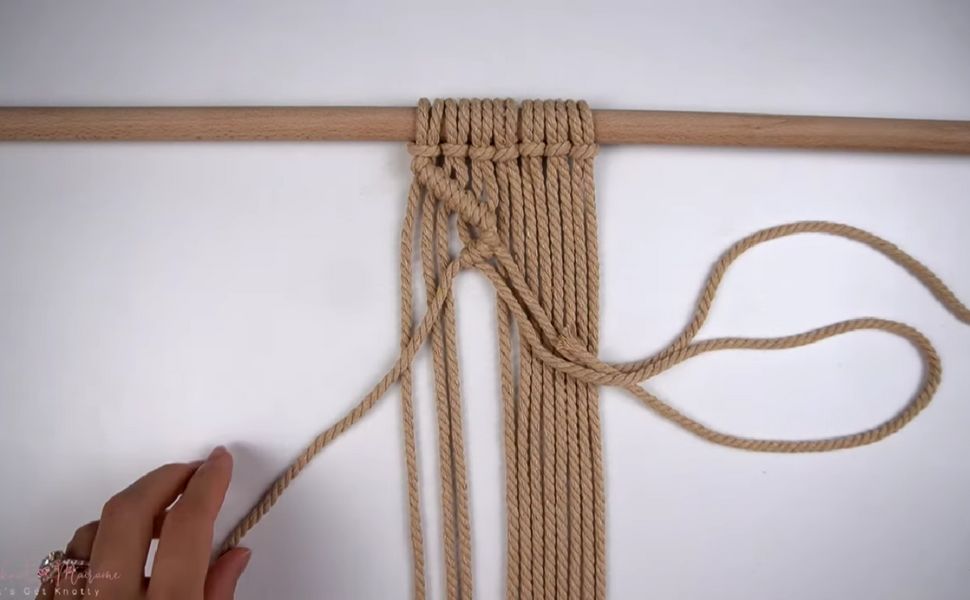
When working quickly, it's easy to forget to tighten the first Half Hitch knot, but this step is very important.
Just like with the rest of your knots, the first knot needs to be pulled tight to ensure your macrame looks neat.
After making the first Half Hitch knot, pull on the working cord to tighten it before moving on to the second knot.
This ensures that both knots are equally tight, giving you a clean, even Double Half Hitch knot.
Taking a moment to tighten each knot will help keep your overall design uniform and polished.
Tip 3: Adjust Knots Regularly

To keep your Double Half Hitch knots neat and even, it's important to adjust the knots and pull on the anchor cords regularly.
You can do this after each knot or after every few knots.
These small adjustments help ensure that your knots stay in line and don’t get too loose or uneven.
By taking a moment to make these adjustments as you go, you'll avoid the frustration of having to redo sections later because of uneven knots.
This simple step can make a big difference in how clean and polished your macrame project looks.
It’s an easy habit that leads to better results and saves time in the long run.
Tip 4: Use a Spacer
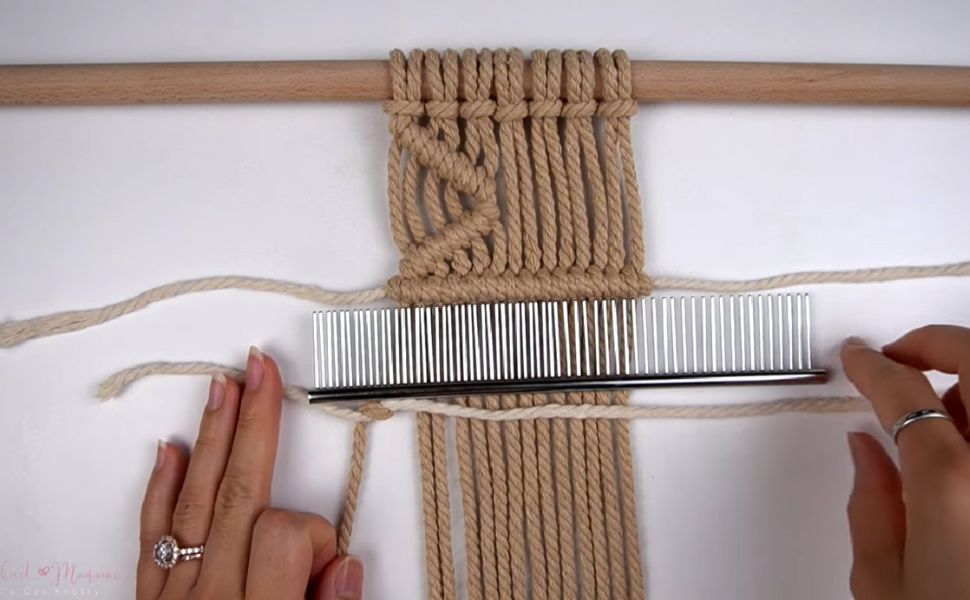
If you want your rows of Double Half Hitch knots to have equal spacing and straight lines, using a spacer can be incredibly helpful.
A spacer helps you keep everything even and tidy, making your macrame look polished.
You can use simple items like a dowel, ruler, or comb as spacers, depending on how wide you want the spacing between your knots to be.
By placing the spacer underneath your working area, you’ll have a guide to follow, ensuring that each row of knots is evenly spaced and perfectly straight.
This small tool makes a big difference in giving your macrame a professional, clean appearance, and it helps you avoid uneven gaps or crooked rows.
Using a spacer is a simple way to add precision to your macrame work.
Tip 5: Quick Untying
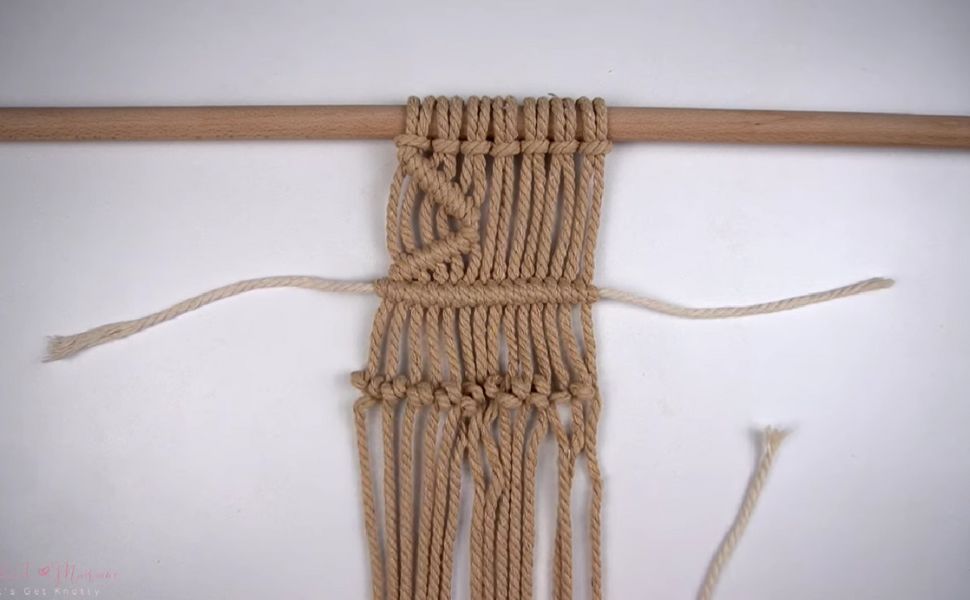
If you ever need to undo a row of Double Half Hitch knots, there’s a simple trick to make it quicker and easier.
Instead of untying each knot one by one, you can just pull out the anchor cord.
This will undo the entire row at once, saving you time and effort.
It’s a handy shortcut that makes fixing mistakes or adjusting your work much less frustrating.
These tips will help you master the technique of creating clean, neat Double Half Hitch knots, making your macrame projects look even more polished and professional.
For a more detailed guide and to follow along step by step, check out our "Tips to Tie Double Half Hitch Knots" video.
Now that you’ve learned how to make perfect Double Half Hitch knots, there’s another challenge that can sometimes come up in macrame—running out of cord.
It’s a common issue, but don’t worry!
We’ll show you how to handle it without ruining your project.
With your new knotting skills and these helpful techniques, your macrame projects will not only look beautiful but also have that clean, professional finish you're aiming for.
Keep practicing, and soon your macrame will impress everyone who sees it!
How to Add Macrame Cord to a Project If You Run Out
Running out of cord in the middle of a macrame project can be frustrating, but don’t worry—there are easy solutions to handle it! I
f you're working with Square knots or Double Half Hitch (also known as clove hitch) knots, running out of cord is a common issue, and with the right approach, you can fix it without having to start over.
First, remember that it’s always a good idea to have extra cord on hand when you begin a project.
It's much easier to trim off any extra at the end than to find yourself short halfway through. But if you do run out, there are ways to add more cord and continue your project smoothly.
We’ll walk you through two common scenarios:
- How to add more cord when working with Square knots
- How to add more cord when working with Double Half Hitch knots.
By understanding these simple techniques, you’ll be able to fix the problem quickly and keep your project on track.
These tips will help take away the stress and frustration, letting you focus on enjoying your macrame process!
Adding Cord to a Square Knot Pattern
Running out of cord can happen to anyone, but fixing it is easier than you might think!
The first step is to figure out which cord is too short.
Once you've identified the problem, you can add a new cord and keep going with your project without starting over.
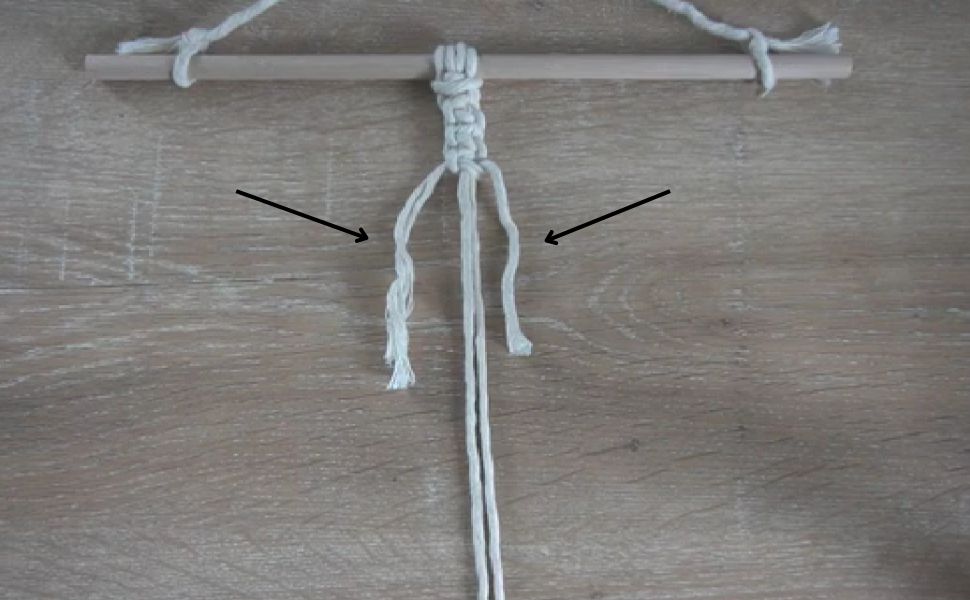
Technique 1: Adding Cord to a Square Knot
-
Add a New Cord: Cut a longer piece of cord that matches your existing cords.
-
Make a Square Knot: Tie a new Square knot just below where the last one was, using all four cords from the previous knot as the anchor cords.
-
Hide the Short Cord: Continue tying more Square knots until the short cords are hidden inside the new knots.

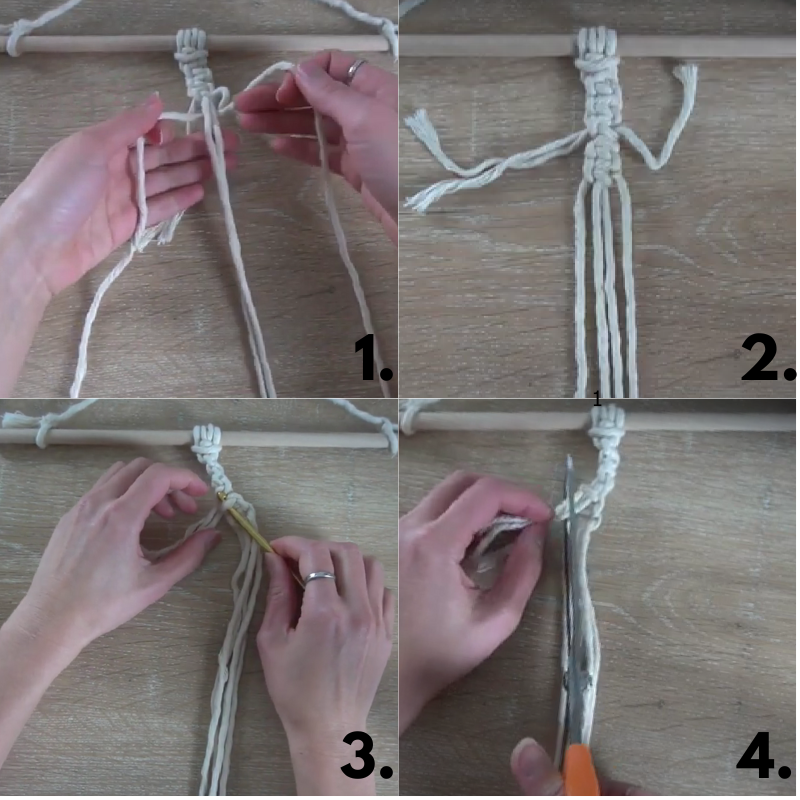
Technique 2: Another Way to Add Cord to a Square Knot
- Add a Longer Cord: Insert a new, longer cord that matches the existing cords.
- Tie Square Knots: Use the new, longer cord to make Square knots with the original anchor cords.
- Tuck in the Short Ends: Use a crochet hook to tuck the short cord ends behind the new knots, keeping everything neat and tidy.
- Trim Excess: Once you're done, trim off any extra cord to clean up your work.
Adding Macrame Cord to a Double Half Hitch Knot
- Find the cord that's too short to continue.
- Make the First Knot: Tie a Double Half Hitch knot with the shorter cord.
- Add a Longer Cord: When you can't keep going with the short cord, add a new, longer cord. Make a Double Half Hitch knot with the new cord, leaving a short end at the back.
- Continue the Pattern: Keep making Double Half Hitch knots as usual.
- Tie a Knot to Secure: Once you've finished the pattern, flip the project over and tie a Double Overhand knot at the back to hold the old and new cords together.
- Trim the Ends: Finally, trim any extra cord to give your project a clean finish.
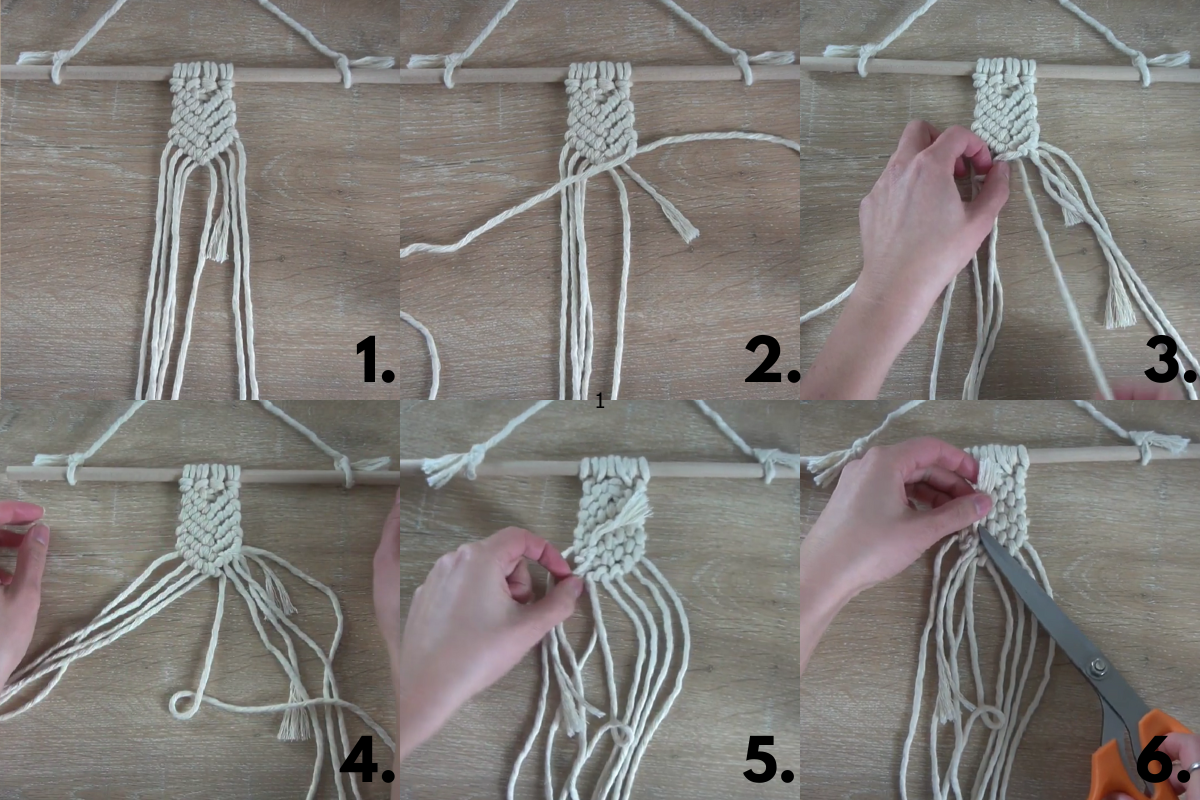
By following these steps, you can seamlessly add new cord to your macrame project, whether you're working with Square knots or Double Half Hitch knots.
This allows you to continue your project without any interruptions and ensures a neat, polished appearance.
If you want to see these techniques in action, you can follow along with our How to Add Cord When You Run Out video for step-by-step guidance!
Creating the Perfect Fringe
Fringe is more than just the finishing touch—it adds texture, softness, and flow to your design.
But getting it to look just right requires a few simple steps to prepare, straighten, and shape the fringe properly.
With these tips, you’ll learn how to turn your fringe from basic to beautiful, ensuring that every piece you create has a clean and polished finish.
Let’s dive into how you can perfect your macrame fringe!
Tip 1: Preparing Your Fringe
Before you start shaping your fringe, it’s important to prepare it properly.
Taking a few moments to get it ready will make the process much easier and help you achieve a smooth, even fringe.
First, if you have long strands of excess cord at the ends, trim them to your desired length.
This will give you a clean starting point and help ensure that your fringe looks neat.
If you're using a 3-ply cord, make sure to unravel the individual strands.
This step is key because it loosens the cords and makes it much easier to comb through and shape the fringe later.
Unraveling helps the fringe look fuller and more textured, which adds to the overall look of your macrame piece.
By preparing your fringe like this, you’re setting the stage for a smooth, even finish that will make your project look polished and professional.
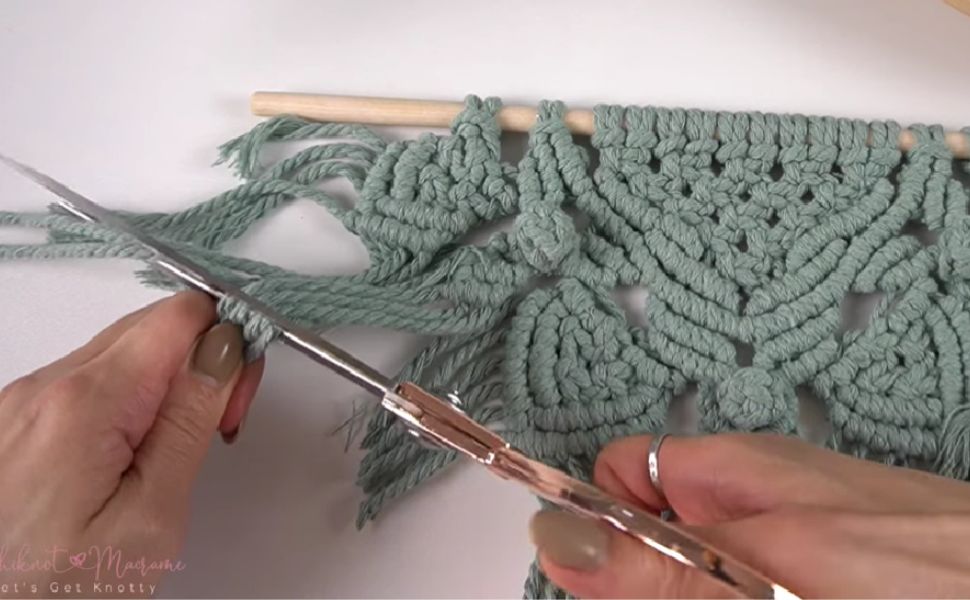

Tip 2: Straightening Your Fringe
If your fringe looks curly or crimped and you want it to be straight and smooth, a steamer is your best friend.
Using a steamer can help relax the fibers in your cord, making the fringe easier to work with and giving it a neat, polished look.
Here’s how to do it: Hold the steamer close to the fringe and let the steam heat the fibers.
The heat will help remove any unwanted curls or crimps, leaving you with soft, straight fringe.
While steaming, make sure to comb through the fringe at the same time.
This will help keep the fibers straight as they relax from the heat, ensuring a smooth and fluffy finish.
By combining steaming with combing, you can achieve a beautifully straight and even fringe that adds a refined touch to your macrame piece.
It’s a simple step that makes a big difference in the final look.
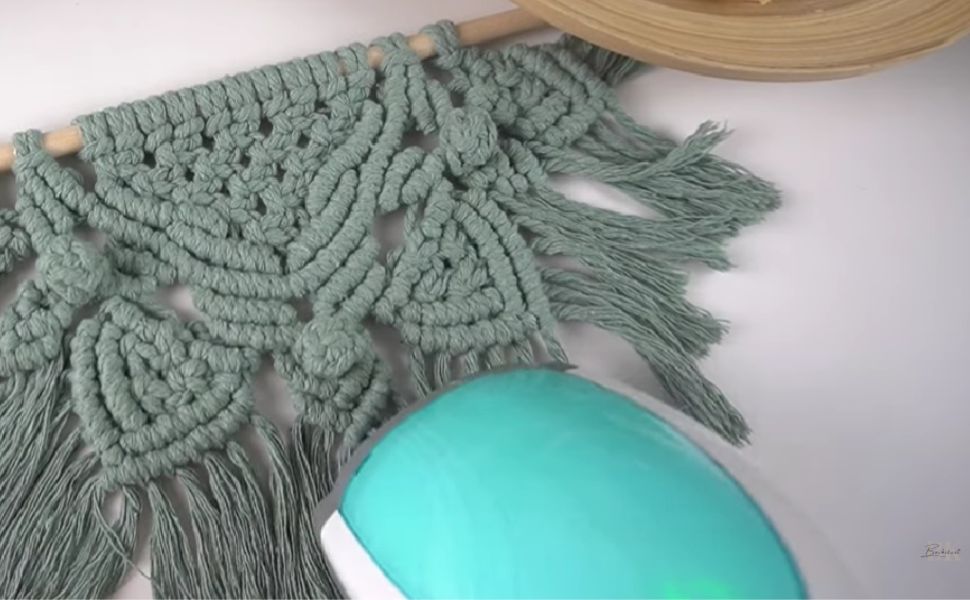
Tip 3: Combing Your Fringe Before Shaping
Before you start shaping your fringe, it’s important to thoroughly comb it to make sure it’s free of tangles and nicely straightened.
This step is key to getting a neat, even fringe that looks polished and professional.
Start by combing the fringe from the bottom and work your way up.
This helps to carefully untangle the fibers without causing any snags or unevenness.
By working from the bottom up, you’re gently loosening the fibers and ensuring that the entire length of the fringe is smooth.
Taking the time to fully comb through the fringe before you begin shaping is crucial.
It ensures that your fringe lays flat and even, making the next steps of trimming and shaping much easier.
A well-combed fringe will give you the clean, polished look you want for your macrame project.
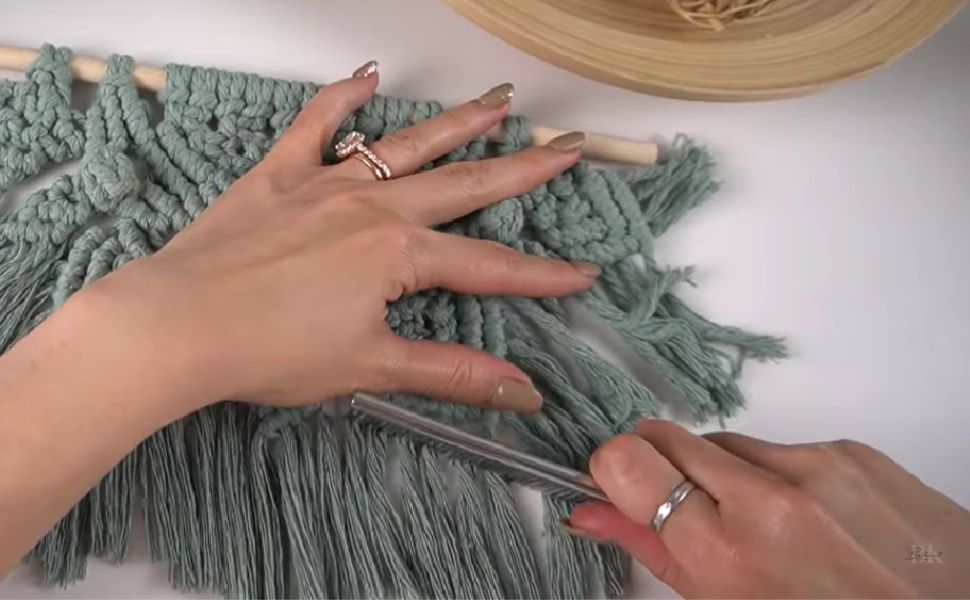
Tip 4: Using Tape for Clean and Even Fringe
To get precise and clean-looking fringe, using tape as a guide is a simple but effective trick.
It helps keep everything in place while you trim, ensuring that your fringe looks neat and even.
Here’s how to do it: Place a strip of tape along the area where you want to cut the fringe.
The tape acts as a marker and holds the fringe securely in place, preventing it from shifting while you trim.
This way, you can easily follow the tape’s edge to cut a straight, well-defined line.
Using tape gives you more control, making it much easier to achieve a smooth and polished fringe.
If you want a perfectly straight line or a specific shape, this method ensures your fringe looks professional and even across your macrame piece.
It’s a simple tip that makes a big difference in getting that flawless finish!
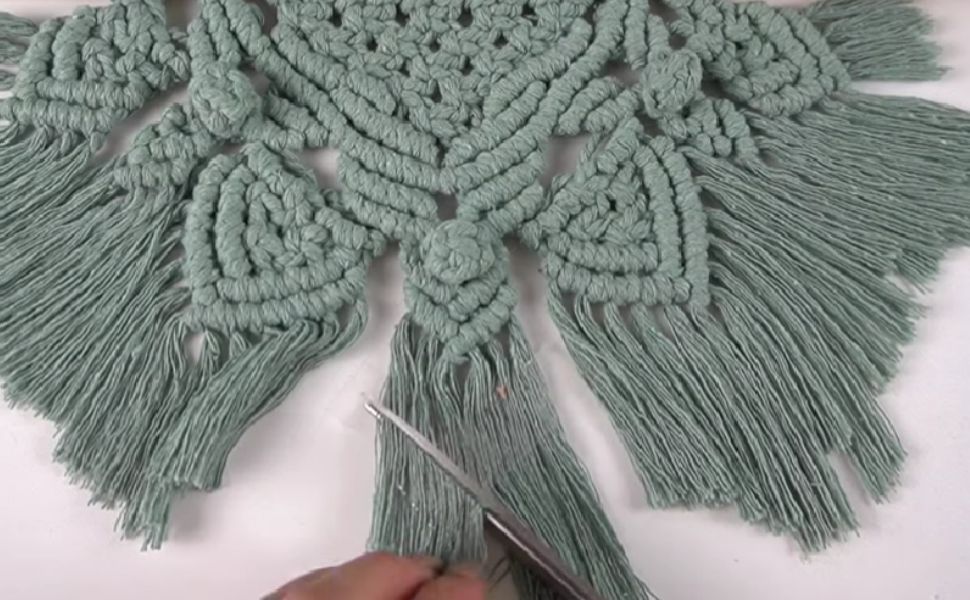
Tip 5: To hold the shape of the fringe, use hairspray or fabric stiffener on the fringe.
If you want your macrame fringe to stay in place and keep its well-defined shape, using hairspray or fabric stiffener is a great solution.
These products work by binding the individual fibers together, giving your fringe extra hold, especially after the piece is hung on the wall.
This helps prevent the fringe from getting tangled or losing its shape over time.
To apply, simply spray hairspray or use a fabric stiffener on the fringe after shaping it.
As you apply the product, make sure to brush and reshape the fringe so it stays smooth and even. The product will dry in place, keeping your fringe looking polished and clean.
These tips will help you achieve that perfect fringe for your macrame projects.
If you’re ready to practice, be sure to check out our Ultimate Guide to Macrame Fringe for step-by-step instructions.
Now, you're fully equipped to create the perfect fringe for any macrame project.
Whether you're going for a sleek, straight fringe or a more fluffy, textured look, these techniques will help you achieve exactly what you want.
Not all macrame projects end with a fringe, though.
It’s important to know how to handle loose cords too!
Let’s explore how to tuck in those loose ends for a clean, fringe-free finish.
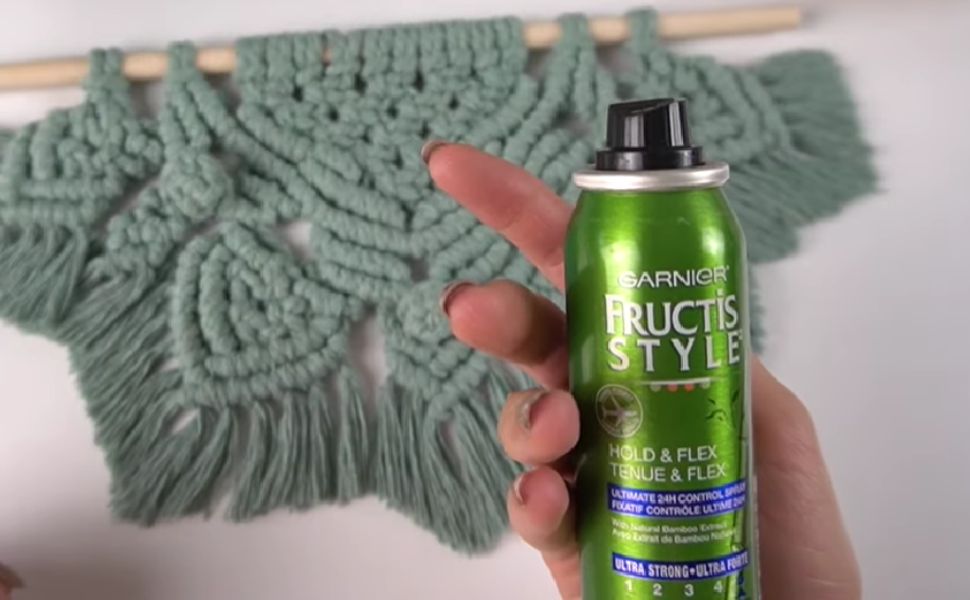
If you want your fringe to maintain its shape and look well-defined, consider using hairspray or fabric stiffener.
These products help bind the individual fibers together, keeping the fringe in place, especially when the wall hanging is hung.
Remember to reshape and brush the fringe as you apply the hairspray.
These tips will help you achieve the perfect-looking fringe for your macrame projects, follow along with our Ultimate Guide Macrame Fringe when you're ready to practice!
You're now equipped to craft the perfect fringe for your macrame projects.
So, pick up your comb, steamer, and hairspray, and embark on your fringe-shaping journey with confidence.
Not all projects end with a fringe though, so it is import to know how to tuck in your loose cords as well!
How to Tuck in Loose Cord Ends for a Clean Finish
While many macrame projects end with a beautiful fringe, there are times when you may prefer a neat, fringe-free finish.
If you want your project to have a clean, polished look, a great way to do this is by tucking in the loose cord ends.
This technique hides the ends and prevents them from unraveling, giving your macrame piece a tidy, professional finish.
We recommend using a crochet hook to easily tuck the loose ends into the existing knots or cords of your project.
This simple tool helps weave the cords into place without leaving any visible ends.
Tucking in loose cord ends on the sides of a project:
When you’re working with Double Half Hitch knots or similar patterns, you might notice small loose ends from your anchor cords on the sides of the project.
Instead of letting these ends hang freely, tucking them in can create a more polished look.
Here’s how you can tuck in loose cord ends on the sides:
-
Flip your project over to work on the back side. This ensures that the tucked cords are hidden from view on the front.
-
Use a crochet hook to gently weave the loose cord ends back into the rows of knots or nearby cords. For best results, try to weave the ends through two or three knots to keep them securely in place. This will also prevent the ends from slipping out over time.
-
Tuck in the anchor cords carefully, making sure they blend in with the existing knots so they aren't visible from the front of the project.
-
Once the loose ends are tucked in securely, trim any excess cord. Make sure not to cut too close to the knot—you want enough cord tucked in so that it stays hidden and secure.
By tucking in the loose ends, you can give your macrame project a clean, finished appearance without fringe.
This technique is particularly useful for projects where you want a more modern or minimalist look, such as wall hangings or plant hangers.
Knowing how to tuck in loose cords will give your macrame work a professional touch, making it stand out with its neat, well-crafted finish.
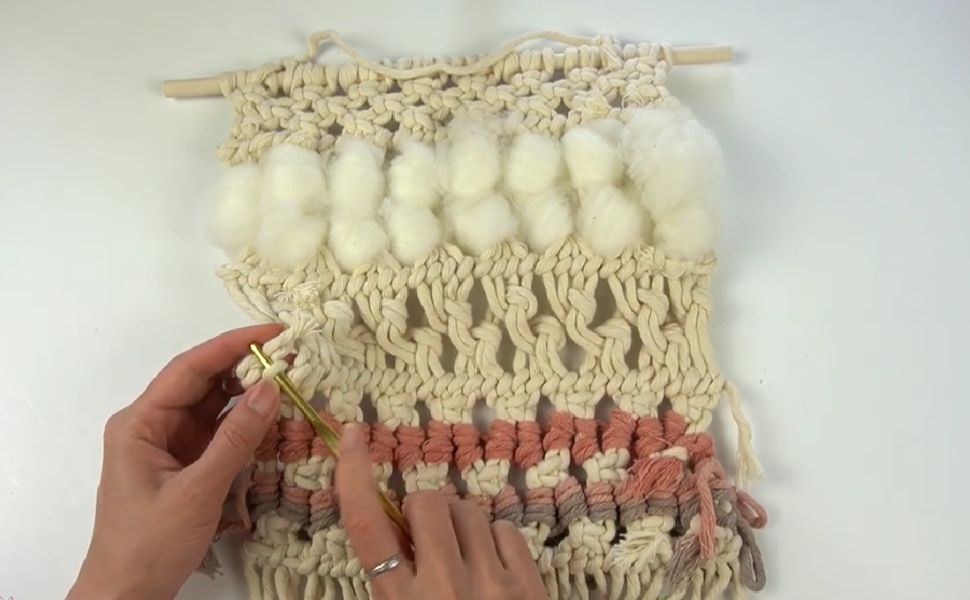
Tucking in Other Loose Cord Ends
In addition to the loose cords on the sides of your macrame project, you might also have extra cord ends from add-ons (like beads or new cords you’ve added) or from weaving cords throughout the design.
These loose ends can sometimes stick out and disrupt the clean look of your project, but they can easily be tucked in to create a polished finish.
Here’s how to neatly tuck in these extra cord ends:
-
Locate the loose cords: These might be from attachment add-ons or cords that were woven into your project, like when adding a new piece of cord mid-pattern.
-
Flip the project to the back side: This is where you’ll tuck in the cords to hide them from view. Working from the back ensures that the front of your macrame piece stays neat and clean.
-
Use a crochet hook to tuck the loose cord ends through the existing knots. For example:
- If you’re working with Double Half Hitch knots, you can weave the loose ends back through these knots to secure them.
- If your project uses Square knots, you can also tuck the ends through the loops of these knots.
-
Weave through two or three knots: Make sure to weave the loose ends through at least two or three knots. This adds extra security, making sure the cords stay hidden and won’t slip out later.
-
Trim any excess cord: After the ends are securely tucked in, use scissors to trim off any extra cord. Be careful not to cut too close to the knot, as you want to leave enough cord tucked in for stability.

By tucking in these loose cord ends, your macrame project will have a more finished and professional appearance.
This method works well for cleaning up any extra cords that stick out from attachments or weaving, ensuring your piece looks neat from every angle.
Tucking in the Fringe for a Clean, Fringe-Free Finish
If you want a fringe-free finish at the bottom of your macrame project, there’s an easy technique you can use to tuck in the fringe cords and create a smooth, neat look.
Instead of leaving the fringe to hang, you can weave the cords back into the project to give it a polished, clean edge.
Here’s how you can tuck in the fringe for a fringe-free finish:
-
Flip your project to the back side: Just like with the side cords, you’ll want to work from the back of the project so that the tucked-in cords are hidden from view when the piece is displayed.
-
Use a crochet hook to tuck the fringe cords: Take each piece of fringe and weave it up into the knots and loops that you created in the pattern. This helps hide the fringe and secures the cords neatly within the design.
-
Weave through multiple knots: To make sure the fringe cords stay secure, weave them through two or three knots or loops. This will prevent the cords from coming loose over time and keep the back of your project looking tidy.
-
Trim any excess cord: After the fringe cords are tucked in, trim off any extra length with scissors. Be careful to leave enough cord tucked in so it stays hidden and secure, but not so much that it adds bulk.

By following these steps, you can easily eliminate the fringe at the bottom of your macrame project and create a clean, modern look.
This technique is perfect for projects where you prefer a fringe-free finish, like sleek wall hangings or minimalist designs.
Tucking in the fringe gives your piece a neat and professional appearance, making it stand out with a polished, finished look.
Alternative Method for Tucking in Fringe: Using a Gathering Knot
If you prefer a fringe-free finish but don’t have knots to tuck your fringe into, there’s an alternative method you can use: the Gathering Knot.
This technique gives your macrame project a smooth, polished finish without the need for fringe hanging down. It’s a great option when you want a clean look for your piece.
Here’s how you can use a Gathering Knot to tuck in the fringe:
-
Weave a separate strand of cord through the gathered cords at the bottom of your project. This will help hold the cords together and make the next step easier.
-
Create a Gathering Knot around the fringe you want to tuck up. To do this, wrap the new cord around the gathered fringe several times, forming a neat bundle. Secure the knot by pulling the cord through the loop at the end of the Gathering Knot.
-
Tighten and adjust: Once the Gathering Knot is in place, tighten it and adjust as needed to make sure the fringe is tucked up smoothly and securely.
Using this method helps you achieve a fringe-free finish that looks neat and professional, even when there aren’t any knots to tuck the fringe into.
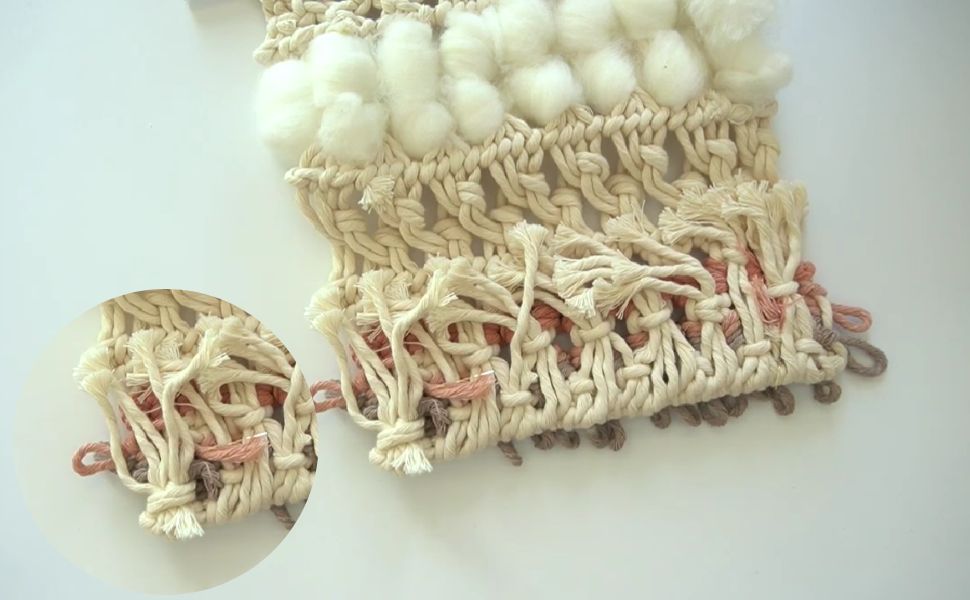
For more detailed guidance, make sure to check out our How to Tuck in Loose Cord Ends with NO FRINGE video.
Mastering the Art of Macrame, One Knot at a Time
From learning essential knots to handling common challenges like running out of cord, we’ve covered a lot of ground in your macrame journey.
Together, we’ve explored the beauty of symmetrical knotting, mastered the precision of Square knots, perfected the finesse of Double Half Hitch knots, and discovered how to achieve a flawless fringe.
We’ve also shared important techniques for adding cord when you run out, ensuring your creativity doesn’t get interrupted by minor setbacks.
With these tools in hand, you’re ready to face any challenge that comes your way.
At Bochiknot, our goal is to equip you with the skills and knowledge to succeed in the world of macrame.
Every knot you tie, every fringe you shape, and every finishing touch you add is a reflection of your creativity and craftsmanship. We believe that your macrame projects should not only look beautiful but also be strong and well-made.
As you continue on your macrame journey, always remember—practice makes perfect.
Every knot, every adjustment, and every finished project is a chance to learn and improve. With time and dedication, you’ll refine your skills and develop a style that’s uniquely yours.
So, keep experimenting with new techniques, keep creating, and most importantly, don’t be afraid to push the boundaries of what’s possible with macrame.
Your creativity has no limits, and with each project, you’ll grow as a macrame artist. Happy knotting!

Looking for Macrame Patterns and Projects?
I’ve got a fun variety of DIY macrame patterns for you to explore—whether you’re into creating unique wall hangings to spruce up your home or timeless plant hangers, there’s something for every skill level.
Each pattern is super easy to follow with step-by-step photos, clear instructions, and plenty of tips to help you along the way.
Ready to start creating?
Browse DIY macrame patterns on Etsy and dive into your next project.

Join the Bochiknot Macrame Community: Your Gateway to Exclusive Tutorials & Inspiration
Discover the art of macrame like never before! Join our exclusive community of passionate macrame enthusiasts and unlock a world of creativity.
Gain access to a treasure trove of unique patterns, expert guidance, and a supportive network of fellow artists.














Leave a comment