


DIY Macrame Christmas Trees with a Cinnamon Stick Twist

Add a dash of cinnamon and a twist of macrame to your tree
The Christmas season is full of familiar sights—twinkling lights, Christmas trees, and gingerbread houses.
But have you ever thought about adding your love of macrame to your holiday traditions?
Now you can!
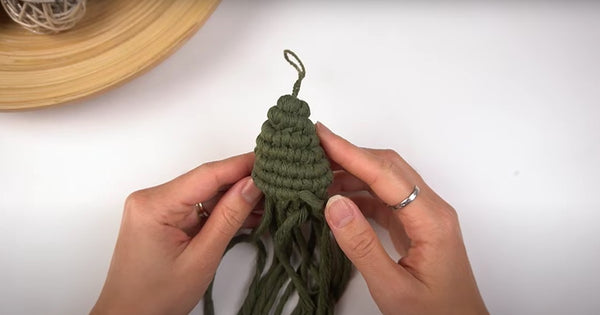
We’ve created a fun and easy macrame pattern that lets you craft your very own cone-shaped Christmas trees—using cinnamon sticks as the base.
This project combines the warmth of cinnamon with the beauty of handmade macrame, making it a perfect way to add some personalized charm to your holiday decor.
These mini macrame Christmas trees aren’t just decorations; they’re a reflection of your creativity and holiday spirit.
You can hang them on your tree, place them on your mantel, or even gift them to loved ones. Wherever they go, they’ll bring joy and a festive touch.
So, grab your favorite holiday drink (and don’t forget the marshmallows!) and let’s get started.
Macrame Knots You Need to Know for Your Macrame Tree Ornament
Before we dive into crafting your macrame tree ornament, let’s talk about the knots you’ll need to know.
Don’t worry—these are the basics, and once you get the hang of them, you’ll be ready to create all sorts of macrame magic!
For this project, you’ll use:
- Overhand Knot
- Reverse Lark’s Head Knot
- Double Half Hitch Knot
These knots may be simple, but they’re the backbone of macrame.
Mastering these will not only get you through this ornament but open the door to all kinds of future projects (hello, Macrame Christmas Wreaths!).
Here’s a quick rundown:
- Overhand Knot: This is your everyday knot, perfect for tying off cords or preventing fraying. Think of it as the knotting world's trusty sidekick—simple but super helpful.
- Double Half Hitch Knot: The star of many macrame designs, this knot is super versatile and will give your piece that structured, intricate look. It’s the building block for a lot of patterns, so get comfortable with it!
- Reverse Lark’s Head Knot: This is just the flip side of the classic Lark’s Head Knot, and it's great for attaching cords in a neat, tidy way.
The more you practice these, the more confident you’ll feel.
Before you know it, you’ll be knotting like a pro, exploring new designs and intricate patterns in no time!
So, let’s start with these basics and turn them into something beautiful for the holidays.
Interested in More Knots for You Future Macrame Projects?
If you want to add more knots to your macrame designs, check out my free resource, "50 Macrame Knots & Sennit Guide."
It's packed with easy, step-by-step instructions to help you improve your skills and try new creative projects.
Access it here.

Important Macrame Terms for Beginners
Before we begin, it's probably best to go over a few important terms used in macrame.
This will help you understand the techniques more easily, follow patterns with confidence, and set a strong foundation for your macrame journey.
- Knots: Macrame involves various knots, like the overhand knot and alternating overhand knot. Learning these basic knots is key to building a strong foundation. Check the "Macrame Knots You Need to Know" section for the knots used in this pattern.
- Cords: The primary material in macrame is cords made from cotton, jute, nylon, or synthetic fibers. They come in different thicknesses and colors. You can learn more about macrame cord with our "Macrame ESSENTIALS: Everything You Need—Cord, Tools, & Materials" post.
- Loop: A loop is formed by crossing the cord over itself to create a ring-like shape. Loops are essential in many macrame designs.
- Fringe: The loose ends of cords that hang down, adding a decorative element. The fringe can be left as is or trimmed to your desired length. Want to learn more about fringe? here's "My Top 5 Secrets for Creating PERFECTLY Styled Fringe" post you might find helpful.
- Anchor Cord: The fixed cord or structure to which other cords are attached. It provides stability and support for your design.
- Working Cord: The cord that is actively manipulated to create knots and patterns throughout the project.
- Sennit: A series of knots grouped together to form a pattern or part of your macrame project.
- Frays and Tassels: The loose ends of your cords, often used intentionally as decorative elements like frays or tassels in your design.
DIY Macrame Christmas Trees with a Cinnamon Stick Twist Cord and Materials

For this project, we used 3mm single twist macrame cord in Army Green and 1.5-2mm macrame string in Army Green, both from our popular Rainbow Cord line.
These cords are made from soft, sturdy recycled cotton fibers, making them not only eco-friendly but also perfect for knotting at any skill level.
Plus, the deep Army Green color adds a rich, festive touch to your holiday projects!
Macrame Tools & Supplies

You will need the following materials to make your Macrame Christmas Tree Ornament
Essential macrame tools
You will also need some essential macrame tools:
Mini Macrame Christmas Tree Ornament Details
Skill Level:
- Advanced Beginner
Completed Size:
- 2" wide x 4" length
Completion Time:
- 1 to 2 hours depending on skill level
Materials Needed (for 1 unit):
Cotton Lengths Needed:
- 1 x 140 cm (55”)
- 3 x 90 cm (35”)
- 2 x 80 cm (32”)
- 1 x 60 cm (24")
* Note: The cord lengths suggested here are based on the pattern using a 3mm Single Twist macrame cord.
Should you use a different size cord or cord from another brand, actual cord lengths may differ slightly and, therefore, should be adjusted accordingly.
DIY Macrame Christmas Trees with a Cinnamon Stick Twist | Video Tutorial
DIY Macrame Christmas Trees with a Cinnamon Stick Twist | Step-by-Step Guide
*Note: We recommend following the tutorial video for more detailed instructions and to achieve the best results.
This will provide additional guidance and clarity as you work through each step.
Step 1:
-
Measure 45 cm from one end of the 140 cm cord and make a loop.


Step 2:
-
Attach 3 cords (each 90 cm) onto the loop using Reverse Lark's Head knots.


Step 3:
- Pull the longer end of the cord to tighten.
- Use this longer cord to create a row of Double Half Hitch (DHH) knots all around the loop.


Step 4:
- Fold a 25 cm string in half, tie an Overhand knot at the ends, and weave the looped end through the top of the cone pattern.


Step 5:
- Attach 2 cords (each 80 cm) to the anchor cord using Reverse Lark's Head knots, then make a full row of DHH knots.


Step 6:
-
Create another full row of DHH knots.


Step 7:
- Attach a 60 cm cord with a Reverse Lark's Head knot and continue with a fourth row of DHH knots.


Step 8:
- Add a fifth and sixth row of DHH knots.
Step 9:
-
Trim any excess cord ends.

Step 10:
- Take 8 cm long strings, tie an Overhand knot in the middle, and weave both ends through a DHH knot on the cone.


Step 11:
-
Glue the stick inside the tree to finish the ornament.


And just like that, you’ve created your very own Macrame Christmas Tree Ornament—a unique, handcrafted piece that brings festive charm to your holiday decor.
If it’s hanging on your tree, adding a touch of magic to your mantel, or gifting it to someone special, this ornament is a reflection of your creativity and love for the holiday season.
But don’t stop here!
The world of macrame offers endless possibilities, and there are so many more holiday projects waiting to be discovered.
From wreaths to garlands and beyond, you can keep the festive crafting going and fill your home with even more handmade wonders.
Ready for your next holiday project?
Head over to our Macrame Journey page, where you’ll find tutorials and inspiration to keep the creativity flowing.
Let’s make this holiday season extra special, one knot at a time! 🎄✨
Much love,


Looking for Macrame Patterns and Projects?
I’ve got a fun variety of DIY macrame patterns for you to explore—whether you’re into creating unique wall hangings to spruce up your home or timeless plant hangers, there’s something for every skill level.
Each pattern is super easy to follow with step-by-step photos, clear instructions, and plenty of tips to help you along the way.
Ready to start creating?
Browse DIY macrame patterns on Etsy and dive into your next project.

Join the Bochiknot Macrame Community: Your Gateway to Exclusive Tutorials & Inspiration
Discover the art of macrame like never before! Join our exclusive community of passionate macrame enthusiasts and unlock a world of creativity.
Gain access to a treasure trove of unique patterns, expert guidance, and a supportive network of fellow artists.
Join today to get access to our library of macrame tutorials and best practices.


Leave a comment