The Perfect Holiday Decor: Creating a Macrame Reindeer Pattern
by Nicole Woo
The holiday season is the perfect time to unleash your creativity and add some festive touches to your home.
If you're a fan of macrame, why not try your hand at creating a cute and whimsical macrame reindeer?
This adorable decoration will add a touch of charm to any space, and is a fun and easy project that even beginners can tackle.
In this blog post, we'll take you step by step through the process of creating a macrame reindeer pattern.
From choosing your materials to tying your knots, we've got you covered. So grab your supplies and let's get started on making your own unique holiday decor!
Pinterest Me for Later
This project should take 45-90 minutes, depending on your skill level.
You can find all these cords and supplies in our shop. I used a 3mm Single Strand Twist cord in Sand, Natural, Buttermilk and Terracotta from our Rainbow range, along with a reindeer metal frame.
Cord Lengths:
Antlers: 8 x 110cm (43”), 2 x 60cm (24”)
Ears: 2 x 50cm (20”), 4 x 130cm (51”)
Face: 10 x 170cm (67”), 2 x 160cm (63”)
Nose: 2 x 60cm (24”)
Bow: 1 x 60cm (24”)
Step-by-Step Instructions
Creating The Festive Reindeer Pattern
Step #1 :
Attach 2 x 110 cm cords onto the top antlers with Reverse Lark's Head knots.
Step #2 :
Make a Square knot.
Use the outer two cords as working cords, looping them over the middle anchor cords and over each other.
Repeat this in the opposite direction.
Step #3 :
Weave the outer left and right cords through the back and to the front on the sides.
Make a Square knot.
Repeat 6 more times below.
Step #4 :
Take the working cord ends to the back and secure with a Double Overhand knot.
Trim the excess cord.
Step #5 :
Repeat the same pattern onto the adjacent antler for a total of 7 Square knots.
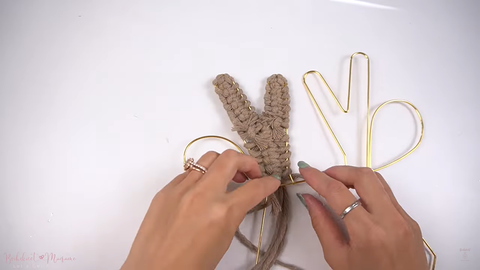
Step #6 :
Take a 60 cm cord and make a Reverse Lark's Head knot in the middle of the antlers.
Step #7 :
Take the outer left and right cords as working cords for a Square knot.
Make 5 weave + Square knots underneath.
Step #8 :
Secure the working cords at the back.
Repeat the pattern on the other set of antlers.
Step #9 :
Push the cords through to the back of the frame and weave the cord ends through 2 loops at the back.
Step #10 :
Attach a 50 cm cord onto the ear with a Reverse Lark's Head Plus Half Hitch ("RLHPHH") knot.
Repeat with another on the right and left with 130 cm cords.
Step #11:
Use the outer 2 cords on both sides as working cords for a Square knot.
Make 5 Weave + Square knots underneath.
Step #12 :
Repeat on the other ear.
Step #13:
Secure the working cords at the back with Double Overhand knots.
Trim the excess cord.
Weave the middle cords through 2 knot loops.
Step #14 :
Attach 10 x 170 cm cords to the top of the face with Reverse Lark's Head knots.
Step #16:
Make 2 rows of Alternating Square knots.
Step #17:
Attach a 160 cm cord onto the left side with a Reverse Lark's Head knot.
Make a Square knot with the 2 cord ends adjacent to them.
Repeat on the other side.
Step #18 :
Add another row of alternating Square knots.
Step #19:
Take the left-2 and right-2cords and weave them through the sides of the frame.
Secure with Square knots.
Fill in the remainder of the row with Square knots.
Step #20:
Make an alternating row of Square knots.
Continue with 4 Weave + Square knot row sections underneath.
Don't know what a Square Knot or a Half Square Knot is? Want you learn how to make your very own macrame wall hanging, but don't know where to start?
We got the perfect solution to your problem!
Our 50 knot eBook is here to help develop and improve new knot tying skills. Download it for free and start learning all about the knots and tying techniques needed to create stunning patterns of your very own.
Today, we're diving into the delightful world of crafting as we create a charming heart-shaped coaster. What makes this project extra special is the unique tying technique we'll use, giving our coaster a clean and modern appearance without any...
Love is in the air, and what better way to celebrate the season of romance than by crafting some adorable macrame creations? In this blog post, we're sharing six of our favorite macrame projects that will add a touch of love...
A decorative Rose Knot is a fancy and detailed way of tying knots that looks like a blooming mini rose. It's a lovely and versatile knot that adds a touch of elegance to macrame projects. In this blog post, I'll...
 Skip to content


Leave a comment