

































Make a Macrame Christmas Tree Ornament That Smells Like Cinnamon

Turn cotton cord and a cinnamon stick into a little Christmas tree with a shape you can see from every side. This free macrame Christmas tree ornament pattern walks you through a cone-shaped design, from the first loop to the knotted decorations and cinnamon-stick trunk.
You will use 3mm single-strand cord for the tree and finer string for the hanger and decorations. Follow the 11 illustrated steps below, or knot along with Nicole in the video. The useful skill here is learning how repeated double half hitch rows can build a three-dimensional form.
Your Cinnamon-Stick Tree At A Glance

| Project Detail | What To Expect |
|---|---|
| Skill Level | Advanced beginner: practice double half hitch knots before starting. |
| Finished Size | Approximately 2 inches wide × 4 inches long (5 × 10 cm), excluding the hanging loop; tension and finishing can change the result. |
| Making Time | Approximately 1–2 hours, depending on experience. |
| Main Cord | 3mm single-strand cotton cord; Army Green is used in the original project. |
| Tree Construction | A cone built with six rows of double half hitch knots. |
| Main Cord Total | 7 pieces totalling 6.3 metres, plus finer string for the hanger and decorations. |
| Trunk | One cinnamon stick or wooden stick. |
| Tutorial Includes | Written pattern, 24 step photos and a follow-along video. |
The measurements and time above follow the original Bochiknot pattern. Different cord, knot tension or trimming can change the result.
Materials And Tools You Will Need
Choose the 3mm cord first. Keeping the main cord thickness consistent will make it easier to follow the cutting list and shape the cone.

3mm Single-Strand Cord
For the tree body. Select the 3mm size; Army Green matches the original project.
Shop 3mm Cord →
Fine Cotton String
A current 2mm option for the hanger and decorations. The video uses 1.5mm 2-ply string.
Shop 2mm String →
Macrame Scissors
For cutting your measured lengths and trimming the lower edge of the tree.
Shop Scissors →The Amazon supplies links below are affiliate links. As an Amazon Associate, we earn from qualifying purchases.
Why Use Single-Strand Cord?
The original pattern uses 3mm single-twist cotton. Keeping to that construction and thickness gives you a closer starting point for the cone’s proportions. If you switch to thicker, braided or 3-ply cord, make a test tree before cutting for a batch. Our guide to macrame cord and materials explains how cord choices affect your work.
Cord Cutting List For One Tree
Cut the main tree cords from 3mm single-strand cotton. Keep the hanging string and decorative pieces separate so they do not get mixed into the tree body.
| Material | Quantity × Length | Used For |
|---|---|---|
| 3mm Cord | 1 × 140 cm (about 55 in) | Starting loop and anchor cord |
| 3mm Cord | 3 × 90 cm (about 35½ in) | Initial cords attached in Step 2 |
| 3mm Cord | 2 × 80 cm (about 31½ in) | Added in Step 5 |
| 3mm Cord | 1 × 60 cm (about 23½ in) | Added in Step 7 |
| Fine String | 1 × 25 cm (about 10 in) | Hanging loop in Step 4 |
| Fine String | 8 cm (about 3 in) per decoration | Knotted details in Step 10; quantity depends on your placement |
Main cord total: 6.3 metres across seven pieces. Add 25 cm of fine string for the hanger and 8 cm for each decorative knot. Keep spare cord for practice and adjustments. Measure in centimetres for the closest match; inch conversions are rounded.
Knots To Practice Before Making The Tree
- Reverse Lark’s Head: mounts new cords onto the loop or anchor. Review the Lark’s Head knot and its reverse variation.
- Double Half Hitch (DHH): builds the rows around the cone. Practice with our double half hitch knot tutorial.
- Overhand Knot: closes the hanging string and creates each small decorative knot.
Anchor cord means the cord you hold in position while other cords knot around it. A working cord is the strand making the knot. In this pattern, a row travels around the cone rather than across a flat panel.
New to macrame? Start with the beginner’s guide to macrame, then practice a short DHH row before beginning this shaped project.

A REFERENCE BESIDE YOUR CORD
Keep your next knot within reach.
Use the free 50 Macrame Knots & Sennits guide when a pattern introduces a technique you want to practice.
Watch The Macrame Christmas Tree Tutorial
Use the video to check how the anchor travels around the cone, where the extra cords join, and how the decorative knots tuck into the finished rows. Pause after each stage and compare your tree with the step photos.
Watch the Christmas tree tutorial on YouTube if the player does not load.
Video shortcuts: Materials · 01:53 · Hanging Loop · 05:53 · Decorations · 11:40 · Trunk · 12:44
How To Make A Macrame Christmas Tree With A Cinnamon Stick

Build the cone first, add its hanging loop while the top is accessible, then finish the decorations and trunk. Keep the unneeded cord lengths nearby until their step.
Step 1 Form The Starting Loop
Watch Step 1 at 02:51 on YouTube →
Take the 140 cm cord. Measure 45 cm from one end and make a loop at that point. Leave the remaining, longer length available for the rows that follow.
Check before moving on: Keep the two unequal ends identifiable; the longer one will become the anchor.


Step 2 Attach The First Three Cords
Watch Step 2 at 03:24 on YouTube →
Attach each of the three 90 cm cords to the loop with a Reverse Lark’s Head knot. Arrange the mounting knots together on the loop.
Check before moving on: You should have attached all three 90 cm cords before tightening the loop.


Step 3 Tighten The Top And Knot Row One
Watch Step 3 at 04:26 on YouTube →
Pull the longer end of the starting cord to tighten the loop. Use that longer cord as the anchor and work a full row of double half hitch knots around the loop.
Check before moving on: Follow the anchor around the shape. Check the video if you are unsure where the row closes.


Step 4 Add The Hanging Loop
Watch Step 4 at 05:53 on YouTube →
Fold the 25 cm fine string in half and tie the loose ends together with an Overhand knot. Draw the looped end through the top of the cone with your crochet hook.
Check before moving on: Pull gently to check that the knotted end holds the hanger in place.


Step 5 Add Two Cords And Knot Row Two
Watch Step 5 at 06:55 on YouTube →
Attach the two 80 cm cords to the anchor using Reverse Lark’s Head knots. Continue around the cone with a full row of double half hitch knots.
Check before moving on: Compare the insertion points with the photos before tightening the whole row.


Step 6 Knot Row Three
Watch Step 6 at 08:27 on YouTube →
Work another complete row of double half hitch knots around the cone. Turn the piece as you go so you can see the section you are knotting.
Check before moving on: Keep each knot snug without pulling one section tighter than the others.


Step 7 Add The Last Cord And Knot Row Four
Watch Step 7 at 09:13 on YouTube →
Attach the 60 cm cord to the anchor with a Reverse Lark’s Head knot. Continue with the fourth full row of double half hitch knots.
Check before moving on: This is the final extra cord from the main cutting list.


Step 8 Complete Rows Five And Six
Watch Step 8 at 10:04 on YouTube →
Work two more full rows of double half hitch knots. These are the fifth and sixth rows of the cone.
Check before moving on: Count your rows and inspect the shape from several sides before trimming.
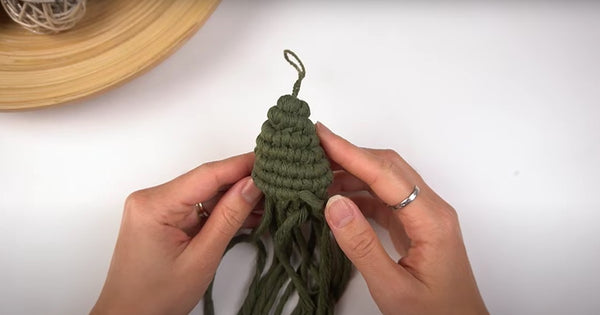
Step 9 Trim The Lower Edge
Watch Step 9 at 10:55 on YouTube →
Trim the excess cord ends around the bottom of the cone. Start conservatively, then make small adjustments to even the edge.
Check before moving on: The photo shows a short fringe beneath the last row. Avoid cutting into the knots.

Step 10 Add The Knotted Decorations
Watch Step 10 at 11:40 on YouTube →
For each decoration, cut an 8 cm piece of fine string and tie an Overhand knot in its middle. Use the crochet hook to draw both ends through a DHH knot on the cone, leaving the small central knot visible on the outside. Repeat wherever you want another detail.
Check before moving on: Choose the number and placement as you go. The original pattern does not specify a fixed quantity.


Step 11 Secure The Cinnamon-Stick Trunk
Watch Step 11 at 12:44 on YouTube →
Test the cinnamon stick inside the opening at the base. Adjust it until the exposed section looks like a trunk, then glue it inside the tree. Let the glue cool and set before hanging the ornament.
Check before moving on: Keep fingers clear of hot glue and check that the trunk is secure before displaying or gifting.


Troubleshooting Your Macrame Tree
| What You Notice | What To Check |
|---|---|
| The Cone Looks Uneven | Compare the tightness of nearby knots and check that you added both 80 cm cords and the 60 cm cord in the correct stages. Loosen and retie the uneven section before continuing. |
| You Lose Track Of The Rows | The first DHH row is Step 3, the second is Step 5, the third is Step 6, the fourth is Step 7, and rows five and six are Step 8. |
| The Cord Is Running Short | Recheck the starting loop: it begins 45 cm from one end of the 140 cm cord. Cord thickness and loose knotting can also use up length. Avoid trimming until the cone is complete. |
| The White Decorations Disappear | Keep the central Overhand knot outside the cone while drawing its two ends inward through the knotwork. |
| The Trunk Looks Off-Centre | Test its position inside the cone before adding glue. Let the glue set with the trunk held in the position you want. |
Make Your Christmas Tree Your Own

Keep the same cord thickness and construction while you explore colour. Army Green with pale knotted details gives the look shown here; a natural cotton tree offers a softer neutral version. Make one sample before committing to a set.
- For your Christmas tree: coordinate the hanger and decorations with the rest of your ornaments.
- For a gift: tie the finished ornament onto a parcel so the decoration becomes part of the present.
- For a different trunk: use a wooden stick, an alternative included in the original materials list.
Store the finished tree somewhere dry and avoid crushing the cone beneath heavier decorations. Keep it away from candles and other heat sources.
Macrame Christmas Tree Ornament FAQs
Is This A Free Macrame Christmas Tree Pattern?
Yes. The written instructions, cutting list, step photos and YouTube tutorial are free to follow here. You supply the cord, stick and tools.
Can A Beginner Make This Cinnamon-Stick Tree?
This is an advanced-beginner project because you work double half hitch knots around a cone and add cords partway through. Practice the knots first, then use the video alongside the written steps.
How Much Cord Do I Need For One Tree?
The tree body uses seven lengths of 3mm cord totalling 6.3 metres: one at 140 cm, three at 90 cm, two at 80 cm and one at 60 cm. Separately, cut a 25 cm fine-string hanger and one 8 cm fine-string piece for each decoration.
How Many Rows Does The Tree Have?
The cone has six DHH rows. You add two 80 cm cords before the second row and one 60 cm cord before the fourth row.
What Size Is The Finished Ornament?
The original pattern measures approximately 2 inches wide by 4 inches long, excluding the hanging loop. Your tension, cord choice and finishing can change the size.
Can I Use A Wooden Stick Instead Of Cinnamon?
Yes. The original pattern allows a cinnamon stick or wooden stick. Test the fit inside the completed cone before gluing the trunk in place.
Can I Use 4mm Cord Instead Of 3mm?
You can experiment, but thicker cord changes the knot size and may change the length required. The cutting list is designed for 3mm single-strand cord, so make a test piece rather than assuming the same measurements will work.
How Many Decorative Strings Should I Cut?
Cut one 8 cm length for each knotted decoration you want to add. The original instructions leave the quantity open; start with a few and decide their spacing on the finished cone.
KEEP LEARNING
More Macrame Christmas Ornaments To Make

Macrame ReindeerWall Hanging
Try attaching and arranging cord around a shaped frame.
Make The Reindeer →
Macrame StarOrnament
Add a different shape to your tree with a knotted star.
Make The Star →
Macrame AngelOn A Ring
Practice shaped DHH rows and brushed fringe in a different Christmas ornament.
Make The Angel →Find more ideas in our macrame Christmas tutorials, or work through the complete beginner’s guide.
MAKE SOMETHING NEXT MONTH, TOO
Keep Learning With Nicole
Your next project can come with a little more guidance. Learn with Nicole through monthly patterns, follow-along videos and technique lessons. Choose the membership that fits how you want to make.
Mini-Macrame Creations
For a new project without the search.
- A new #MakingMacrame pattern each month
- A full video tutorial to follow as you knot
- Access to the complete pattern archive
- Revisit past projects at your own pace
Mastering Macrame Skills
For understanding how and why the knots work.
- Everything in Mini-Macrame Creations
- A library of macrame lessons and challenges
- Technique breakdowns to help you understand the knots
- More ways to practice beyond the monthly project
Macrame Masterpiece
For learning with project supplies included.
- Everything in Mastering Macrame Skills
- Project supplies through a kit-inclusive plan
- Lite, Bundle and Masterpiece options
- A kit schedule to suit how often you make
Compare current prices and full benefits on Patreon. Kit contents, delivery frequency and availability depend on the plan you choose.

A NOTE FROM YOUR MACRAME TEACHER
Made By You. Shared With Love.
A few rows of the same knot can become something you can hold, hang and give. This little tree is a chance to practice shaping in the round—and notice how your tension changes the result. What colour would you make next? Share your idea in the comments.
Much love,

Leave a comment