

































How to Make a Macrame Fishtail Keychain (Free Pattern + Video)

FREE MACRAME PATTERN · PHOTO + VIDEO TUTORIAL
Three cords, two knot types and a little fringe shaping turn into a keychain you can use or give as a handmade gift. This macrame fishtail keychain has a narrow strip of woven diamonds and a brushed, two-pointed tail.
In this free tutorial, you’ll attach the cord with lark’s head knots, shape the repeating pattern with double half hitches, and finish the fringe like a mermaid tail. It’s a manageable next project once you can tie a double half hitch in both directions.
New to the knots? Keep our free 50 Macrame Knots & Sennits PDF beside you, and practise a short diagonal row before starting.
Your fishtail keychain at a glance
Cord, tension, clasp size and fringe trimming affect the finished dimensions. The video’s length is approximate.

Cord and tools for your fishtail keychain
Use 3mm single-strand cotton for the original cutting list and a fringe that brushes out easily. Nicole’s sample is olive green; choose a colour you enjoy and check that your clasp has room for three folded cords.
As an Amazon Associate, we earn from qualifying purchases. Amazon links in this article are affiliate links, at no extra cost to you.

3mm single-strand cord
Cut three 100 cm lengths for one keychain. Select the 3mm option; changing thickness can change the finished size and cord needed.
Shop 3mm single-strand cord →
Swivel lobster clasp
Choose a lower ring wide enough for three lark’s head knots. Check the size and finish before ordering.
Shop Swivel lobster clasp →
Rose gold scissors
Use sharp scissors for clean cord cuts and small, controlled trims when shaping the tail.
Shop Rose gold scissors →
Macrame fringe comb
Separate the loose cotton fibres before the final trim. An ordinary comb you already own can also work.
Shop Macrame fringe comb →
Measuring tape
Measure all three cut lengths before mounting them. A ruler is fine if you already have one.
Shop Measuring tape →
Optional macrame board
Keep your clasp and cords steady while you knot. Use the board with T-pins to organise your strands and check the alignment of each diamond.
Shop The Macrame Board →Prefer Amazon? Shop 3mm cotton cord, the video’s 1-inch swivel D keyring, rose gold scissors or a fringe comb. Check the selected size and product details before ordering.
Cutting list: three cords, six hanging strands
| Cord | Cut length | Quantity |
|---|---|---|
| 3mm single-strand cotton | 100 cm / about 39.4 in | 3 |
Total: 3 metres (about 3.3 yards). Measure and cut three separate pieces, then fold each in half when mounting it. Three folded cords give you six working ends to arrange—not six separate 100 cm pieces.
The two knots—and one weave—you’ll use
The lark’s head attaches the cord. The double half hitch creates the diagonal borders. Inside each diamond, the four centre strands cross in a weave. This “fishtail” name describes the finished design; it is not the same sequence as a fishtail braid.
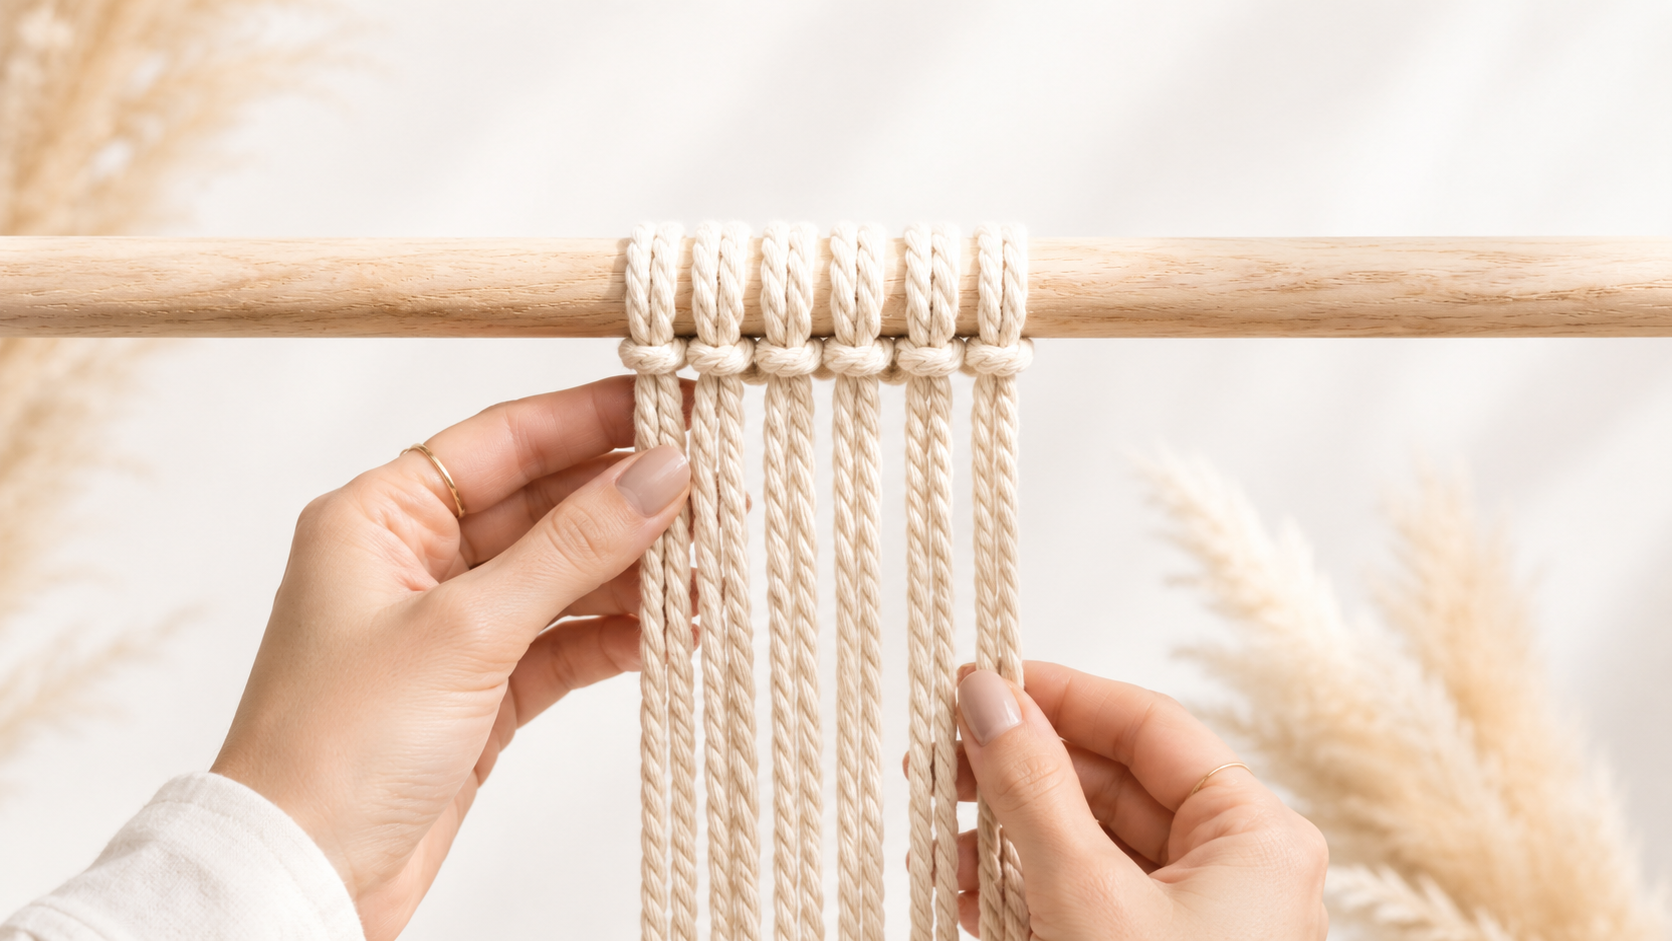
Lark’s head
Use this mounting knot to attach folded cords. Check whether the pattern calls for the standard or reverse version.
Learn Lark’s Head →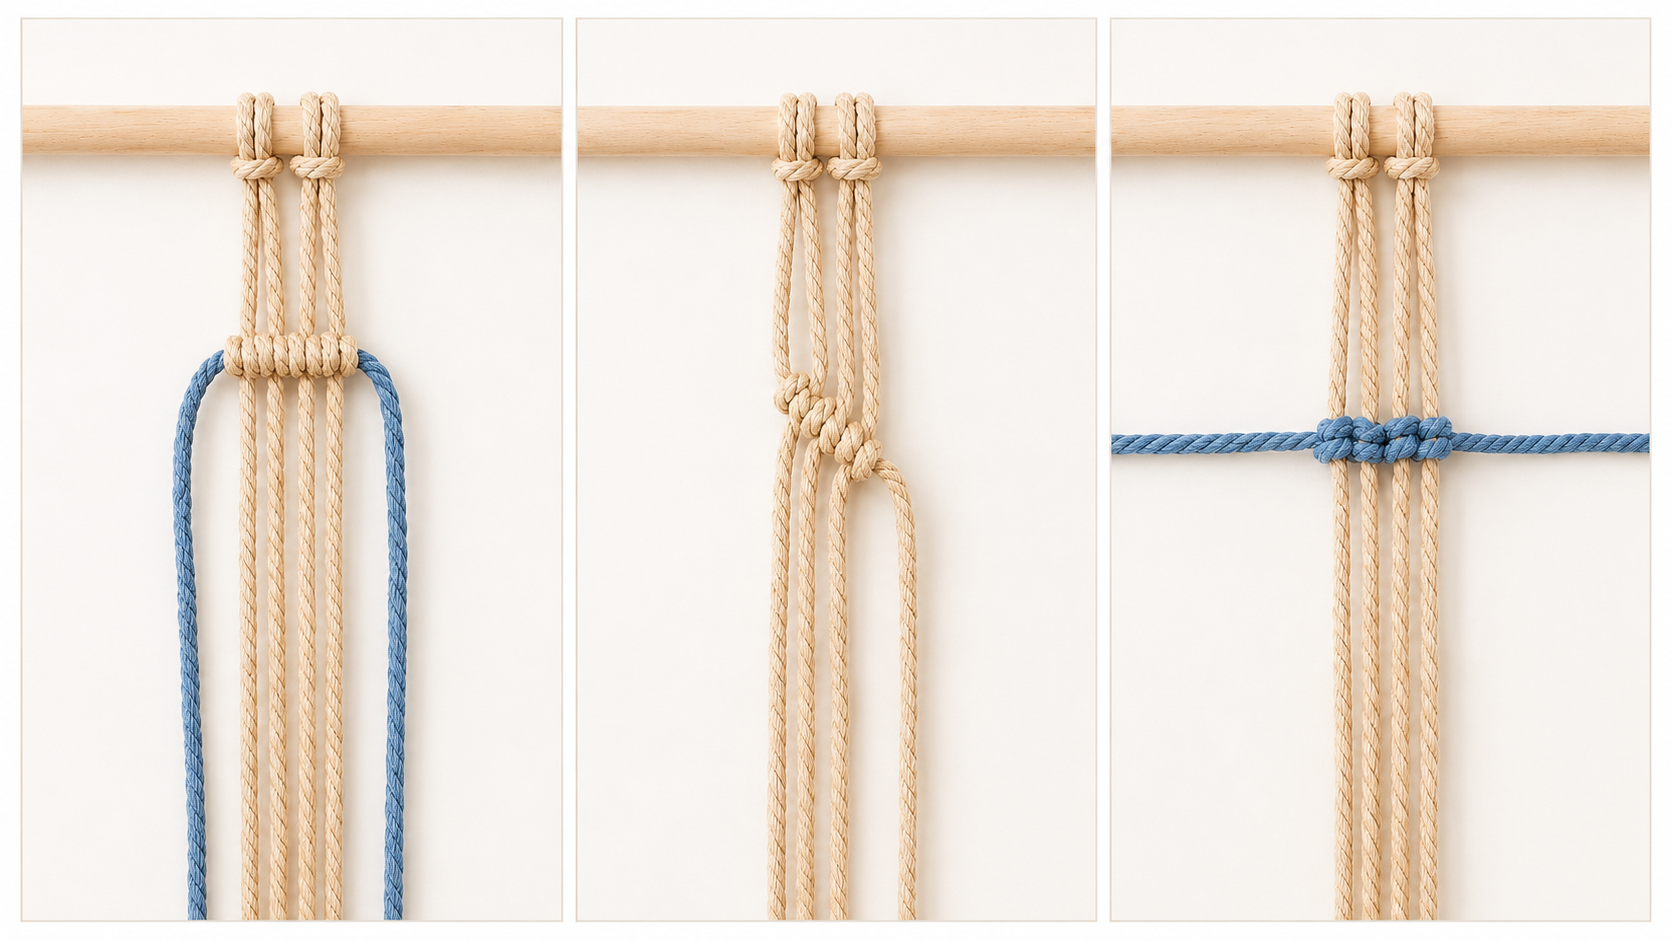
Double half hitch
Tie two half hitches with one working strand around the anchor. Hold that anchor at the angle you want the row to follow.
Learn Double Half Hitch →Anchor vs working strand: hold the anchor in the direction you want the row to travel. The working strand wraps around it twice to make one complete double half hitch. Strand roles can change in the next row.
Watch Nicole make the fishtail keychain
Watch the pattern once to see how the small side rows, woven centre and closing diamond connect. Then use the photos below while you knot.
Open the Full Tutorial on YouTube →How to make a macrame fishtail keychain: 10 steps
Read left and right as you face the front of your work. When a step names the middle or third strand, count from its current position. Tap any step photo to open the larger original.
STEP 1 OF 10
Mount three cords on the clasp
- Fold each 100 cm cord in half. Pass the folded loop through the clasp’s lower ring, feed both ends through the loop, then pull snug to make a lark’s head knot.
- Repeat with the other two cords. Slide the three mounting knots side by side. You now have six hanging strands, not six cut cords.


Check before continuing: Check that the ends start evenly and the clasp is held steady.
Follow Along with Nicole’s Video →STEP 2 OF 10
Make the first inward-pointing rows
- Take the far-left strand as the anchor and hold it diagonally down toward the centre. Use the next two strands, one at a time, to tie two double half hitch knots along it.
- Mirror this on the right: the far-right strand becomes the anchor for two knots moving toward the centre.
- Join the two centre strands with one more double half hitch directed to the left, matching the closing position in the last photo.


Check before continuing: One double half hitch means two wraps with the same working strand around the same anchor.
Follow Along with Nicole’s Video →STEP 3 OF 10
Start the small left-side diagonal
- On the left side, make one diagonal double half hitch directed to the right, following the strand placement in the photo.
- Keep the other strands separated so you can see which one becomes the next anchor.

Check before continuing: Direction describes the line of knots; keep the anchor steady while the working strand wraps.
Follow Along with Nicole’s Video →STEP 4 OF 10
Turn the left anchor outward
- Use the middle-left strand as the new anchor. Hold it diagonally toward the left.
- Tie two double half hitch knots along that anchor, moving outward to the left.

Check before continuing: Count the strands in their current positions. Their order changes as you knot.
Follow Along with Nicole’s Video →STEP 5 OF 10
Mirror the detail on the right
- With the two far-right strands, make one double half hitch directed to the right.
- Below it, use the third strand from the right as the anchor. Tie two double half hitch knots along it toward the right.


Check before continuing: Compare the left and right outlines before moving on. Adjust unequal tension now.
Follow Along with Nicole’s Video →STEP 6 OF 10
Weave the four centre strands
- Separate the four centre strands from the two outside strands. Arrange the centre strands in the criss-cross weave shown in the photos.
- Keep the crossings flat rather than twisting the strands together. Trace each strand from the knot above to its free end, then compare the over-and-under arrangement with the close-up.


Check before continuing: This is a woven crossing, not a square knot. Open the larger photo or pause Nicole’s video if a strand path is unclear.
Follow Along with Nicole’s Video →STEP 7 OF 10
Close the diamond
- Make a row of double half hitch knots inward from the left, then mirror it inward from the right.
- Bring the rows together at the centre to close the diamond around the woven section. Keep the centre weave flat as you snug the border into place.


Check before continuing: Avoid pulling one side farther down than the other; compare both edges before tightening the centre.
Follow Along with Nicole’s Video →STEP 8 OF 10
Start the next repeat
- Repeat steps 3–5 to make the small side diagonals again.
- Follow the photos as the next set of diagonal rows forms an upside-down V and opens the space for another woven centre.


Check before continuing: Keep each repeat similar in height. A small difference grows more noticeable down the keychain.
Follow Along with Nicole’s Video →STEP 9 OF 10
Repeat the woven diamonds
- Repeat the four-strand centre weave from step 6, then close the diamond as in step 7.
- Continue the side details and woven diamonds in the same sequence, using the finished knotted section below as your visual guide. Leave enough unknotted cord for the tail.


Check before continuing: Do not trim short strands to match the others yet. Working strands use more cord, and trimming removes your room to adjust.
Follow Along with Nicole’s Video →STEP 10 OF 10
Brush and trim the mermaid tail
- Untwist and gently comb the loose ends, starting at the tips and working upward. Hold the knotwork so brushing does not tug the last row loose.
- Fan out the fringe. Trim a shallow inverted V into the lower edge: the centre is shorter and the two outer points are longer, like a mermaid tail.
- Take off a little at a time. Brush again, check both sides, and make the final small cuts. Check the clasp closes properly and gently tug the finished knots before attaching keys.


Check before continuing: A blunt cut is easy to shorten; an over-trimmed tail cannot be made longer. Stop and compare both sides often.
Follow Along with Nicole’s Video →Video links open the full lesson; they are not step-specific timestamps.

Fix the common sticking points
The diamond is leaning
Check that both anchor cords follow matching angles and that you made the same number of hitches on each side. Loosen and retie the uneven row before adding another repeat.
The woven centre looks tangled
Lay the four centre strands flat and trace each one from top to end. Compare the crossings with the larger step 6 photo before enclosing them with the next row.
One strand is getting short
Working strands consume more length than anchors. Recheck the setup and stop before adding another repeat if the shortest end will not leave enough fringe.
The fringe will not fan out
Single-strand cotton separates more readily than a tightly braided cord. Untwist gently, comb from the tips upward and brush before trimming.
The tail looks uneven
Comb it flat again, find the centre and compare the two outer points. Trim small amounts from the longer side rather than deepening the entire V.
The mounting knots slide around
Bring the three lark’s heads together and snug them onto the ring. Use suitable hardware and check the closure before carrying keys.
For more help, see our beginner macrame tips and common mistakes.
Fishtail keychain questions
Is this macrame keychain beginner-friendly?
Yes, once you can make a double half hitch in both directions. The project uses only two knot types, but the anchor changes and centre weave need attention. Practise the knot first, then follow one step at a time.
How much cord do I need for one keychain?
The original pattern uses three 100 cm lengths of 3mm single-strand cotton—3 metres total. Fold each cord in half to mount it, giving six hanging strands.
Can I use 4mm cord instead?
You can experiment, but the same cutting list and finished size are not guaranteed. Thicker cord makes larger knots, uses more length per repeat and needs more room on the clasp. Sample it before cutting your final pieces.
How long is the finished keychain?
Nicole’s video description gives an approximate finished length of 7 inches (18 cm). Your knot tension, hardware, number of repeats and fringe trim affect the result.
Do I need glue or fabric stiffener?
Neither appears in the original materials list. Brush and shape the single-strand cotton fringe, then check the final knots. Everyday use can ruffle the fibres; a gentle re-comb tidies them.
Can I make it longer or use more than one colour?
Yes, but treat those changes as a new sample. More repeats require longer cords. Using different colours of the same diameter and construction makes strand paths easier to follow.
Is the fishtail pattern a braid?
Not in this tutorial. This design uses double-half-hitch borders around woven centres and a tail-shaped fringe. A fishtail braid uses a different strand-crossing sequence.
How should I care for it?
Keep the cotton fringe dry where practical, gently spot-clean small marks and allow it to dry fully. Re-comb lightly when needed. Check the clasp and knots periodically, and replace worn hardware or damaged cord.
KEEP MAKING
Choose your next free keychain pattern


Make a flower keychain
Explore a floral shape and a different use of colour.
See the Free Tutorial →
Learn two more keychain styles
Compare a snake braid with a barrel-knot design.
See the Free Tutorial →Browse all our macrame keychain tutorials, or use the Macrame Journey to choose your next skill.
KEEP A KNOT REFERENCE NEARBY
A little help between tutorial pauses
Revisit a knot before repeating it across your project. Our free 50 Macrame Knots & Sennits guide gives you a reference to return to as you learn.
Get The Free Knot Guide →A LITTLE SUPPORT FOR YOUR NEXT PROJECT
Keep learning with the Bochiknot Patreon community
If you would like a regular reason to pick up your cord, explore the Bochiknot community on Patreon. Choose the level of guidance that fits the projects you want to make.

TIER 1
Mini-Macrame Creations
Explore smaller projects with patterns and video guidance.

TIER 2
Mastering Macrame Skills
Build your technique through guided projects, lessons, and creative challenges.

TIER 3
Macrame Masterpiece
Explore a learning and materials-kit option. Compare the kit schedule and shipping details on Patreon.
Tier 3 also has Macrame Masterpiece Lite (S2) and Macrame Masterpiece Bundle (S1) options. See Patreon for the current inclusions, availability, and pricing.

NICOLE WOO · BOCHIKNOT
Take your time with the first woven diamond. Once the strand path feels familiar, the next repeat becomes much easier. Enjoy making something small, useful and your own.

A little inspiration between projects
Follow Bochiknot for tutorials, new ideas, and more ways to keep knotting.

Leave a comment