

































Floral Berry Macrame Pattern: Learn the Motif, Build Your Skills

FREE MACRAME PATTERN · PRACTISE A MOTIF, THEN BUILD YOUR SKILLS
Learn a small floral pattern you can bring into a bigger design. With eight hanging strands, angled double half hitch rows and one raised berry knot, you’ll create a decorative motif that adds both shape and texture to your macrame.
If you know a few knots but feel unsure how to combine them, start here. Make one sample, check the shape, then use what you have learned in a complete wall hanging. Nicole’s seven-step lesson below includes original close-up photos and a video link to every step.
The motif is a useful bridge from basic knots to intermediate pattern work: the challenge is changing anchor direction and keeping the two sides balanced. New to the knots? Keep our free 50 Macrame Knots & Sennits guide nearby and practise the building blocks first. Practise the square knot before learning the berry finish.

Your Practice Pattern at a Glance
Allow longer for your first attempt. Finished dimensions depend on cord thickness, spacing and tension; this lesson teaches a motif rather than a fixed-size wall hanging.
Why Learn the Floral Berry Pattern?
Add Shape
Double half hitch rows change direction to outline the floral detail. Practise guiding the anchor rather than pulling each knot into place at random.
Add Raised Texture
The berry is made from square knots folded into a rounded bump. It gives the motif a focal point without adding a bead or other accessory.
Build Design Confidence
A small sample lets you work on symmetry and cord roles before managing the many strands of a wall hanging.
Your first goal: one balanced motif with a secure berry. Repeat the sample until the sequence feels familiar, then choose a full project with its own cutting list.
Cord and Tools for Your Practice Sample
Use supplies you already have where possible. A smooth, light-coloured cotton cord makes the knot paths easier to see. 3mm single-strand cotton is a practical practice choice; this is a recommendation for your sample, not a confirmed cord specification from the original lesson.

Single-Strand Cotton Cord
Choose one thickness and colour for your first sample. Consistent cord makes it easier to compare the two sides of the motif.
Shop Single-Strand Cord →
Wooden Dowel
Mount four folded cords on a secure dowel so you can follow the eight strands clearly.
Shop Wooden Dowels →
Rose Gold Macrame Scissors
Cut your practice cords cleanly. Keep the remaining tails until you decide how the sample will be used.
Shop Macrame Scissors →Also keep a measuring tape nearby for recording your sample size and cord use. A macrame board is an optional support if you prefer working at a table.
Set Up Four Cords to Get Eight Strands
- Prepare four equal-length cords of the same type. Use long practice scraps with enough free length to tie the motif and hold the ends comfortably.
- Fold each cord in half and attach it to the dowel with a lark’s head knot.
- Lay out the eight hanging strands without crossing them. Find the middle pair before beginning.
In the instructions, cord sometimes means one hanging strand. Left and right refer to the work as you face it. When a step names the “far-left” or “middle” strand, use its current position after the previous row.
Understand the Knots Before You Combine Them
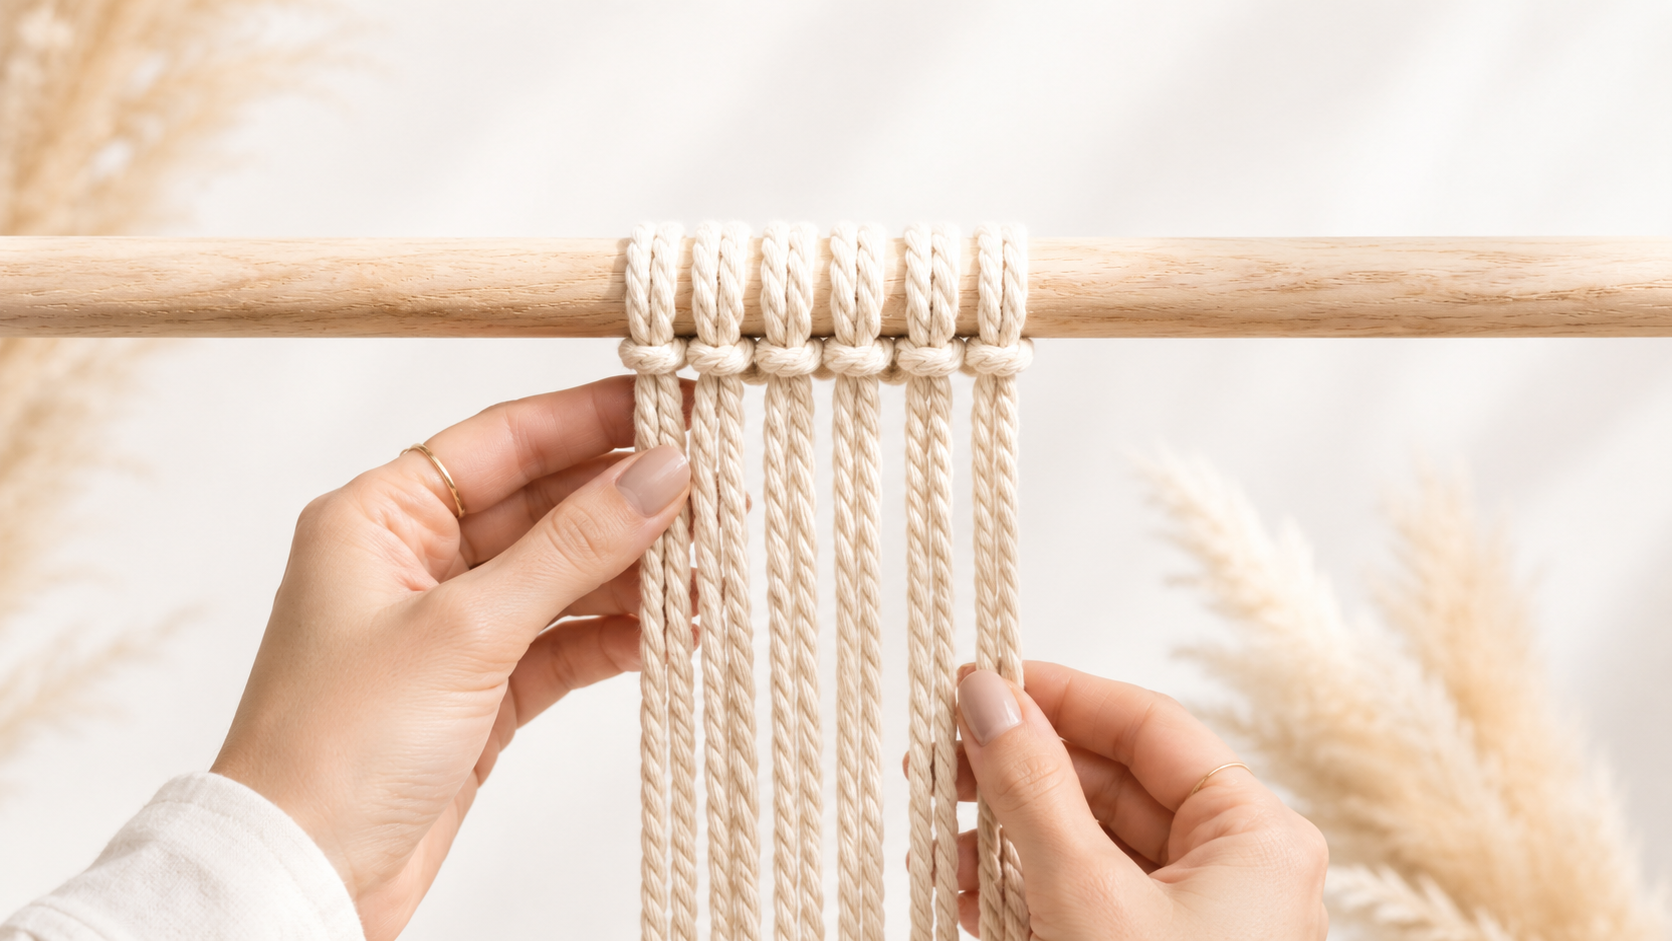
Lark’s head
Use this mounting knot to attach folded cords. Check whether the pattern calls for the standard or reverse version.
Learn Lark’s Head →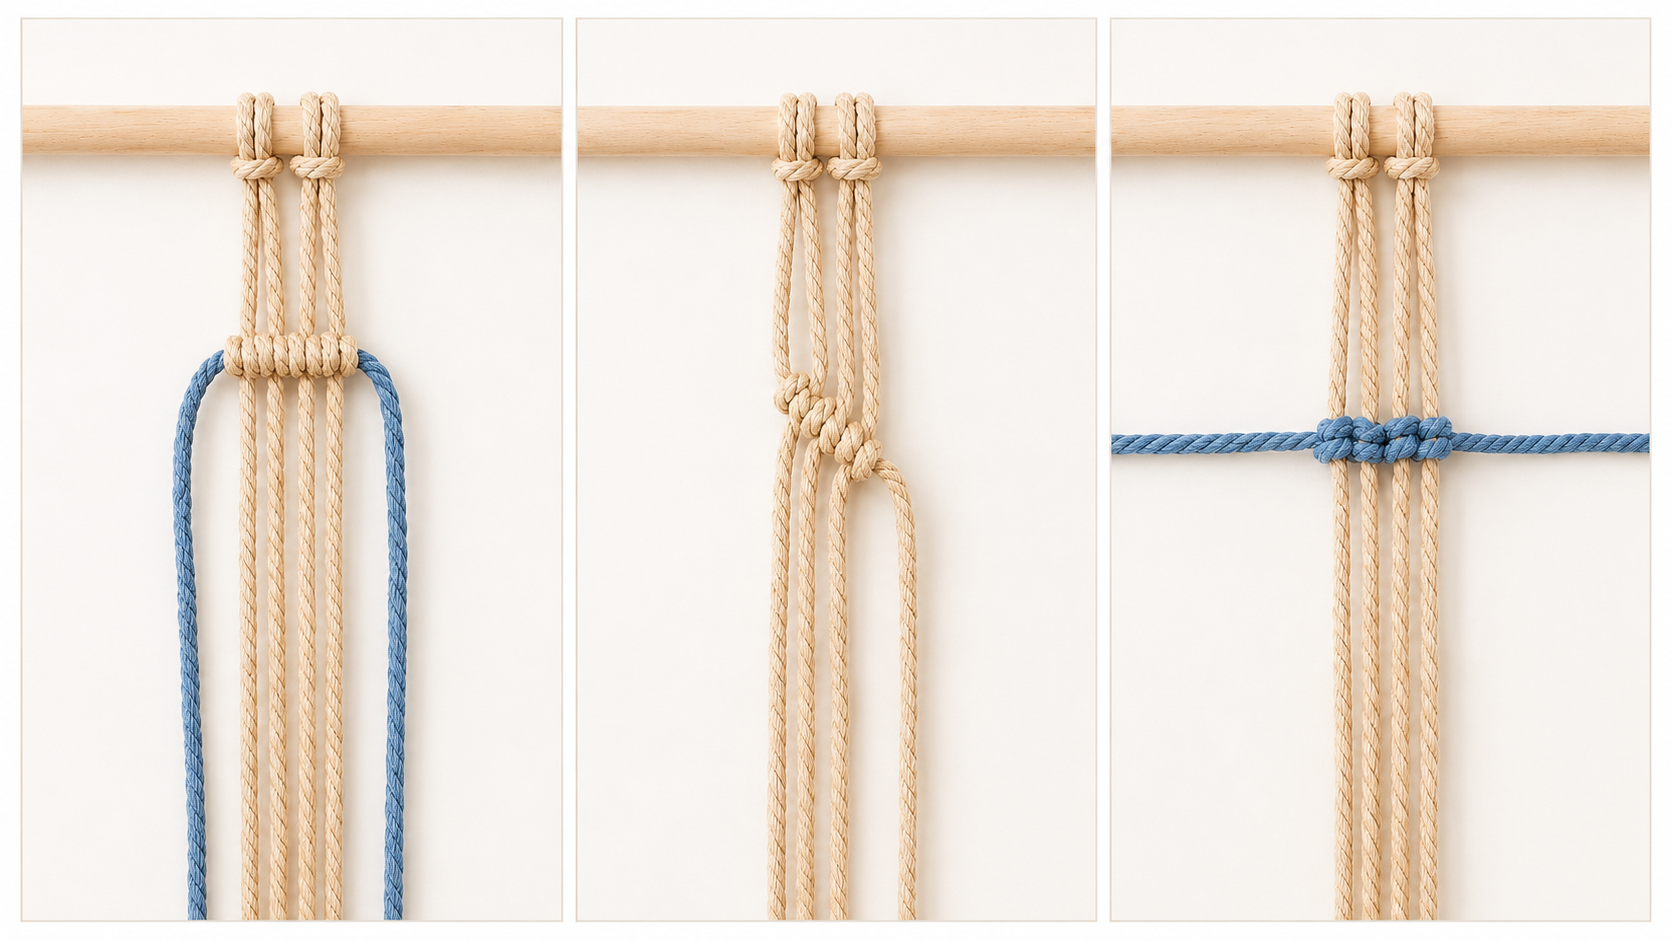
Double half hitch
Tie two half hitches with one working strand around the anchor. Hold that anchor at the angle you want the row to follow.
Learn Double Half Hitch →
Square Knot
Learn the two mirrored halves of a complete square knot. Three square knots form the stack used for the berry.
Learn Square Knot →
Berry Knot
Turn a stack of square knots into a raised berry, then secure it underneath. Practise this finish before step 7.
Learn Berry Knot →Square Knots Become the Berry
For the berry, use four strands: the two outer working strands wrap around the two centre filler strands. Make three complete square knots, bring the fillers through the opening above the first knot, and secure the rolled shape with another square knot.
See The Berry Knot Tutorial →A double half hitch (DHH) contains two half hitches made by one working strand around an anchor. The anchor sets the angle of the row. It is a different role from the stationary filler pair inside a square knot.
Watch Nicole Tie the Floral Berry Motif
Watch the shape develop once before knotting along. Setup begins at 0:22; the first knotting step begins at 2:18. Each step below opens the matching moment.
How to Make the Floral Berry Knot Pattern
Work through one motif slowly. Hold the anchor at the angle shown, then snug each working knot against the previous one. Tap any photo to open its larger original.
STEP 1
Start the Left Diagonal
- Use the middle two strands to begin a diagonal DHH row toward the left. Match the anchor and working-strand positions in the first photo.
- Continue with two more DHH knots toward the left, making three DHH knots in this first sequence.


Check Before Continuing: Keep the anchor steady at the intended slope. Each DHH is two half hitches, not a single wrap.
Watch This Step · 02:18 →STEP 2
Build the Right Diagonal
- Use the middle-right strand as the anchor.
- Tie two diagonal DHH knots toward the right, following the strand order in the photo.

Check Before Continuing: Follow the stated knot count. The first leftward sequence includes the starting knot between the middle pair; do not add an extra right-side knot just to match its count.
Watch This Step · 02:55 →STEP 3
Turn the Left Anchor Inward
- Bring the left-side anchor across toward the right.
- Tie two DHH knots along it to create the next inward-facing row.

Check Before Continuing: The change in anchor direction shapes the motif. Keep neighbouring strands separate so you do not knot around the wrong one.
Watch This Step · 03:27 →STEP 4
Bring the Right Anchor Back to the Left
- Turn the right-side anchor toward the left.
- Make three DHH knots along this anchor as shown, bringing the inner shape together.

Check Before Continuing: Compare the meeting point with the photo before tightening fully. Correct a crossed or missed strand now.
Watch This Step · 03:50 →STEP 5
Shape the Outer Left Detail
- Take the current far-left strand as the working strand. Tie a DHH around the next strand down, matching the first close-up.
- Turn that anchor toward the right and make three DHH knots along it.


Check Before Continuing: Notice the role change: the far-left strand starts as the worker. Keep track of which strand is the anchor before changing direction.
Watch This Step · 04:33 →STEP 6
Mirror the Detail on the Right
- Repeat the outer-detail sequence on the right side, reversing the directions from step 5.
- Compare the two sides for spacing and shape before moving on to the berry.

Check Before Continuing: Aim for balanced sides with similar tension. If one is noticeably tighter, loosen the newest knots rather than pulling the other side harder.
Watch This Step · 05:20 →STEP 7
Form and Secure the Berry Knot
- Select the middle four strands. Use the outer two as workers and the centre two as fillers.
- Tie three consecutive complete square knots. Leave access to the opening above the first square knot.
- Bring the two centre filler strands through that opening as shown. Pull them through evenly so the square-knot section rolls into a rounded berry on the front.
- With the same outer working strands and centre filler pair, tie one more square knot underneath to secure the berry.


Check Before Continuing: Check that the berry faces forward and is held by the final square knot. The floral detail should remain visible above it.
Watch This Step · 06:04 →Small Fixes That Make the Pattern Clearer
The Floral Shape Looks Uneven
Check the most recent anchor angle, knot count and spacing. Compare corresponding rows on both sides. Undo the affected section before continuing; extra tension on the opposite side usually makes comparison harder.
The Double Half Hitch Row Is Wandering
Hold the anchor along the line you want to create. Tighten the working strand around it, keeping the anchor from drifting. Check that each DHH contains both half hitches.
The Square Knots Form a Spiral
Check that each square knot contains two mirrored halves. Repeating the same half-knot direction creates a twist instead of the flat stack needed for this berry.
The Berry Will Not Roll Neatly
Check that you have passed the centre filler pair through the opening above the first square knot. Keep both fillers moving evenly and leave the outer workers available for the securing knot.
The Berry Loosens
Look for the final square knot underneath. The rolled section needs that securing knot; pulling on the filler pair alone is not the final step.
The Cord Ends Are Getting Too Short
Pause while the ends are still easy to hold and untie. Use a longer practice set for the next attempt and record what you used. For a wall hanging, follow its own cord measurements from the beginning.
For more help with anchor direction, see our double half hitch troubleshooting tips.
How to Take a Small Motif Into a Wall Hanging
You have learned more than one decorative shape: you have practised managing strand roles, repeating knot counts and keeping a pattern balanced. Before planning a larger piece, make a second sample with the same cord and compare it with the first.
- Record your sample. Note the cord type and thickness, finished motif width and height, and remaining strand lengths. Measure after the knots have settled.
- Choose the layout. A single floral berry motif can be a focal detail. Repeats can become a row or vertical feature, with space around them so the outline stays visible.
- Plan the strands. This motif uses eight hanging strands. Side-by-side independent groups need eight strands each; four folded cords supply one group. Additional borders and sections need their own cords.
- Plan cord consumption separately. Adding more motifs across the width is different from making deeper repeats on the same cords. Do not assume that doubling the finished width means doubling every cut length.
- Use a complete tutorial for your first wall hanging. Its mounting arrangement, cutting list and finishing sequence take the guesswork out of turning practice into a finished piece.
PUT YOUR PRACTICE TO WORK
Your Next Step: A Berry Knot Diamond Wall Hanging
Ready for a complete piece? Nicole’s medium wall hanging uses square knots and berry knots in a repeating diamond design. It is an approachable way to practise the berry technique across a wider layout and finish something for your wall.
This is a different design that builds on the berry-knot skill. It does not repeat the exact floral double-half-hitch motif above. Follow the video’s own setup and cutting instructions from the beginning.

Make the Berry Knot Diamond Wall Hanging
Approximately 12 inches wide and 13 inches long in the original tutorial. Build confidence by repeating square and berry knots across a complete design.
Watch The Wall Hanging Tutorial →Focus on Repetition, Then Scale
Start by keeping each berry similar in size and the diamond spacing consistent. Once you can repeat those details comfortably, larger projects become an exercise in planning and consistency.
For an original wall hanging using this floral motif, test the motif layout and cord allowance before cutting the full set.
Explore Your Macrame Journey →Floral Berry Pattern Questions
Is this pattern suitable for beginners?
It is a useful next step once you can tie a square knot and a double half hitch. The intermediate part is changing anchor direction and keeping the floral outline balanced. Practise those basic knots first if they are new to you.
How many cords do I need?
Four cords folded in half make eight hanging strands. The berry uses the middle four hanging strands. A larger wall hanging has its own total cord count and cutting lengths.
How long should I cut the cords?
The original motif lesson does not specify a tested cutting length. Use long practice scraps for a sample, keep notes on cord use, and use the separate project cutting list when making a wall hanging. Thickness, tension and the number of repeats all affect consumption.
Is the berry knot a bead?
No. In this pattern, three square knots are rolled into a rounded bump by drawing the centre fillers through the opening above them. A final square knot secures the berry underneath.
Can I use thicker cord?
Yes, as a sample experiment. Thicker cord changes the size and cord consumption, so do not expect the same measurements. Use the same construction and thickness throughout your first sample for a clearer comparison.
Can I repeat the motif in a large wall hanging?
Yes, but plan the layout and cord allowance first. Each independent motif group uses eight hanging strands. Repeating down the same group consumes more length; adding groups across the dowel requires more cords. Test a sample rather than scaling by appearance alone.
Does the recommended wall hanging use the same floral pattern?
The linked berry knot diamond wall hanging develops the square-knot and berry-knot skills in a different repeating design. Use this lesson to practise the berry, then follow that video for the complete wall hanging.
How do I keep the berries consistent?
Use the same number of square knots, similar knot tension and comparable spacing above the stack. Pull both centre filler strands through evenly, then secure each berry underneath before judging the final size.
Keep Building Your Knotting Skills
Lark’s head
Use this mounting knot to attach folded cords. Check whether the pattern calls for the standard or reverse version.
Learn Lark’s Head →
Double half hitch
Tie two half hitches with one working strand around the anchor. Hold that anchor at the angle you want the row to follow.
Learn Double Half Hitch →
Practise the Berry Knot
Revisit the square-knot stack and rolled finish before repeating it across a larger project.
Learn The Berry Knot →
KEEP A KNOT REFERENCE NEARBY
A Little Help Between Tutorial Pauses
Revisit a knot before repeating it across your project. Our free 50 Macrame Knots & Sennits guide gives you a reference to return to as you learn.
Get The Free Knot Guide →A LITTLE SUPPORT FOR YOUR NEXT PROJECT
Keep Learning With The Bochiknot Patreon Community
If you would like a regular reason to pick up your cord, explore the Bochiknot community on Patreon. Choose the level of guidance that fits the projects you want to make.

TIER 1
Mini-Macrame Creations
Explore smaller projects with patterns and video guidance.

TIER 2
Mastering Macrame Skills
Build your technique through guided projects, lessons, and creative challenges.

TIER 3
Macrame Masterpiece
Explore a learning and materials-kit option. Compare the kit schedule and shipping details on Patreon.
Tier 3 also has Macrame Masterpiece Lite (S2) and Macrame Masterpiece Bundle (S1) options. See Patreon for the current inclusions, availability, and pricing.

NICOLE WOO · BOCHIKNOT
Start with one floral berry motif and give yourself time to understand each change of direction. A small sample is a chance to build confidence before your next wall hanging. Happy knotting!

A Little Inspiration Between Projects
Follow Bochiknot for tutorials, new ideas, and more ways to keep knotting.

I want to expand my knowledge of macrame and this looks like a great site to do that.
I want to expand my knowledge of macrame and this looks like a great site to do that.
Leave a comment