


How to Make a $700 Designer Bag Dupe with Macramé (for Under $30)


Updated 2026 · ~9 min read
🔖 Save for later
📅 Updated: June 6, 2026 · 14-step tutorial
- Phase 1 — Net base (Steps 1–4): Build 5 connected overhand-knot sections side by side to form the bottom of the net, then knot the opposite side so the base cradles the bottom of your clutch.
- Phase 2 — Climb the clutch (Steps 5–7): Divide cords left and right, work alternating overhand knots up each side, then complete a full row around the clutch with 1.5-inch spacing.
- Phase 3 — Refine and continue (Steps 8–10): Loosen-redistribute-retighten any scrunched areas so the net sits flat, then keep adding rows until the net reaches just past the top of the clutch.
- Phase 4 — Top loops + handle (Steps 11–14): Form 1-inch loops around the top edge, trim the ends, then weave two 55 cm cords through the loops as a wristlet-style handle.
Total time: 1–2 hours · Finished size: ~6" wide x 19" long · Skill level: beginner · Cost: ~$25–$30 in materials

📌 $700 Bottega vs $30 DIY — save 96%, pin this dupe
The Bottega Veneta Cassette Net Bag retails for $700–$1,200. This handmade macramé net bag dupe costs about $25–$30 in materials (a $670+ savings) and looks indistinguishable in photos. Save this DIY to your designer-dupe, summer-bag, or Bottega-inspired Pinterest board and make one this weekend.
Save to Pinterest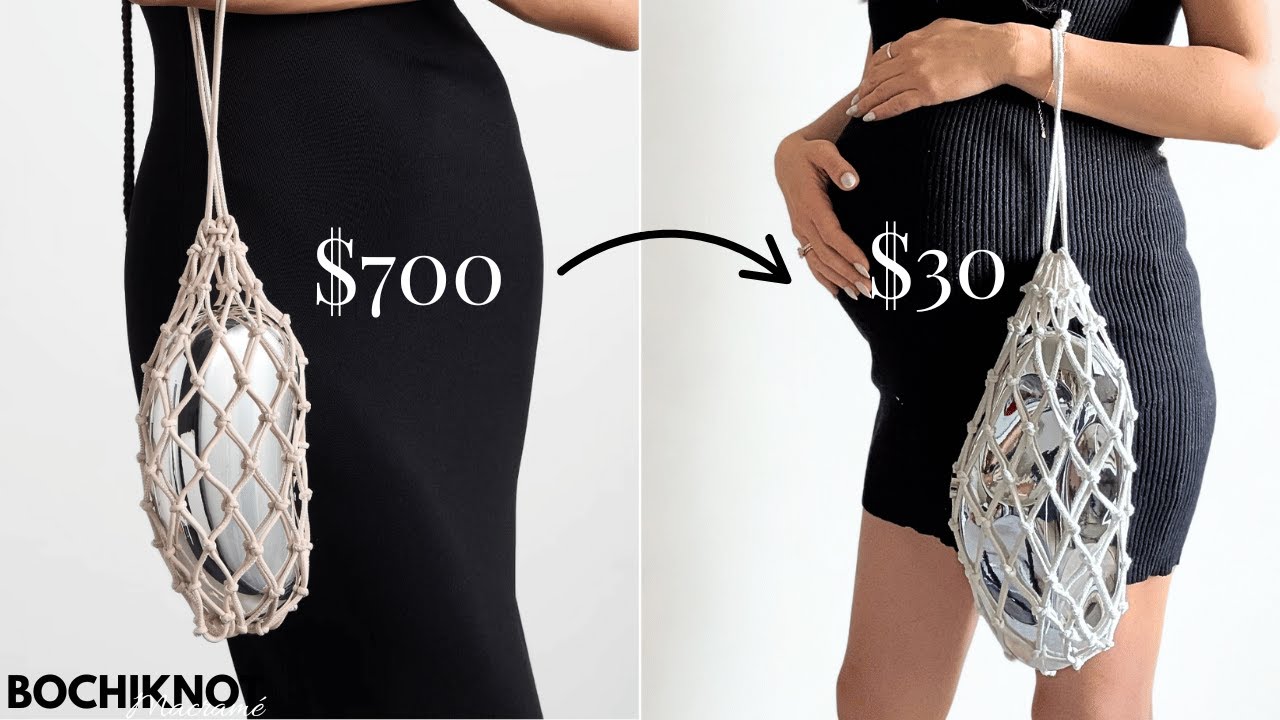
🎥 Prefer to watch?
The full step-by-step video walkthrough shows every alternating overhand knot in real time. The trick that makes the net actually sit flat against the clutch (the loosen-redistribute-retighten move in step 8) is much easier to see in motion than from still photos.
Jump to videoWhat You'll Learn
Tutorial Contents
- What is a macramé designer bag dupe?
- Why DIY this Bottega-inspired bag?
- Project details (skill, size, time, cost)
- Materials & tools you'll need
- What clutch to use as your base
- Cord quantities & cost
- Sizing variations (small / medium / oversized)
- Video walkthrough
- Step-by-step tutorial (14 steps)
- What to know before starting
- Pro tips & troubleshooting
- Common mistakes & fixes
- 6 color variations
- Designer inspiration & net bag history
- Make it vs buy (savings breakdown)
- Make multiples — Etsy seller angle
- Where to source a base clutch
- Perfect for these 6 occasions
- Designer bag dupe FAQ
- Keep learning with Bochiknot
What Is a Macramé Designer Bag Dupe?
A macramé designer bag dupe is a hand-knotted cotton net overlay built around a basic metal clutch to recreate the silhouette of luxury net bags — most famously the Bottega Veneta Cassette Net Bag ($700–$1,200), but also similar pieces from Cult Gaia, Staud, and Anthropologie. The body of the dupe is constructed with a single foundational knot — the overhand knot — repeated in an alternating grid pattern across 10 strands of 4mm braided macramé cord. The net cradles the bottom of the clutch and rises in evenly spaced rows around the body, finishing with small loops along the top edge that thread a wristlet handle.
What makes this dupe a viral favorite:
- $670+ savings. A $700 designer bag for ~$30 in materials — a 96% savings that lands instantly with the "smart shopper" Pinterest aesthetic.
- One knot only. The entire bag is built with the overhand knot. If you can tie a shoelace, you can make this.
- Beginner-friendly with a luxe finish. The natural braided cord and sleek metal clutch read as boutique, not craft.
- Two bags in one. The clutch works on its own as an evening bag, and the net works on its own as a market or beach bag — instant double-duty styling.
- Free pattern for commercial use. Sell handmade versions on Etsy — handmade net bags retail $35–$95 and net bags are not trademark-protected.
Why DIY This Bottega-Inspired Bag?
The original inspiration piece — the Bottega Veneta Cassette Net Bag — retails for $700 to $1,200 at Bottega boutiques and resale on The RealReal. Designer net bag alternatives sit in the $80–$160 range (Anthropologie, Madewell), and handmade Etsy versions go for $35–$95. A handmade Bochiknot version offers four advantages:
- Cost. About $25–$30 in 4mm braided cord and a thrifted or Amazon metal clutch — plus a couple of evenings of your time. A 96% savings vs the Bottega original.
- Custom fit. Build the net to fit your exact clutch — small evening, oversized weekend, or anywhere in between.
- Custom color. Pick from natural, cream, black, sage, terracotta, blush, or any cord color you can buy.
- Sustainable. 100% cotton biodegradable cord, no synthetic blends, no fast-fashion supply chain. As Harper's Bazaar has noted in its coverage of summer net-bag trends, handmade cotton outlasts most $80 synthetic dupes by years.
92 million tons
Global fashion waste produced each year — your handmade bag adds zero (Ellen MacArthur Foundation)
Project Details
Materials & Tools You'll Need

4mm Braided Macramé Cord
The cleanest knot-definition cord for net bags — holds alternating overhand knots crisply without fraying at the cut ends
Shop cord
Scissors + Tape + Comb
The three essential tools — sharp scissors for clean cord cuts, measuring tape for accurate 180 cm strands, comb to brush ends smooth before trimming
Shop tools
Bochiknot Welcome Kit
The beginner bundle — cord, scissors, comb, dowel, and pattern access in one box, perfect for first-time makers
Shop Welcome KitEssential Macramé Tools
- Rose gold macramé scissors — sharp, clean cuts for the overhand knot ends and the final cord trim
- Macramé measuring tape — accurate 180 cm and 55 cm cord cuts
- Macramé fringe comb — brushes the braided cord ends smooth before trimming for a clean finish
- Bochiknot Welcome Kit — full bundle of cord, scissors, comb, and a dowel for first-time makers
Cord Quantities & Cost Breakdown
| Component | Cord | Quantity | Use |
|---|---|---|---|
| Net body cords | 4mm braided macramé cord | 10 x 180 cm (71") | Form the entire alternating overhand knot grid around the clutch |
| Handle cords | 4mm braided macramé cord | 2 x 55 cm (22") | Threaded through the top loops as a wristlet handle |
| Base clutch | Metal clutch (silver, gold, or matte) | 1 | Provides the rigid structure inside the net |
Scaling for your clutch size (small / medium / oversized)
| For | Clutch size | Net body cords | Handle cords | Estimated cost |
|---|---|---|---|---|
| Small clutch (evening) | ~5" wide x 7" tall | 8 x 150 cm | 2 x 45 cm | ~$20–$25 |
| Medium (this tutorial) | ~6" wide x 8" tall | 10 x 180 cm | 2 x 55 cm | ~$25–$30 |
| Oversized (weekend / beach) | ~9" wide x 11" tall | 14 x 240 cm | 2 x 80 cm | ~$35–$45 |
Cost estimate based on 4mm Braided Macramé Cord (100m, $18). A single roll covers 3–4 medium designer bag dupes with cord to spare — perfect if you want to make one for yourself and a few as gifts.
Sizing Variations
The base tutorial uses a ~6" wide metal clutch. Scale up or down depending on the bag you want and the occasion:
| Size | Clutch / base | Finished bag dimensions | Best for |
|---|---|---|---|
| Mini wristlet | ~5" wide hard clutch | ~5" w x 15" l | Evening, weddings, formal events |
| Standard (base pattern) | ~6" wide metal clutch | ~6" w x 19" l | Dinner, vacation, going out, gifts |
| Crossbody | ~7" wide clutch + long handle | ~7" w x 22" l with strap | Daytime, casual chic, brunch |
| Oversized beach | ~9" wide pouch / no clutch | ~9" w x 14" l | Beach, market, weekend, summer travel |
| Net only (no clutch) | None — open mesh | ~7" w x 16" l | Produce, beach toys, casual everyday carry |
Video Walkthrough
How to Make a Macramé Designer Bag Dupe (Step-by-Step)
Follow the 14 steps below. Each step has photos and clear bullet instructions. If you get stuck on any step, the video above walks through every step in real time.
How the pattern works — a quick overview
This pattern builds in four phases: (1) form the bottom of the net by tying alternating overhand knots across 5 connected sections, (2) climb the sides of the clutch with consistent 1.5-inch spacing while shaping around the corners, (3) refine and continue until the net reaches just past the top edge, and (4) form loops along the top, trim the ends, and thread two short cords through the loops as a wristlet handle.
Step 1: Start With Two 180 cm Cords and Tie a Center Overhand Knot
- Start with two 180 cm cords — place one vertically and the other horizontally underneath it.
- Find the center of the horizontal cord and tie an overhand knot around the vertical cord.
- Tighten the knot, then adjust as needed so both the horizontal and vertical ends are even.
- This forms one complete starting section.

Step 2: Make a Second Matching Section and Connect Them
- Make a second identical section and place both side by side.
- Connect them with alternating overhand knots, keeping the spacing tight.
- Use the right cord each time and leave about 1 inch between knots.

Step 3: Add Three More Sections to Build the Bottom Width
- Repeat the process until you have five sections connected side by side, forming the base of the net.
- Adjust the number of sections if needed so the width matches your clutch.

Step 4: Turn the Work and Knot the Opposite Side
- Turn the piece around and repeat the alternating overhand knots on the other side, keeping the same 1-inch spacing.
- This creates a balanced base — check it against your clutch to make sure the width extends past both sides, adding sections if needed.

Step 5: Begin Shaping the Sides
- Divide the cords into left and right groups, then begin making alternating overhand knots on each side so the structure starts to rise.
- Work one knot on one side, then one on the opposite side, repeating with the upper cord sets.
- Keep the spacing consistent with the previous rows.


Step 6: Increase Spacing Slightly as the Net Climbs
- After establishing the sides, make another row on both the front and back, increasing the spacing to about 1.5 inches.
- This wider spacing creates a more open, airy look and helps reduce bulk.
- Work three alternating overhand knots on each side to keep the pattern even.


Step 7: Work a Full Row All the Way Around
- After completing the side rows, make a full round of alternating overhand knots all the way around the bag.
- Keep the spacing at about 1.5 inches and expect some bunching or scrunching at this stage — it is normal as the net takes shape.

Step 8: Fix Any Scrunched or Uneven Areas (the key step)
- This step is key for a polished finish — if cords bunch on the sides, the net will not sit flat once the clutch is inside.
- To fix it, slightly loosen tight knots, adjust the surrounding cords, then retighten while shifting excess cord outward.
- Work section by section on both sides, testing the fit around the clutch until the net looks smooth with no puckering.

Step 9: Add Another Full Row and Fit It Directly on the Clutch
- After the initial adjustments, make another full row of alternating overhand knots all the way around.
- Wrap the net around the clutch again to check the fit and spot any uneven tension.
- Adjust by pulling and redistributing tightness through the rows until the net sits evenly and looks polished.

Step 10: Keep Repeating Rows Until You Reach the Top
- Continue making rows of alternating overhand knots until the net reaches the top of the clutch, using about 1.5-inch spacing for most rows.
- As you approach the top, reduce the spacing to around 1 inch for a tighter final row.
- Adjust the number of rows as needed so the net sits slightly past the top edge of your clutch.

Step 11: Finish the Top Edge With Small Loops
- Once the net is tall enough, secure the top edge by forming loops — loosen the final overhand knot slightly, weave a front strand through it, then retighten to create a loop about 1 inch long.
- For added strength, tie a double overhand knot at the back using the woven strand and the cord behind it, even if it creates a slight bulge.
- If a cleaner finish is preferred, skip the extra knot and instead secure the ends with glue or a hidden sewn join.


Step 12: Repeat the Loop Finish All the Way Around
- Continue making loops all the way around the top edge of the bag.
- Keep the loop sizes consistent so the handle can glide smoothly.

Step 13: Trim the Excess Cord Ends
- Trim off the excess cord, leaving a little extra if you want to prevent fraying.
- Secure and flatten any visible ends or knots with a small dab of glue for a cleaner finish.

Step 14: Make the Handle With Leftover Scrap Cords
- Use two cords (about 50–55 cm each), then weave one through the loops on one side and tie an overhand knot at the end; repeat on the opposite side.
- Each side should have about five loops, creating a simple wristlet-style handle once both cords are secured.
- To use, tighten the handle for carrying or loosen it to open and remove the clutch.


That's a Wrap!
Step back, admire your finished macramé designer bag dupe, and slide the silver clutch inside. Sling the wristlet over your wrist and you have a Bottega-inspired luxury bag for about $30. This is one of the most rewarding "make vs buy" projects in the Bochiknot library — perfect for summer dinners, beach club vacations, wedding guest looks, gifts, and Etsy seller inventory.
Honest Take: What to Know Before Starting
A few honest disclaimers before you commit
- The net will look messy until step 8. Steps 5–7 produce a lot of bunching and scrunching — this is expected. Step 8 (loosen, redistribute, retighten) is where the bag transforms from "craft" to "luxury." Trust the process.
- Spacing matters more than perfection. Consistent 1–1.5 inch spacing makes a polished bag. A few crooked knots blend into the texture of natural cord. Do not unravel — adjust.
- Use a real clutch, not a soft pouch. The metal or hard-sided clutch gives the net its structure. A soft fabric pouch lets the net collapse and look saggy in photos.
- Buy 1.5x cord your first time. If you run out partway through a row, the dupe is much harder to splice cleanly than it is to start with extra. The Bochiknot 100m braided roll gives you enough for 3–4 bags.
- Skip the white cord for travel. Natural color hides dirt; pure white shows everything. Save white for evening-only events and use natural for daily wear.
- The clutch removes for cleaning. Spot-clean the macramé net with a damp cloth and mild soap, then air-dry. Wipe the metal clutch separately.
Pro Tips & Troubleshooting
- Cut all cords at once. Measure and cut all 10 base cords + 2 handle cords before starting. Cutting mid-project leads to inconsistent lengths and an uneven bottom edge.
- Test fit every 2 rows. Slip the clutch into the partially-knotted net every couple rows to check tension. Easier to redistribute now than to fix at the end.
- Use the right cord weight. 4mm braided is the sweet spot. 3mm looks delicate but stretches over time; 5mm looks chunky and adds too much bulk for an evening bag silhouette.
- Loops should be consistent. Step 12 loops — keep them all the same length so the handle threads evenly. Even loops = professional finish.
- Burn or glue cord ends. Cotton cord frays at the cuts. A tiny dab of clear-drying craft glue or a quick lighter pass keeps ends crisp for years.
- Comb the cord before knotting. Run a fringe comb down each cord before you start — it removes kinks and makes the knots sit cleaner.
- Photograph against a hard surface. Style your finished bag on stone, linen, or wood — never on a wrinkled bed. The texture of the macramé reads best against minimal backgrounds.
Common Mistakes & Fixes
| Problem | Likely cause | Fix |
|---|---|---|
| Net sags below the clutch | Base too wide or knots too loose | Tighten the bottom row of knots; if still saggy, remove a section from the base width |
| Net squeezes / distorts the clutch | Base too narrow or first row too tight | Add a section to the base or loosen the bottom knots and redistribute outward |
| Sides look puckered or scrunched | Inconsistent spacing on side rows | Run step 8 again — loosen, redistribute excess cord outward, retighten section by section |
| Top loops are uneven | Different cord lengths going into each loop | Loosen the affected loops and pull cord from longer adjacent sections to balance |
| Handle won't slide through loops | Loops too small or handle cord too thick | Use a single 4mm cord for the handle (not doubled), or redo loops at 1.25" instead of 1" |
| Cord ends fray after a week | Trimmed too short with no glue | Re-trim slightly longer, dab clear-drying glue, or singe gently with a lighter |
| Bag looks too "craft" not luxe | Wrong cord type or clutch base | Use 4mm braided (not 3-ply twisted) and a sleek metal clutch (not fabric pouch) |
| Pattern feels random | Counting rows by eye, not by knot count | Count knots per row out loud — 5 across the front, 5 across the back, every row |
6 Color Variations

The same alternating overhand knot pattern works in any 4mm braided cord color. Six that dominate Pinterest in 2026:
Choose your braided cord color and start your bag today. All 6 trending shades ship from our shop.
Shop Braided CordDesigner Inspiration: The Net Bag, A Short History
The net bag is one of the oldest bag silhouettes in fashion — versions appear in Ancient Egyptian and Greek art, in Mediterranean fishing villages, and in 1970s European market totes. The modern luxury interpretation began in 2019 when Bottega Veneta, under Daniel Lee, released the Cassette Net Bag: a leather Cassette pouch wrapped in a knotted cotton net, retailing for $700–$1,200. The piece went viral on Instagram and instantly defined the "quiet luxury" handbag look of the early 2020s. The broader dupe phenomenon — covered extensively by Vogue Business — has reshaped how Gen Z and Millennial shoppers approach luxury accessories.
$73 billion
Estimated value of the global luxury dupes market in 2024 (Vogue Business)
What we are doing here is not a Bottega copy — it is a return to the original net-bag tradition that predates Bottega by centuries. Net bags are not trademarked or copyrighted in their fundamental form (knotted open mesh around a clutch), which is why dozens of brands now sell similar pieces. The Bochiknot version uses 100% cotton braided cord and a sleek metal clutch base to land in the same visual world for 96% less — an approach aligned with The New York Times coverage of sustainable, slow-fashion shopping.
How to Tell a Real Bottega Bag from a Knockoff (vs Your Handmade Macramé Version)
| Detail | Real Bottega Cassette | Cheap knockoff | Your handmade macramé version |
|---|---|---|---|
| Material | Soft Nappa leather, intrecciato weave | Plasticky PU leather | Cotton macramé cord |
| Stitching | Hand-finished, invisible | Machine, visible threads | Hand-knotted, intentional knots |
| Logo | Subtle leather stamp inside | Often missing or misspelled | None (your own creation) |
| Hardware | Solid brass | Light plastic with paint | None / repurposed |
| Smell | Premium leather scent | Strong chemical/plastic | Natural cotton |
| Price | $700–$1,200 | $50–$150 | ~$30 in materials |
Make It vs Buy: The Savings Math
| Source | Typical price | Notes |
|---|---|---|
| Bottega Veneta Cassette Net Bag (original inspiration) | $700–$1,200 | Leather pouch + cotton net, luxury boutique |
| Other designer net bags (Anthropologie, Madewell, Staud) | $80–$160 | Synthetic blends, mass-produced, often nylon or jute |
| Etsy handmade similar | $35–$95 | Cotton cord, varies in quality, custom colors available |
| Bochiknot DIY (this tutorial) | ~$25–$30 | 100% cotton braided cord, custom fit, free pattern, beginner-friendly |
Save $670+ vs the Bottega original. That is 96% off.
73%
of Gen Z consumers report buying designer dupes regularly (Coresight Research, 2024)
Pricing Tiers if You Make Multiple Bags
Free for personal AND commercial use. Here's how your per-bag cost drops as you scale — useful if you're building an Etsy inventory or planning to sell at craft fairs.
| Scale | Cord cost per bag | Time per bag | Suggested Etsy price | Profit per bag |
|---|---|---|---|---|
| 1 bag (you) | $25–$30 | 4 hours | — | — |
| 5 bags (friends + gifts) | $22–$25 | 3.5 hours | $55–$75 | $30–$50 |
| 50 bags (Etsy starter inventory) | $18–$20 | 2.5 hours | $55–$85 | $35–$65 |
| 500+ bags (wholesale order) | $12–$14 | 2 hours | $45–$65 wholesale | $30–$50 |
Make Multiples: The Etsy Seller Angle
This pattern is free for personal AND commercial use. Handmade macramé net bags retail $35–$95 on Etsy, and the dupe trend has only grown since Bottega's Cassette launch. With one 100m roll of Bochiknot braided cord ($18) you can make 3–4 bags at $25–$30 material cost each, sell for $55–$85 (3x materials, the standard handmade pricing rule), and clear $25–$55 per bag.
Best-selling Etsy variations: cream net + gold metal clutch (wedding gift), natural net + matte black clutch (everyday luxury), sage net + champagne clutch (brunch favorite). List with the keywords macramé net bag, Bottega inspired, designer dupe, wedding clutch, handmade purse.
Where to Source a Base Clutch (3 Easy Options)
Thrift / Vintage Store
$3–$10 for an old metal evening clutch. Even outdated 80s/90s clutches transform once wrapped — the macramé becomes the visual hero.
Best for: Sustainable budget makers
Amazon Basics
$15–$25 for a simple silver or gold metal clutch. Search "metal evening clutch" — pick a flat hard-sided shape (no embellishments, no rhinestones).
Best for: Predictable size + fast shipping
Old Wedding / Bridesmaid Clutch
That clutch sitting in your closet from a wedding three years ago — wrap it in macramé and it becomes wearable again as a daily statement.
Best for: Closet rescue + zero cost
📸 Show Off Your Designer Dupe
Hundreds of Bochiknot makers have posted their handmade designer dupes on Instagram. Tag @bochiknot and use #BochiknotDupes #designerdupe #bottegavenetadupe #macramebag #netbag #diyfashion on your finished piece — we feature reader makes every week in our story round-up. Bonus points for "$700 vs $30" side-by-side reels.
Tag @bochiknotPerfect for These 6 Occasions
Beach Day
Throw sunscreen, sunglasses, and a paperback inside. The net texture reads as elevated beach style, not basic tote.
Summer Dinner
Cream or sage net over a small evening clutch — pairs with linen, denim, or a slip dress for al fresco patio dinners.
Wedding Guest
Match the cord color to the wedding palette. Gold metal clutch underneath for evening, silver for daytime ceremonies.
Vacation / Beach Club
Natural cord net + sleek clutch = the "I packed light but look expensive" vacation bag. Sized for phone, passport, lip balm.
Gift
Made-by-you handmade bag in the recipient's favorite color. Better than a $50 chain store gift, and far more personal.
Etsy Seller Starter Pattern
Beginner-friendly + viral category + commercial-use free = the perfect first listing for a new handmade shop.
Designer Bag Dupe FAQ
Is this $700 Designer Bag Dupe beginner friendly?
Yes. The build is very beginner friendly because it mainly uses overhand knots and alternating overhand knots. The biggest skill is keeping your spacing consistent and adjusting any areas that bunch up — step 8 walks through the loosen-redistribute-retighten technique that solves most net-fit problems. New to macramé entirely? Start with the Bochiknot Beginner's Guide.
How much does this project cost to make?
About $30 or less total. The metal clutch is around $20–$25 from Amazon, Target, or a thrift store, and the 4mm braided macramé cord costs about $5–$8 worth per bag from a 100m roll. Compared to the $700–$1,200 Bottega Veneta Cassette Net Bag inspiration piece, that is a 95%+ savings.
What size cord should I use?
Use 4mm braided macramé cord. A natural-colored braided cord gives the closest look to the designer-inspired version shown here. Avoid 3-ply twisted cord for this project — the braided texture holds the alternating overhand knot shape much more cleanly and resists fraying at the cut ends.
What if my clutch is a different size?
Adjust the number of starting sections and the total number of rows. The bottom of the net should extend past the width of the clutch (so it cradles instead of squeezes), and the finished top should sit just slightly above the clutch. For a 6-inch wide clutch use 5 sections, for an 8-inch clutch use 6–7 sections, and for an oversized clutch use 8 sections.
Do I need to sew anything?
No. This version can be made entirely with knots. For extra security at the top loops, you can choose to sew or glue the ends, but it is optional. A small dab of clear-drying craft glue on the back of the final overhand knot is the cleanest hidden finish.
How long should the handle cords be?
Use two cords that are about 50 to 55 cm long. Leftover scrap cords from the body of the bag are ideal if they are long enough. For a longer cross-body strap, scale up to 80 cm cords and weave through every loop instead of every other.
Can I use the net bag and clutch separately?
Yes. That is one of the best features of this design. The silver metal clutch is a finished evening bag on its own, and the macramé net works on its own as a market or beach bag with a small zip pouch inside. Two bags for the price of one.
Is this Bottega Veneta dupe legal to sell?
Yes. A handmade macramé net bag is not a trademark or trade-dress infringement — net bags have been made by hand for centuries (Egyptian, Greek, fishing villages) long before Bottega Veneta released the Cassette Net Bag. As long as you do not use the Bottega name, logo, or copy a unique copyrighted print, you can sell handmade macramé net bags on Etsy and Instagram. They retail for $35–$95 in the handmade market and the pattern in this tutorial is free for personal and commercial use.
What is the difference between a macramé bag and a net bag?
A macramé bag is made entirely with decorative knotting (square knots, overhand knots, half hitches) and the knots are the structure. A net bag is specifically a knotted open-mesh bag (originally fishing or market style) and is one type of macramé bag. This tutorial makes a macramé net bag — knotted, open-mesh, modern Bottega-inspired.
Can I machine wash it?
No — never machine wash. Cotton macramé cord shrinks and frays in a washing machine, and the metal clutch base will rust or warp. Spot-clean the cord with a slightly damp cloth and mild soap, air-dry flat. Wipe the metal clutch separately with a microfiber cloth.
What other bags can I "dupe" with macramé?
Beyond this Bottega-style net bag, macramé easily dupes Cult Gaia Ark (wood handle + knotted half-moon), Anthropologie tote bags (oversized fringe + jute base), Madewell hobo bags (square-knot body + leather strap), and beach market totes (open-mesh body + wood ring handles). The same alternating overhand knot from this tutorial is the foundation for all four dupes.
How long does it take?
Plan for 1 to 2 hours your first time. About 20 minutes to cut and arrange the cords, 60–80 minutes for the 14 alternating overhand knot rows, and 10–15 minutes for finishing the top loops, trimming, and adding the handle. Your second bag finishes in about 45 minutes once the spacing rhythm clicks.
Can I make this without a base clutch?
Yes. Skip the clutch entirely and use the macramé net as a stand-alone market bag, beach bag, or produce bag. Without a clutch inside, line the inside with a simple cloth pouch (a folded tea towel works) for items smaller than the mesh holes. Many makers prefer the no-clutch version for everyday casual carry.
Do designer dupes hold up over time?
This macramé dupe holds up extremely well — 100% cotton braided cord is more durable than the synthetic blends in many fast-fashion designer dupes, and there are no leather panels to crack or stitching to come loose. Expect 5+ years of use with light care (spot clean, air dry, store flat away from direct sun).
Can beginners really make this design?
Absolutely. The only knot you need is the overhand knot, which most people already know. The skill is in spacing consistency and the loosen-redistribute-retighten technique in step 8. If you can tie a shoelace, you can make this bag. Want more beginner-friendly projects? Browse the 12 free macramé projects for beginners.
Keep Learning with Bochiknot

Macramé Skirt
Cross-cluster fashion favorite — Coachella-style fringe skirt, intermediate skill, summer festival ready
Read tutorial
Macramé Wedding Chair Back
Pair with the cream net bag for a complete wedding look — chair backdrop for ceremonies and receptions, under $25
Read tutorial
Square Knot
The foundational macramé knot — use it to upgrade this bag with decorative front panels in your second build
Learn the knot
Double Half Hitch
The diagonal locking knot — adds decorative top borders to upgraded versions of this bag
Learn the knot
Beginner's Guide
The complete 2026 guide to the 4 foundational macramé knots — start here if this is your first project
Start here
12 Free Beginner Projects
Step-by-step tutorials for wall hangings, plant hangers, bags, and more handmade boho decor
Browse projects
About Nicole Woo
Nicole Woo is the founder of Bochiknot Macramé and has been teaching macramé for over 5 years. She has helped thousands of DIY makers knot their first bags, wall hangings, and modern boho fashion pieces through her tutorials, YouTube channel, Patreon community, and best-selling DIY patterns on Etsy. When she's not knotting, she's photographing every step so you don't have to guess.

Leave a comment