

































Macrame Flower Coaster with Knotted Petals: Free No-Fringe Pattern

FREE MACRAME PATTERN · INTERMEDIATE · PHOTO + VIDEO TUTORIAL
A flower shape made with knots, right to the edge. This no-fringe macrame flower coaster combines a textured spiral centre with eleven sculpted petals. It brings a defined floral detail to your table, with no loose fringe to comb out or trim into shape.
If you have made a simple round coaster and want to explore a more detailed finish, this is a useful next challenge. Nicole will show you how to build the spiral, knot a separate petal strip and join the two into a flower about 5 inches (13 cm) across. Original close-up photos and clickable video timestamps guide you through the cord additions, changes of direction and final joins.
This is an intermediate pattern. If you are still learning double half hitches, practise a few rows first. Our free 50 Macrame Knots & Sennits PDF is a handy reference to keep beside the video.
Your Flower Coaster at a Glance
Time and finished size vary with experience, cord construction and knot tension. Allow extra practice time if circular knotting is new to you.
WHAT MAKES THIS COASTER DIFFERENT
Knotted Petals, a Defined Shape, and No Fringe to Brush
A familiar round macrame coaster often pairs a flat knotted centre with a soft, brushed fringe. This design adds its flower outline through a separate border of knotted petals. The centre still needs to sit flat for a cup; the visual dimension comes from the textured rows and shaped edge.
A Typical Fringed Coaster
A round knotted base with loose ends combed and trimmed around it. Choose this look for a soft, feathery outline. Finishing involves brushing and shaping the fringe.
This No-Fringe Flower Coaster
A spiral centre framed by eleven knotted petals, with ends secured underneath. Choose this look for a distinct floral outline and visible knot texture. Finishing focuses on joining and securing the border.
Why Make This Version?
- A decorative edge you can see: the repeated petals give the coaster a flower silhouette even when it is sitting on its own.
- No fringe-grooming step: there is no loose border to brush or repeatedly straighten. You still need to secure the joins, trim the back and let the cotton dry flat after cleaning.
- Small project, useful new skills: practise adding cords to an expanding spiral, changing anchor direction and connecting two knotted sections—techniques you can explore in future designs.
The trade-off is a more involved construction than a simple fringed round. Take your time with the first petal and the final join; the step photos and video links below make those details easier to follow.

Cord and Materials for Your Flower Coaster
Choose 3mm single-strand cotton cord for the original pattern. Use the same cord for the centre and petals so they join consistently. A smooth 10–12 inch dowel holds the petal cords temporarily; it comes out before assembly.

3mm Single-Strand Cord
Select the 3mm option. The fixed cutting list uses 16 metres, plus extra cords added as the spiral grows. Keep the roll beside you.
Shop Single-Strand Cord →
Temporary Wooden Dowel
Use a smooth 10–12 inch dowel or stick to support the petal strip. The mounting loops must be able to slide off.
Shop Wooden Dowels →
Rose Gold Macrame Scissors
Cut your measured lengths cleanly, then trim the reverse only after every join is secure.
Shop Macrame Scissors →
Measuring Tape
Measure the 160 cm starter, 80 cm centre cords and two 600 cm petal cords accurately before you knot. A ruler you already own also works.
Shop Measuring Tape →
Optional Macrame Board
Use a board with T-pins to help steady the work and check its shape. You can also secure the temporary dowel to a suitable work surface.
Shop The Macrame Board →Prefer Amazon? The original tutorial links to 3mm Sand Beige cord. Check the selected size and availability before ordering. As an Amazon Associate, Bochiknot earns from qualifying purchases at no extra cost to you.
You do not need a fringe comb for this design. Its outer edge is knotted, and the loose ends are finished at the back.
Cutting List: Centre, Petals and Added Cords
| Use | Quantity | Length Per Cord |
|---|---|---|
| Spiral starter / anchor | 1 cord | 160 cm / 63 in |
| Initial centre cords | 3 cords | 80 cm / 31.5 in |
| Petal strip | 2 cords | 600 cm / 6 m / 236 in |
| Extra spiral cords | Add as gaps appear | Twice the remaining working-strand length at the addition point |
Fixed cuts: 16 metres (about 17.5 yards), plus the extra spiral cords. Sixteen metres is not the complete project total. The lesson adds cords as the circumference grows rather than giving a fixed number of additions.
For help planning a modified size, read how to measure cord for macrame.
The Knots and Strand Roles You’ll Use
The anchor cord sets the direction of a row; a working strand wraps around it. In the centre, the long starter cord guides the spiral. In the petal strip, the anchor changes as the rows turn.
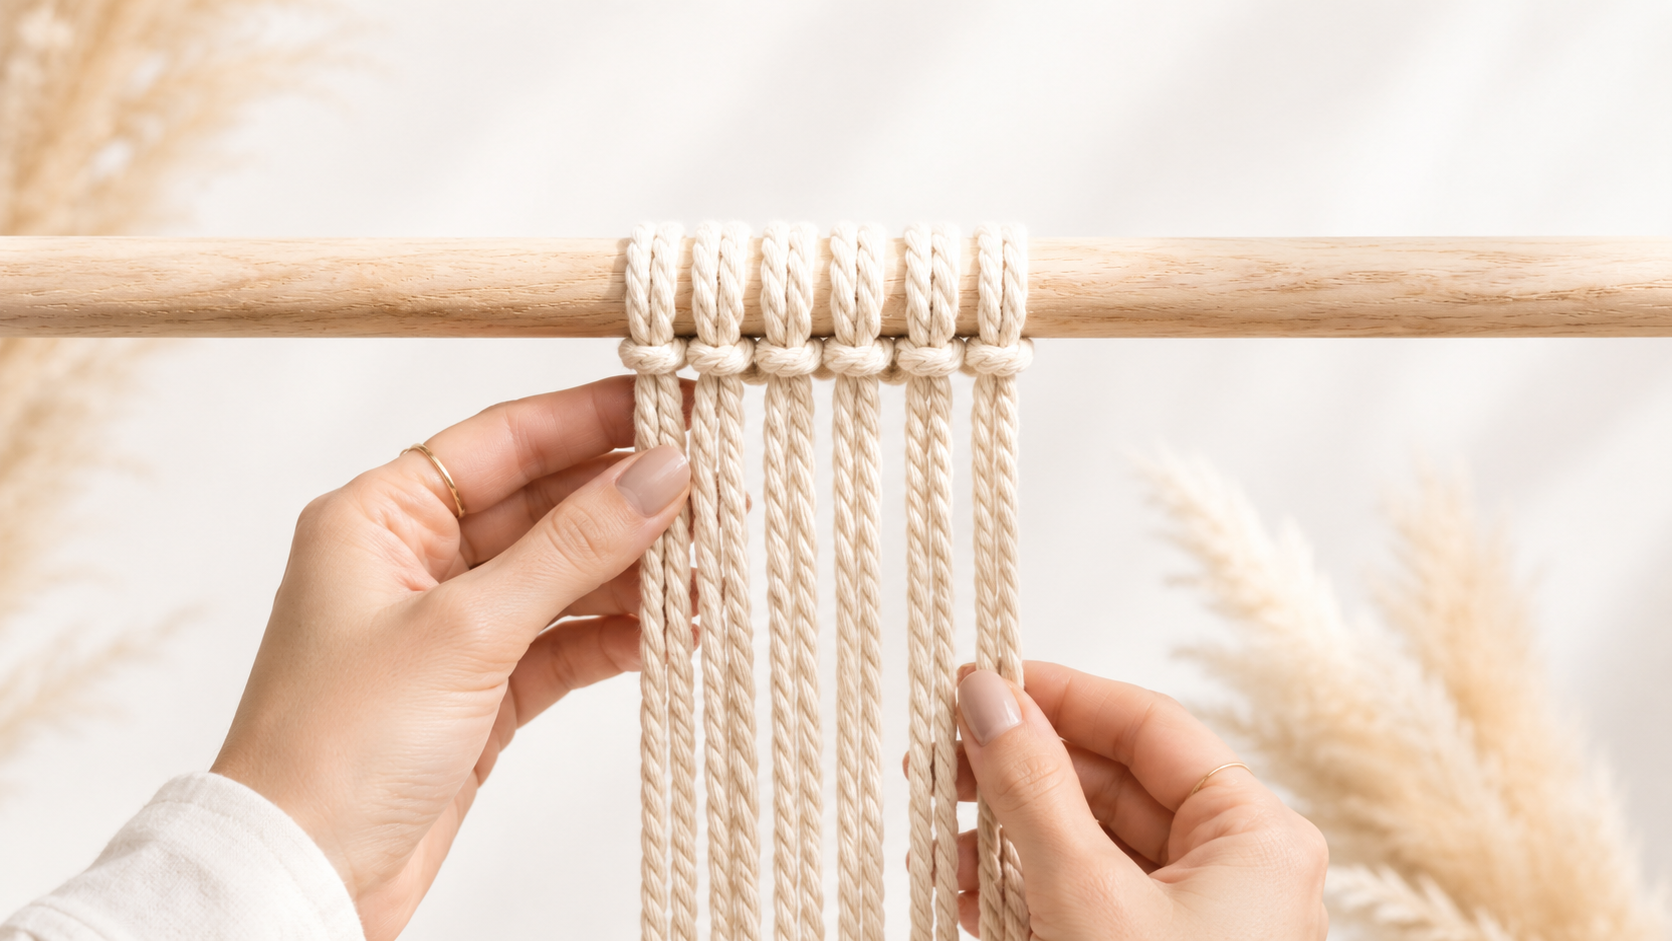
Lark’s head
Use this mounting knot to attach folded cords. Check whether the pattern calls for the standard or reverse version.
Learn Lark’s Head →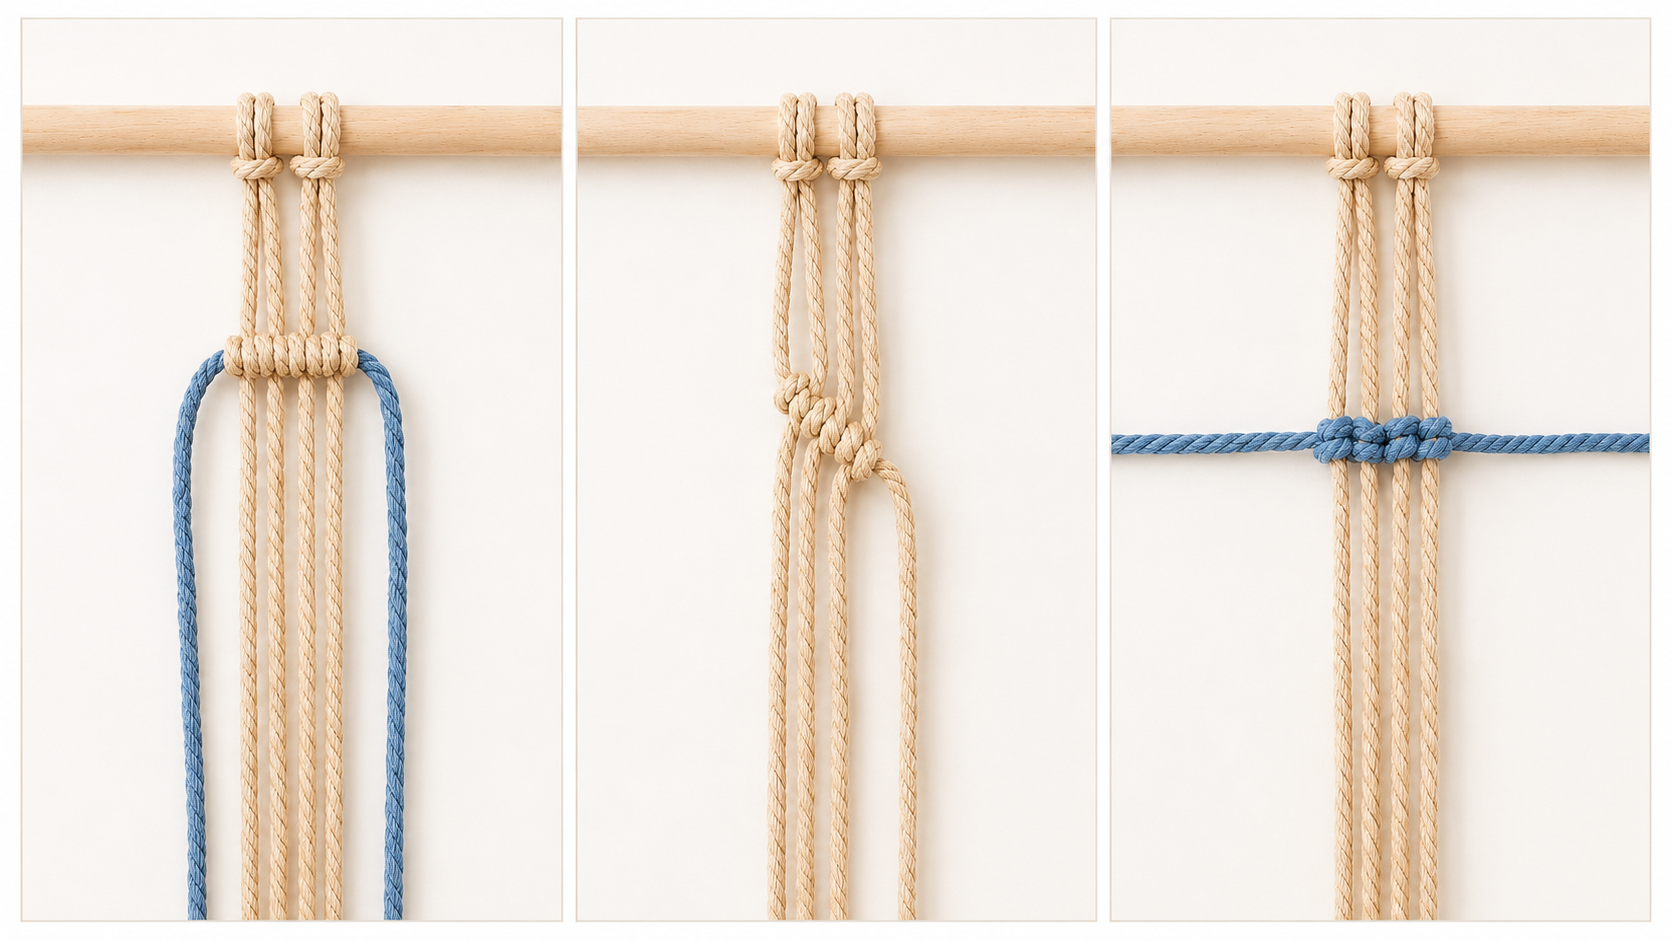
Double half hitch
Tie two half hitches with one working strand around the anchor. Hold that anchor at the angle you want the row to follow.
Learn Double Half Hitch →One DHH consists of two half hitches tied with the same working strand around the same anchor. If your rows keep twisting or becoming uneven, revisit our five double half hitch fixes before starting the petal strip.
Watch Nicole Make the No-Fringe Flower Coaster
See the whole construction first: spiral centre, separate petal strip, then the join. Materials begin at 2:34; the pattern starts at 3:38.
How We’ll Build the Flower, One Part at a Time
1. Shape the Spiral
Use double half hitches to build the round centre, adding working cords where wider gaps appear. Check it on a flat surface as it grows.
Make the Centre →2. Create the Petals
Work with two long cords on a temporary dowel. Change the anchor direction to shape one petal, then repeat until you have eleven.
Knot the Petal Strip →3. Join and Finish
Connect the centre to the petal loops, close the border and secure the ends on the reverse. Check the joins and test with an empty cup before use.
Join the Two Parts →
How to Make a No-Fringe Macrame Flower Coaster
Left and right refer to the work as you face it. Tap a photo for its larger original. The labels follow Nicole’s video, including step 10b, so the instructions and timestamps stay easy to match.
STEP 1
Set Up the Spiral Centre
- Measure 40 cm from one end of the 160 cm cord and fold a loop at that point. Keep the 40 cm end separate from the longer end.
- Fold each of the three 80 cm cords in half. Attach them to the loop with reverse lark’s head knots, matching the mounting direction in the photo.


Check Before Continuing: The original cord has unequal ends on purpose. The long end will guide the spiral.
Watch This Step · 03:38 →STEP 2
Identify the Anchor and Make the First DHH
- Use the long end of the starting cord as the anchor. Use its short end as the working strand.
- Tie a double half hitch (DHH) with the short end around the long anchor: two half hitches with the same working strand. Snug it close to the mounted cords.


Check Before Continuing: Keep the anchor steady; pull the working strand to bring the knot into position.
Watch This Step · 04:54 →STEP 3
Knot Around the Centre
- Continue around the centre with double half hitches. Bring each available working strand around the same long anchor.
- Keep the knots next to one another and lay the work flat as the spiral grows. Stop when the space between working strands becomes too wide for a neat next knot.


Check Before Continuing: A widening gap is the cue to add a cord, rather than stretching the next strand across it.
Watch This Step · 05:52 →STEP 4
Add Cords Where the Spiral Needs Them
- Cut an extra cord about twice the length of a remaining working strand at that point in the spiral. For example, if the hanging working end is 30 cm, cut an added cord about 60 cm long.
- Fold the new cord and attach it to the anchor with a reverse lark’s head knot. It adds two working ends. Continue the DHH spiral and repeat this addition when another large gap appears.


Check Before Continuing: Compare remaining free strand length—not the diameter of the coaster—when measuring the added piece.
Watch This Step · 07:29 →STEP 5
Finish the Round Centre
- Continue adding cords as needed while knotting around the spiral. The lesson works to about seven spiral rounds, or until the long anchor is nearly used.
- Lay the centre on the table and gently settle it flat. Keep the outer ends intact: you will use them to connect the petal border. Set this piece aside.

Check Before Continuing: Do not trim the outer ends yet. The centre and petal strip are made separately, then joined.
Watch This Step · 09:02 →STEP 6
Mount the Two Long Petal Cords
- Cut two 600 cm (6 metre) lengths of the same 3mm cord. Fold each in half and attach both to the temporary dowel with lark’s head knots.
- You now have four long hanging strands. Keep the loose lengths separated so they feed through without tangling.

Check Before Continuing: Use 600 cm per cord, not 60 cm. These two long cords create the entire petal strip.
Watch This Step · 10:21 →STEP 7
Start the First Petal
- Begin about 1 inch (2.5 cm) below the mounting knots. Make a diagonal row of DHH knots toward the left, following the anchor position shown.
- Keep the starting space open; the loops along the strip will help with assembly later.

Check Before Continuing: Keep the four strands in order and avoid tightening away the starting gap.
Watch This Step · 10:40 →STEP 8
Turn the Rows to the Right
- Count the strands in their current positions. Use the second strand from the left as the anchor.
- Make a DHH row toward the right. Repeat one more rightward row underneath, following the same shape shown in the close-ups.


Check Before Continuing: Hold the anchor at the angle you want the row to follow. Moving it while tightening changes the petal shape.
Watch This Step · 12:14 →STEP 9
Turn the Rows Back to the Left
- Bring the anchor back toward the left and make a row of DHH knots in that direction.
- Repeat another leftward row underneath. Compare the curve with the previous pair of rows before tightening fully.


Check Before Continuing: Aim for matching snugness across the rows; pulling harder does not make a neater petal.
Watch This Step · 13:07 →STEP 10
Complete the Petal Repeat
- Use the far-left strand as the anchor. Make a diagonal row of DHH knots toward the right.
- Check the outline of the first petal and its lower attachment loop against the photos.


Check Before Continuing: This completes the sequence you will repeat for the rest of the border.
Watch This Step · 14:08 →STEP 10b
Repeat Until You Have 11 Petals
- Repeat the petal sequence ten more times below the first, making eleven petals in total.
- Keep the repeats similar in size. Once the strip is complete, slip the mounting loops off the temporary dowel and curve the strip around the centre to check the fit.

Check Before Continuing: Count the finished petals before joining. The dowel is a temporary support and is not part of the finished coaster.
Watch This Step · 15:20 →
STEP 11
Join the Centre to the Petal Border
- Arrange the spiral inside the petal border. Follow the video closely to identify the bottom loops used for joining.
- Use the spiral’s outer cords to attach to those loops with DHH knots. The lesson places two or three DHH knots per loop as needed to distribute the centre strands around the border.
- Work gradually around the circle, checking that the centre stays flat and the petals sit evenly.


Check Before Continuing: Avoid pulling all the slack into one petal. Spread the joins around the circle before making final adjustments.
Watch This Step · 17:36 →STEP 12
Close the Petal Seam on the Back
- Turn the coaster over. Connect the first and last petals at the back with overhand knots as shown in the lesson.
- Attach the last two spiral cords to the remaining bottom loop. Check the front again, then gently test the joins before cutting any tails.


Check Before Continuing: Keep the joins on the reverse and avoid a bulky knot stack under the centre where a cup will sit.
Watch This Step · 19:35 →STEP 13
Trim and Check the Finished Coaster
- Trim the excess ends on the back carefully. Leave the securing knots intact; do not cut into them or into the visible petal edges.
- Lay the coaster flat, arrange the petals, and check the underside for loose joins. Test with an empty cup on a stable surface before using it for drinks.


Check Before Continuing: The clean edge comes from securing the ends at the back, not brushing or shaving the petals.
Watch This Step · 21:25 →Keep the Centre Flat and the Petals Even
The Centre Is Cupping
Pause and lay the spiral flat. Check whether the anchor is being pulled too tightly around the circle or whether a widening gap needed an added cord. Loosen the affected section and compare it with the video before continuing.
The Centre Is Wavy
Check for loose spacing or too many cord additions close together. Add a cord where the gap needs filling, rather than automatically adding one after every few knots.
The Petals Are Different Sizes
Compare the anchor angles, row counts and starting spaces. Correct the newest petal while it is easy to undo. Consistent tension matters more than making every knot as tight as possible.
The Petal Strip Does Not Fit
Count eleven petals and check that both parts use the same cord. Distribute the centre strands across the loops before tightening the join. Do not force the strip around the centre by pulling it hard.
An Anchor Is Running Short
Stop while you can still tie secure knots. Check the initial cuts—especially the 600 cm petal lengths. Extra centre additions do not replace a starter anchor that has been cut too short.
The Cup Wobbles
Inspect the reverse for bulky joins or unsecured tails under the centre. Adjust the knot placement without cutting into securing knots, lay the coaster flat, and retest with an empty cup.
Newer to knotting? Our 12 beginner macrame tips explain cord preparation, tension and other habits that make detailed patterns easier.
Macrame Flower Coaster Questions
What makes this different from a basic fringed macrame coaster?
The flower outline is a border of eleven knotted petals, rather than loose cord ends brushed into fringe. You make that border separately and join it to a spiral centre. It gives a defined, textured edge without fringe brushing, but requires extra shaping and assembly. Both styles need a flat, secure centre for a cup.
Is this flower coaster suitable for a complete beginner?
It is an intermediate project. The knots are familiar building blocks, but keeping a spiral flat, changing anchors and joining the petal strip take practice. Learn double half hitches in both directions first, then follow the timestamped steps slowly.
How much cord do I need?
The fixed cuts total 16 metres: one 160 cm starter, three 80 cm centre cords and two 600 cm petal cords. You also need extra cords for the expanding spiral. Their number and lengths depend on the gaps and the remaining working-strand lengths, so keep more cord available.
Can I use 4mm or 3-ply cord?
You can experiment, but it changes knot size, texture and cord consumption. The written cutting list is for 3mm single-strand cotton. Make a sample and adjust both the centre and petal border together rather than expecting the same fit.
Does the wooden dowel stay in the finished coaster?
No. It is a temporary support for the two long petal cords. Slip the mounting loops off when the strip is complete, before joining the petals around the centre.
Why are extra cords added to the spiral?
The circumference grows with each round. When the gap between working strands becomes too wide, an added folded cord supplies two new working ends. Cut it about twice the free working-strand length at that point.
Do I need glue, stiffener or a fringe comb?
These are not part of the original pattern. The petal edge is knotted and the ends are secured on the reverse. Check those joins before trimming; a coating should not be used to compensate for loose knots.
Can I make a larger coaster or use two colours?
Two colours can distinguish the centre from the petals; keep their thickness and construction consistent. A larger version needs a redesigned centre-to-border fit and more cord, so test the two parts together before final assembly.
How should I clean and use it?
Gently spot-clean small marks and let the cotton dry flat completely before placing it on furniture. Test any cleaner on a spare piece first. The coaster is not waterproof, and this pattern is not a heat-rated trivet for hot pans.
KEEP MAKING
Three More Free Macrame Patterns to Try

Try a Diamond Coaster
Explore another coaster shape with a different knotting sequence.
See The Free Tutorial →
Make a No-Fringe Heart
Keep the clean-edge finish and try a heart-shaped design.
See The Free Tutorial →
Explore a Two-Tier Flower
Build on the floral theme with a layered coaster pattern.
See The Free Tutorial →Browse more macrame coaster tutorials, or follow our Macrame Journey to choose the next skill to practise.
KEEP A KNOT REFERENCE NEARBY
A Little Help Between Tutorial Pauses
Revisit a knot before repeating it across your project. Our free 50 Macrame Knots & Sennits guide gives you a reference to return to as you learn.
Get The Free Knot Guide →A LITTLE SUPPORT FOR YOUR NEXT PROJECT
Keep Learning With The Bochiknot Patreon Community
If you would like a regular reason to pick up your cord, explore the Bochiknot community on Patreon. Choose the level of guidance that fits the projects you want to make.

TIER 1
Mini-Macrame Creations
Explore smaller projects with patterns and video guidance.

TIER 2
Mastering Macrame Skills
Build your technique through guided projects, lessons, and creative challenges.

TIER 3
Macrame Masterpiece
Explore a learning and materials-kit option. Compare the kit schedule and shipping details on Patreon.
Tier 3 also has Macrame Masterpiece Lite (S2) and Macrame Masterpiece Bundle (S1) options. See Patreon for the current inclusions, availability, and pricing.

NICOLE WOO · BOCHIKNOT
Take your time with the first petal and check the centre on a flat surface as you go. Those small pauses make the final join easier—and leave you with a useful piece you can enjoy every day. Happy knotting!

A Little Inspiration Between Projects
Follow Bochiknot for tutorials, new ideas, and more ways to keep knotting.

Leave a comment