


Knots & Knot-Tying Techniques for STUNNING Patterns

Revolutionize Your Macrame Designs: Mastering Alternate Knots & Techniques
Ready to take your macrame projects beyond the usual basic knots?
Whenever I begin a new pattern, I like to consider how I can add a unique touch and ensure it reflects my style.
I often look at everything I’ve knotted and clearly have a style!
Everything I knot connects to nature, whether obvious or subtle.
I’ve probably said this 100 times by now, but nature is where I find my peace and my inspiration for nearly everything I have ever knotted.
This doesn’t mean I don’t like to mix things up, though—and by things, I mean knots, obviously.
This train of thought brought me to alternate knots and knotting techniques – and now I want to share these with you!
If you are drawn to more complex macrame projects and eager to expand your skills, you've arrived at the perfect destination.

This comprehensive blog post is tailored for individuals like you who have already ventured into the world of macrame, mastered the basic knots, and are now seeking to reach the pinnacle of their craft.
My goal is to help you discover the true essence of macrame artistry, which involves not only mastering complex knots but also the ability to create unique designs that are distinctly yours by changing the prescribed knot patterns and knots to something you prefer.
In the upcoming sections, we'll explore finding your macrame style and crafting original pieces.
The ultimate aim of your macrame journey is to develop the skill set needed to create one-of-a-kind designs not only by changing an existing pattern but by designing your own patterns.
We'll guide you through the process of learning more knots and knot patterns, enabling you to transform existing designs into your own unique creations.
So, if you're a dedicated macrame enthusiast already well-acquainted with the basics and yearning to expand your horizons, join us on this adventure.
Together, we'll unravel the intricacies of advancing your knotwork as the next step to designing your macrame patterns.
The Journey from Beginner to Mastering Macrame
Becoming a macrame master is an exciting journey filled with growth and improvement.
Understanding this process is important, as it helps you appreciate the more advanced knots and techniques.
In this guide, we'll explore how you can go from a beginner to a skilled macrame artist, highlighting the importance of learning and growing along the way.
Unlock Your Macrame Potential: Level Up Your Skills
As with any art form, macrame skills develop gradually over time.
It all begins with those initial, tentative attempts at tying your first simple knots, as we discussed and practiced in our beginner blogs, which you can find below.
- The Ultimate Beginners Guide
- 12 Macrame Projects for Beginners
- The Complete Guide to Selecting Macrame Materials
- 12 (Must-Know) Macrame Tips for Beginners
You create simple patterns, master the basic square knot, and perhaps craft your first plant hanger or wall hanging.
It's an exciting phase in which you learn the foundational techniques that will guide your macrame journey.
With practice and dedication, you progress to more complex patterns and designs.
The beauty of macrame lies in its versatility.
As you delve deeper into the craft, you discover an array of knots, each with a unique charm.
You start incorporating variations of half-hitch knots, double half-hitch knots, and Lark's Head knots.
Your projects become more intricate, and you gain confidence in your abilities.
The Importance of Continuous Learning and Growth
Herein lies the crux of your macrame journey: the importance of continuous learning and growth.
Macrame is not a static craft.
It's a dynamic art form that thrives on innovation and personal expression.
As you gain experience, you'll find there's always more to explore and new techniques to master.
Continuous learning keeps the spark alive in your macrame journey. It encourages you to push boundaries and expand your horizons.
It separates the novice from the master and the ordinary from the extraordinary.
The more you learn, the more you can infuse your personality and creativity into your macrame pieces, making them truly unique.
As we delve into other knot patterns and techniques you may not have seen before, remember that this is not the destination but rather a significant milestone on your macrame journey.
Embrace the idea of constant growth, and you'll find that macrame offers endless possibilities for your artistic expression.
With each knot tied, each pattern crafted, and personalized design, you'll inch closer to becoming a true macrame master.
Create One-of-a-Kind Macrame: Mastering Unique Knot Patterns

When you're passionate about macrame, the draw lies in the satisfaction of tying knots and finishing projects and in the creativity you can express with each twist and turn of your cords.
In this section, we're about to embark on a journey that will expand your knowledge of knots and knot patterns by exploring wall hangings and plant hangers and awakening your inner artist.
Unraveling the Knot: A Quest for Uniqueness
Imagine your macrame projects as a canvas waiting to be painted.
The knots you choose are your brushstrokes, and the resulting patterns are your masterpieces.
You must explore the vast array of knots and knot patterns available to elevate your craft.
Learning through Practice: Knot-by-Knot

Like any skill, macrame mastery is achieved through practice.
It's not just about learning new knots; it's about getting to know them intimately.
Each knot has its own personality and its own story to tell.
By practicing diligently, you'll be able to execute these knots with finesse and precision, allowing you to create intricate patterns that captivate the eye.
Beyond the Knot: Creative Exploration
But macrame is more than just knots. Its true beauty lies in its versatility.
Learning different knots or completing beginner projects is only the start.
It’s also about knowing how to creatively begin and finish each piece.
Understanding when to add embellishments like tassels, beads, or feathers turns a simple project into a unique work of art.
As we explore new macrame techniques, remember that each knot, pattern, and decoration tells a story—your story of creativity and passion for this timeless craft.
Let’s dive into this creative journey together, where your macrame becomes a story you share with the world.
Bring Your Vision to Life: Knotting Unique Plant Hangers and Wall Hangings

When venturing into the world of design, alterations in macrame, plant hangers, and wall hangings are our favorite entry points!
These projects are not only popular but super versatile, given how many different knot patterns they each use.
They create a safe space for creative experimentation before these techniques are applied to other projects.
Plant hangers, for example, allow you to play with various mounting knots and sennit knots, which transform their appearance while maintaining their functionality.
Wall hangings, on the other hand, give you true artistic freedom of expression.
You can combine intricate knot patterns and unique knot combinations without having to worry about whether it can hold a plant pot, and you can simply focus on the design you want to create.
There are thousands of knot combinations and basic macrame patterns out there, but for now, we will look at 5 different ways to start a plant hanger and 5 unique sennits you can use as plant hanger posts.
Then, we will look at 7 different ways to start and end a wall hanging.
5 Different Ways to Start a Plant Hanger

(Aka: Mounting knots and patterns)
Let’s start with our plant hangers and explore five different methods using a combination of knots/knot patterns to start your macrame plant hanger.
Wooden rings and metal hoops are very common choices for these beautiful macrame patterns, but they are not a requirement.
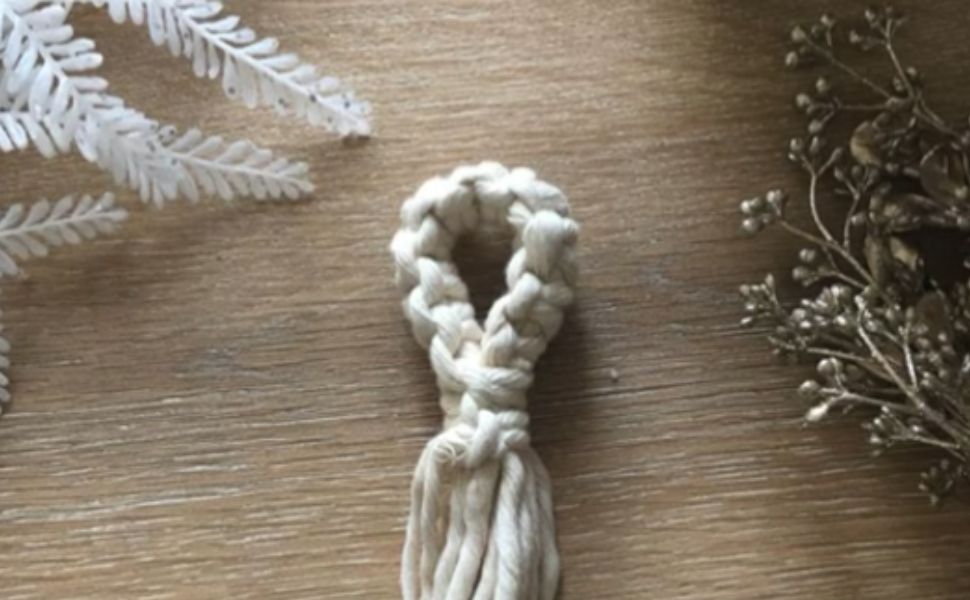
You can start with a ring and add a touch of elegance with the Crown Knot or knot a sturdy foundation by making the Gathering Knot.
We’ll also delve into techniques like the Square Knot, both with and without a ring, and the practical Overhand Knot.
Whether you have a ring ready or not, let's unravel the very basics of these exciting ways to begin your macrame plant hanger.
When you’re ready for more, make sure to check out the "5 Ways to Start a Plant Hanger" blog for an in-depth walkthrough.
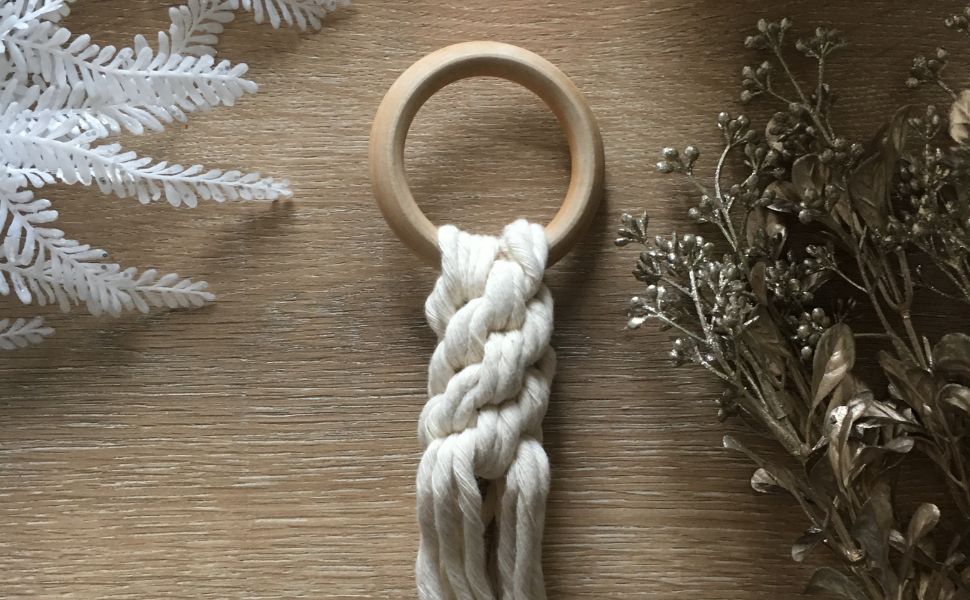
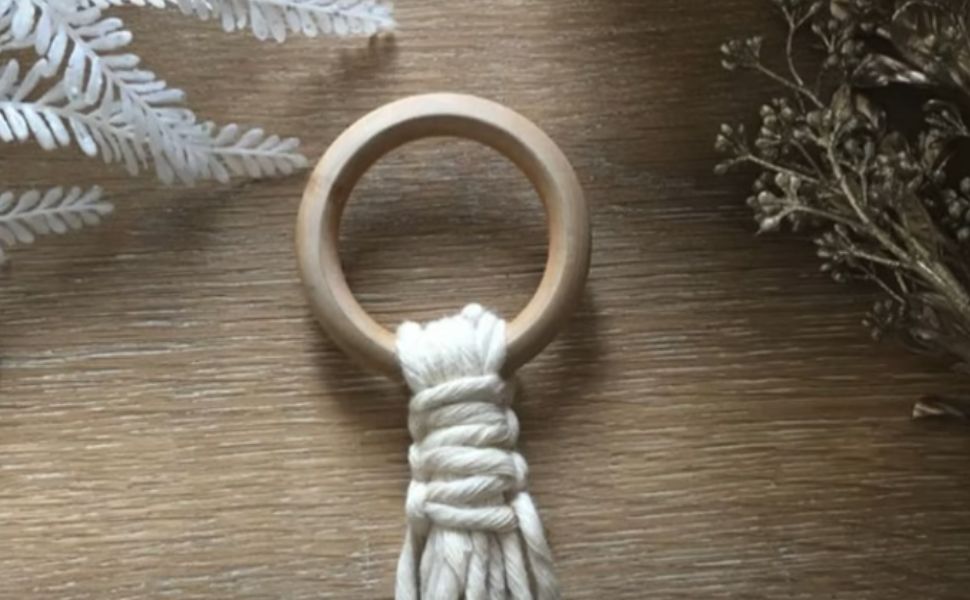
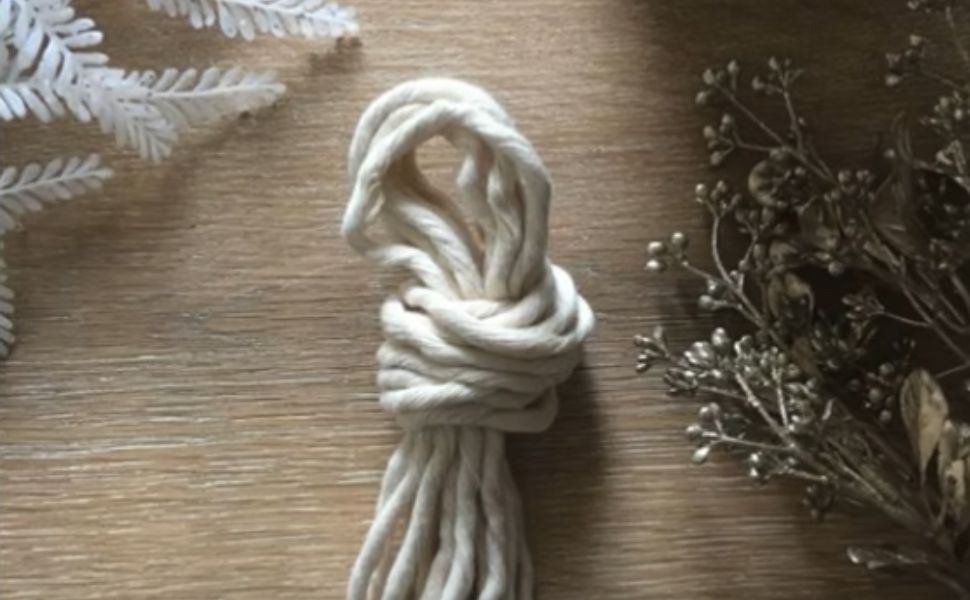
1. The Gathering Knot with Ring
One of the most popular macrame knots is the Gathering knot because it is most commonly used to end many projects.
However, the ease with which you can tie it and its stability make it a versatile knot and a great starting knot for a plant hanger.

2. Crown Knot with Ring
The crown knot is another splendid choice for starting your plant hanger.
It's known for its symmetrical and distinctive appearance and pairs beautifully with a ring for a polished look.
3. Square Knot Chain with Ring
Create a chain of square knots to secure your plant hanger.
This method offers stability and showcases the iconic square knot design.
4. Square Knot Loop (No Ring Needed)
If you prefer a minimalist but sturdy approach, the square knot loop is perfect.
Since we are creating a handle with the knots, no ring is required.
5. Overhand Knot (No Ring Needed)
Simplicity meets functionality with the overhand knot.
It's quick and easy, making it an excellent choice for beginners and those looking for a clean start.
5 Ways To Start A Macrame Plant Hanger (Beginner's Guide)
Now that we've explored five unique ways to begin your plant hanger projects let's dive into another exciting realm of macrame creativity.
Get ready to discover five captivating knot patterns that can elevate your plant hangers to new heights as you use these sennit patterns to create plant hanger posts.
These creative choices infuse your designs with texture, style, and a touch of your flair.
5 Knot Patterns for Plant Hanger Posts

(AKA: 5 Awesome Sennit patterns)
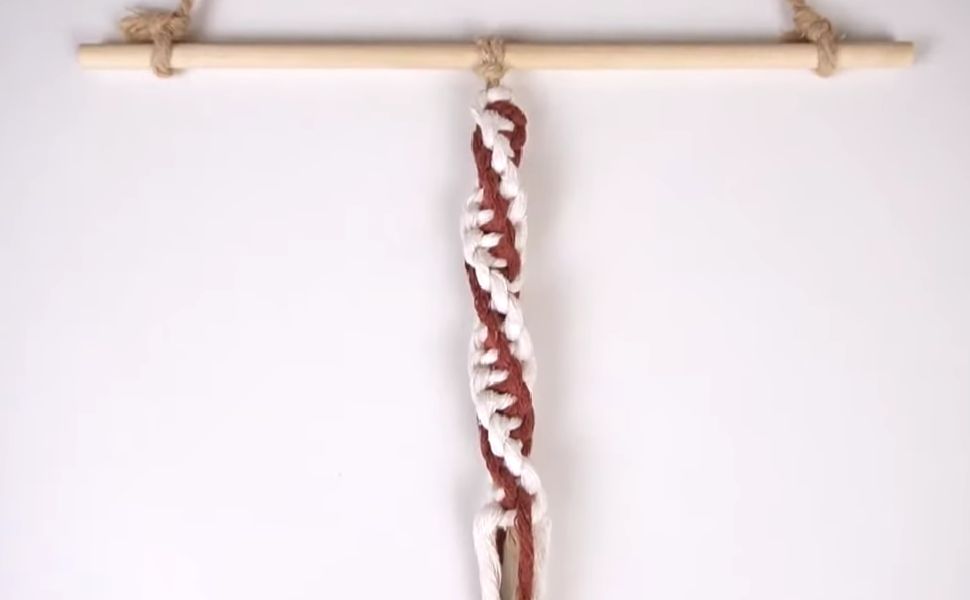
1. Double Half Knot Spiral
Create a stunning spiral effect with the Double Half Knot Spiral, perfect for adding visual interest to your plant hanger.
Repeating double half knots creates a beautiful, twisting pattern that adds texture and movement to your design.
This technique not only adds a mesmerizing twist but also strengthens the structure of your plant hanger, making it both functional and decorative.
2. Alternating Square Knot
The Alternating Square Knot pattern adds beautiful texture and dimension to your plant hanger.
This technique creates a visually dynamic and structured design by knotting square knots in a crisscross, alternating fashion.
The alternating knots form a striking lattice effect, providing strength and flexibility to your project while adding depth.
This pattern enhances the overall appearance and allows airflow around your plants, making it both decorative and functional.
Ideal for plant hangers of any size, the alternating square knot design gives your macrame a timeless, handcrafted look that draws attention to your creativity and skill.
It's a versatile knot pattern that can be customized with different cords, colors, or embellishments like beads to make each piece unique.
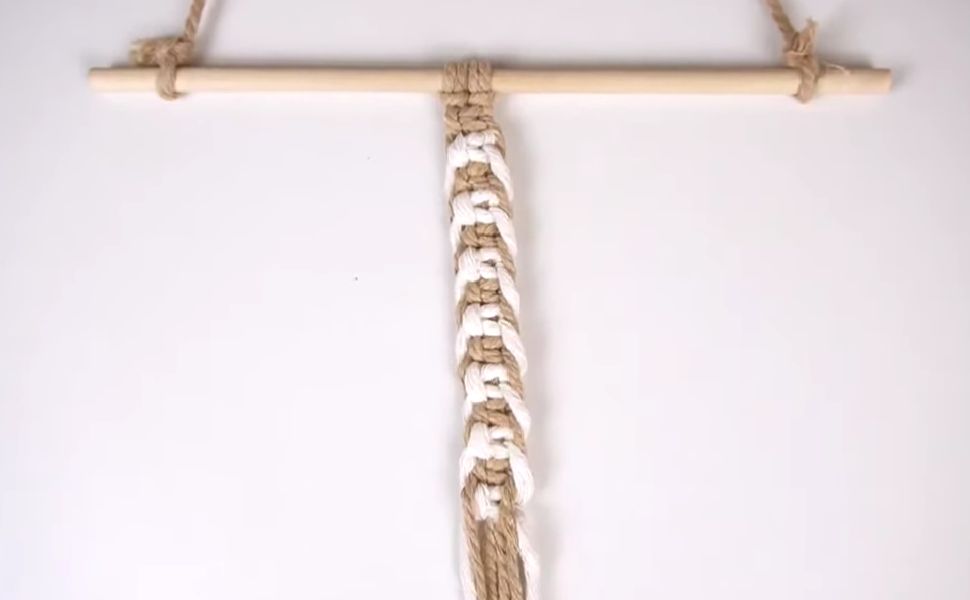
3. Alternating Half Hitch Braid
The Alternating Half-Hitch Braid is a beautiful, braid-like pattern created by alternating half-hitch knots.
This technique adds a charming and intricate texture to your plant hanger, offering a stylish twist that feels delicate and structured.
The braid effect not only adds a layer of elegance but also enhances the overall durability of the design, ensuring your plant hanger is both functional and decorative.
This pattern works exceptionally well for adding subtle detailing along the sides or as a focal point in your macrame project.
The alternating half hitch braid gives your plant hanger a unique, handcrafted look that stands out while still harmoniously blending with any home décor style.
It's a versatile technique that can be adapted to various cord sizes and materials, and it can even be paired with embellishments like beads or tassels to elevate the design further.
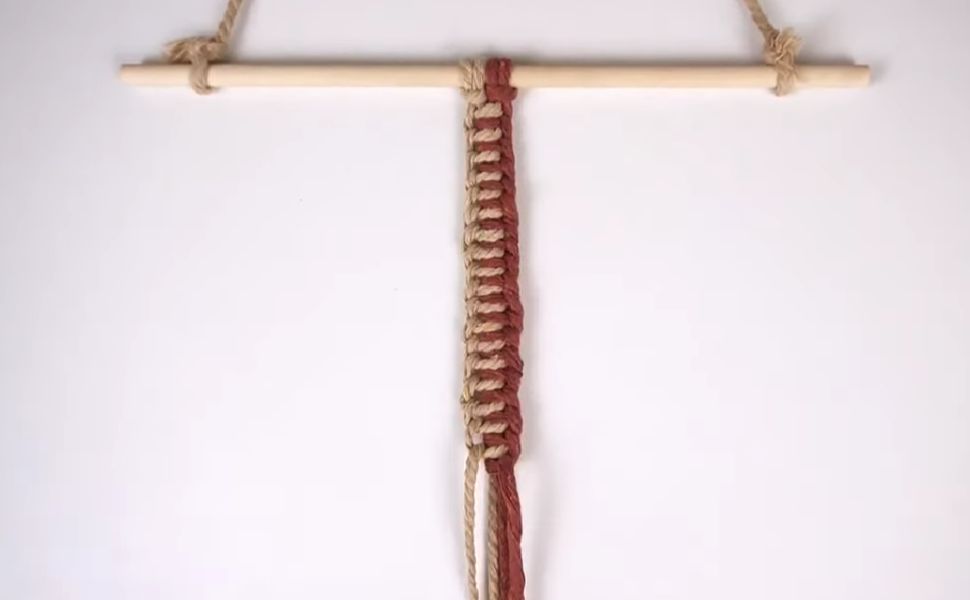
4. Lark's Head Knot Loop Braid
The Lark’s Head Knot Loop Braid is a creative and versatile pattern that combines the classic Lark’s Head knot with loops to form a unique braid-like design.
This technique adds both elegance and practicality to your plant hanger, offering a striking combination of form and function.
The looped braids create a visually appealing, structured texture that enhances the overall aesthetic while reinforcing your hanger's strength.
This pattern works well for framing the main body of your plant hanger or adding intricate detail along the sides.
The Lark’s Head Knot Loop Braid gives your macrame a refined look, perfect for making bold statements or adding subtle decorative touches.
Whether you're looking to elevate a simple plant hanger or add a creative twist to a more intricate piece, the Lark's Head Knot Loop Braid is perfect.
It balances beauty and strength, ensuring that your plant hanger is visually stunning and durable enough to hold your plants securely.

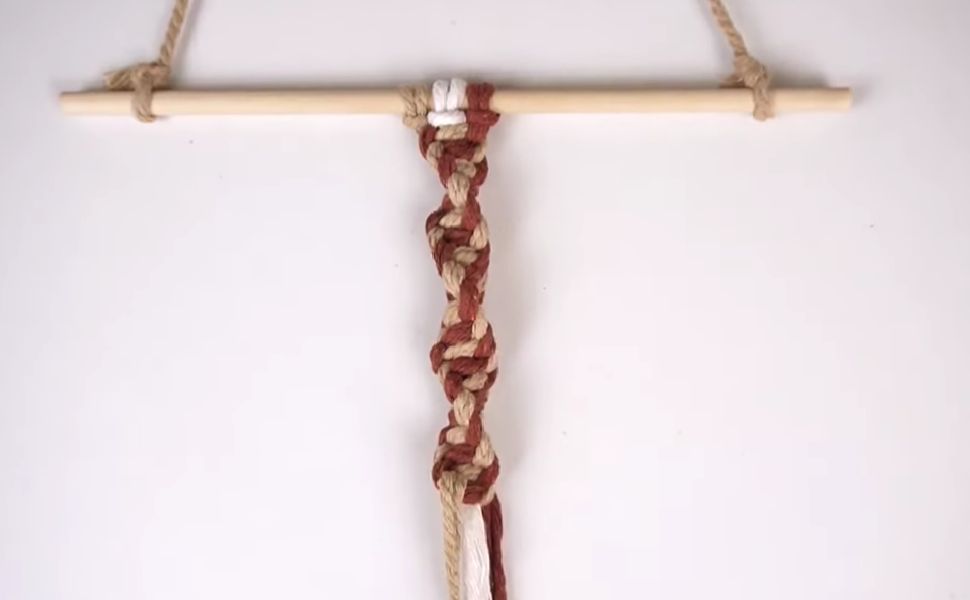
5. Half Knot Spiral
The Half Knot Spiral is a mesmerizing pattern that brings a beautiful, twisting effect to your macrame projects.
By simply repeating a series of half knots, this design creates an elegant spiral that adds depth, movement, and texture to your plant hanger.
The spiral effect naturally draws the eye, making it an excellent choice for those looking to create a visually dynamic piece.
One of the best aspects of the Half Knot Spiral is its versatility.
You can easily experiment with different lengths between knots, varying cord thicknesses, or even combining contrasting colors to create a truly unique look.
The texture of the spiral can be adjusted based on how tightly or loosely you tie your knots, allowing you to control the final appearance—whether you want a subtle twist or a more dramatic coil.
If you want to see how these sennit patterns are made, you can watch the full video here: "5 Sennit Patterns for Plant Hanger Posts"
In the video, you'll find step-by-step instructions that make it easy to follow along and try out each pattern.
It's a great way to learn how to add these beautiful designs to your macrame projects.
7 Unique Knot Tying-Techniques to Start Your Wall Hanging
Now, as we transition from the world of plant hangers, let's shift our focus to another captivating canvas in the realm of macrame - wall hangings.
While the principles of macrame remain, wall hangings offer a broader canvas for artistic expression, enabling you to explore new dimensions and patterns.
Let's explore the basics of these seven distinct ways to start and end your wall-hanging projects, opening up even more possibilities for your macrame artistry.
When ready for an in-depth walkthrough, check our 7 Ways to Start and End a Wall-Hanging blog.
Starting a wall hanging may be where you get stuck when starting a new design.
Depending on what you have planned for the body of the design, there are specific ways to start a wall hanging that will go better with the overall look.

(AKA: Mounting Knots/Patterns on a Wooden Dowel Rod)
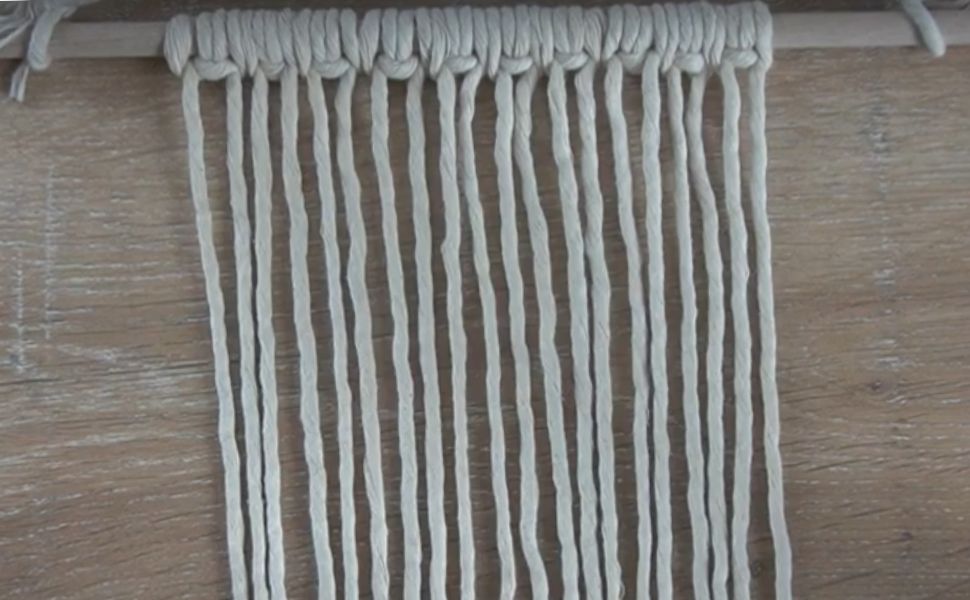
1. Lark's Head Knot
The Lark’s Head Knot is a must-know in the macrame world, especially when starting a wall hanging.
As one of the most essential and versatile knots, it provides a strong and secure foundation for your project.
It’s popular for a reason—simple, effective, and oh-so-clean.
This knot offers a polished look right from the get-go, setting the perfect tone for whatever design you have in mind.
The Lark’s Head Knot neatly anchors your cords to the dowel or rod and creates a tidy, uniform starting point for your macrame piece.
The beauty of this knot is that it works with any style—whether you're going for a sleek, minimalist look or an intricate, detailed design, the Lark's Head gives your wall hanging an elegant and professional vibe from the very first step.
And the best part?
It’s super beginner-friendly but still a staple for the pros.
Incorporating the Lark's Head Knot ensures you're starting your project on solid ground, ready to dive into more complex patterns and techniques as you go.

2. Lark's Head Knot with 2 Sections
If you're looking to mix things up and add some flair to your wall hanging, the Lark's Head Knot with 2 Sections is a fun and creative way to go.
This technique gives your design a fresh layer of complexity, turning a simple knot into something more dynamic.
By breaking up your cords into multiple sections, you can add depth, texture, and even a bit of drama to your project.
Think of it as layering for your macrame—each section brings a new dimension, making your wall hanging more visually stunning and unique.
Want to add bold patterns or play with different colors?
This knot variation allows you to experiment and create something that stands out.

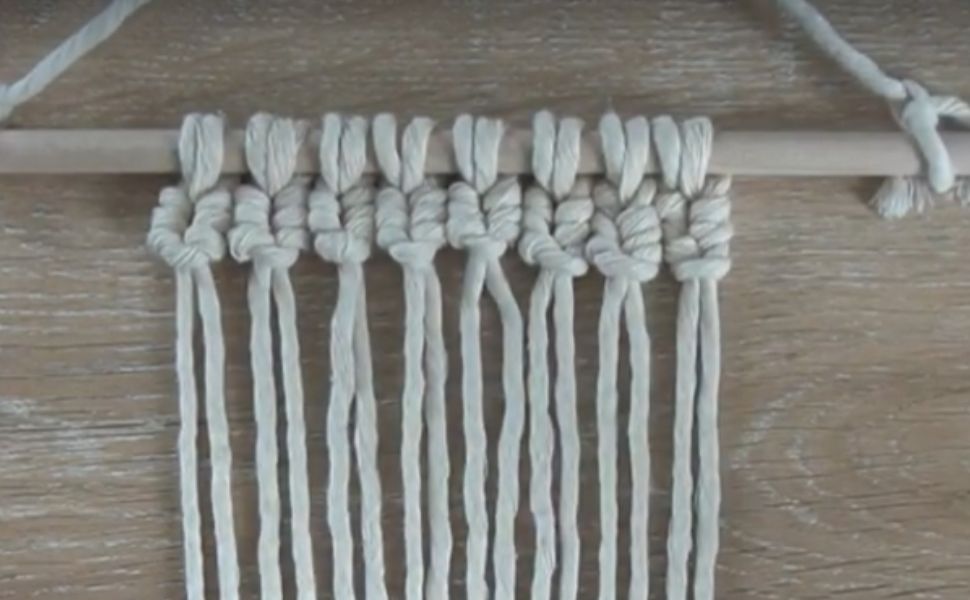
3. Lark's Head Knot Plus Half Hitch Knot
Looking to take your macrame up a notch?
The Lark's Head Knot combined with a Half Hitch Knot is the perfect way to do just that.
This dynamic duo not only secures your cords but also adds some serious structure and style to your design.
Think of it as the foundation that makes your macrame masterpiece stand out.
By blending the simplicity of the Lark’s Head with the strength of the Half Hitch, you can cover more space on your mounting object with ease.
This combo creates perfectly spaced vertical cords, making it a dream for knot patterns like the vertical Double Half Hitch or any weaving techniques you want to throw in.
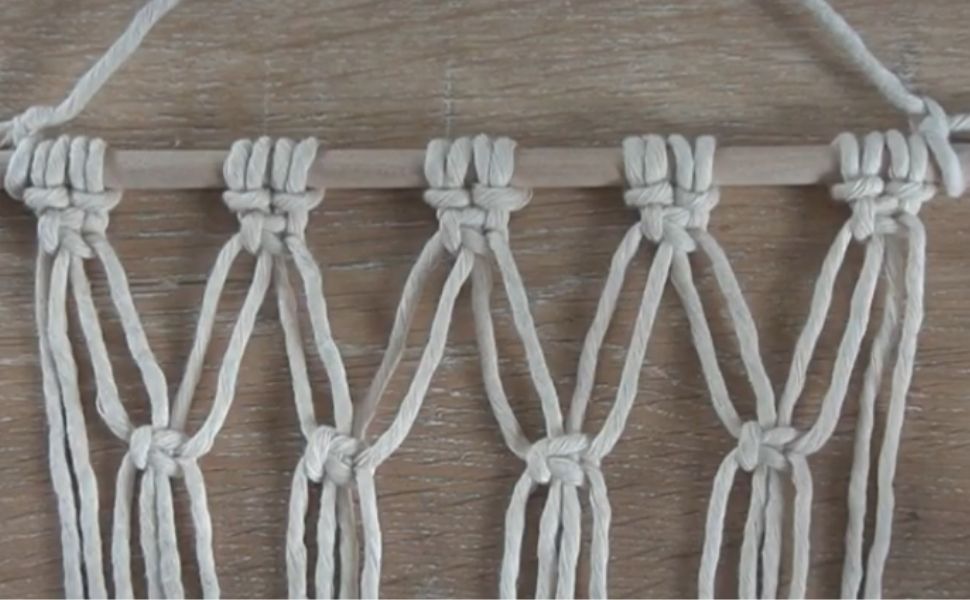
4. Triple Loop Mount Knot
For a bold and eye-catching start to your macrame piece, the Triple Loop Mount Knot is a fantastic choice.
This knot forms three distinct loops, immediately adding depth and texture to your design and making it stand out from the usual starting points.
Perfect for wall hangings or other mounted projects, the Triple Loop Mount Knot gives a rich, layered look that draws attention and sets the tone for the rest of your creation.
This knot creates a striking visual element above the mounting object by incorporating three loops, adding both height and dimension.
It’s ideal for designs where you want to make a statement from the beginning, offering a structured yet artistic touch.
The extra loops add beauty and provide more surface area to work with, allowing you to introduce additional cords, beads, or other embellishments for even more creative flair.
The Triple Loop Mount Knot is especially effective when creating a dramatic entrance to a wall hanging, giving it a more sculptural feel.
It provides a strong foundation while also serving as a decorative feature in its own right.
This knot works well with various cord sizes and materials, making it a versatile choice for any project.

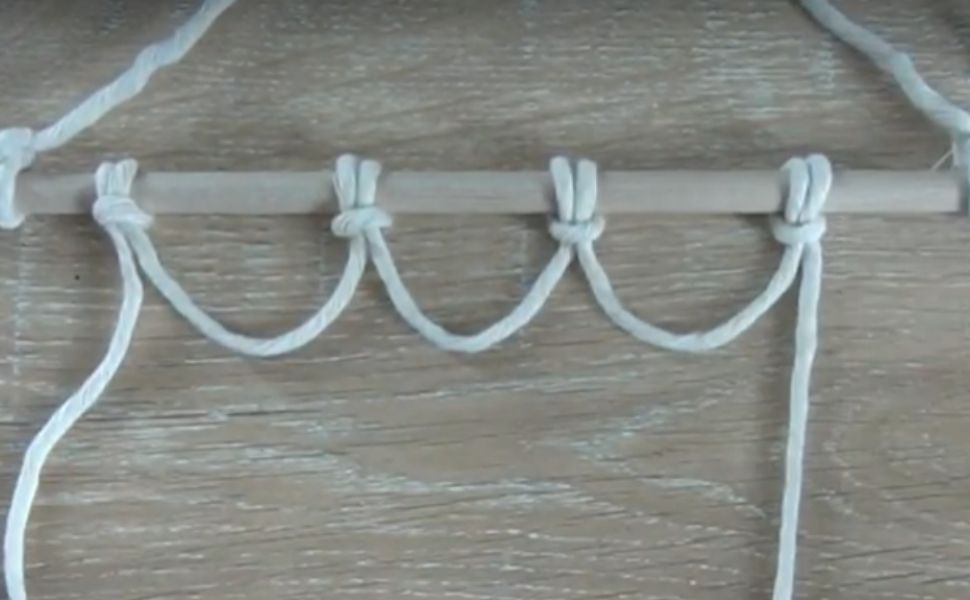
5. Cat’s Paw Hitch Knot
The Cat’s Paw Hitch Knot is the perfect way to infuse a bit of charm and whimsy into your macrame projects.
As the name suggests, this decorative knot mimics the playful look of a cat’s paw, instantly adding a fun and unique element to your design.
Whether you're creating a wall hanging, plant hanger, or any other macrame piece, the Cat’s Paw Hitch Knot offers an eye-catching starting point that stands out.
What makes this knot special is its ability to add personality and creativity to your work.
The knot's distinct loops resemble a paw, giving your piece a sense of movement and texture. It’s an ideal knot for those looking to break away from traditional designs and experiment with something more playful.
The Cat’s Paw Hitch Knot works beautifully as both a functional knot and a decorative accent, setting the tone for the rest of your macrame creation.
Beyond its visual appeal, this knot provides a secure and robust foundation for your cords, making it practical and artistic.
It’s perfect for projects where you want to introduce a touch of creativity right from the beginning while maintaining the structural integrity of your design.
For those who love bringing a little personality into their macrame, the Cat’s Paw Hitch Knot is a great way to do that. Its playful, paw-like structure adds a lighthearted yet elegant touch to any project and pairs well with various macrame techniques and patterns.
Plus, it’s versatile enough to work with different cords and materials, allowing you to customize the look to suit your style.
6. Lark's Head Scallop
Elevate your macrame wall hanging by incorporating the Lark's Head Scallop technique, a decorative twist on the classic Lark's Head knot.
This method allows you to create a beautiful scalloped edge at the top of your piece, adding a delicate, artistic flair that immediately draws the eye.
The gentle curves of the scallop give your macrame a soft, flowing look, making it perfect for anyone looking to add a touch of elegance to their design.
Instead of simply attaching your cords to a dowel or mounting object, the Lark’s Head Scallop lets you connect them to a scalloped cord.
This unique approach provides an extra layer of texture and dimension to your wall hanging, offering a dynamic starting point that makes the entire piece feel more intricate and refined.
It’s ideal for breaking away from traditional straight edges and giving your project a more handcrafted, personalized appearance.
Not only does the Lark’s Head Scallop add visual interest, but it also opens up more creative possibilities for the rest of your design.
The scalloped cord is a base for attaching additional cords, embellishments, or even different knot patterns, allowing you to experiment with layering and new textures.
It’s the kind of decorative detail that transforms a simple project into a standout work of art, making your macrame creation unique.
7. Square Knot Triangle
Add a bold geometric flair to your wall hanging with the Square Knot Triangle technique.
This method involves forming an upside-down triangle as a mounting point using a series of square knots, instantly giving your macrame piece an intriguing and modern look.
The triangle's clean lines and defined shape bring a touch of structure and style, making it the perfect addition for anyone wanting to infuse a little geometry into their design.
Arranging your square knots in a triangular pattern creates a focal point that sets your piece apart from the usual straight-edge starts.
The triangle is a decorative and functional feature, adding visual interest while providing a solid base to attach additional cords or embellishments.
An eye-catching element brings balance and symmetry, giving your wall hanging a more polished and artistic feel.
The beauty of the Square Knot Triangle is in its versatility.
Depending on your design vision, you can customize the size of the triangle to suit your project, making it a bold statement piece or a subtle accent.
This technique is great for macrame makers of all levels. It’s simple to execute but offers a big visual impact.
7 Unique Knot Tying-Techniques to End Your Wall Hanging
(AKA: Knots to sign off the project with)
Now that you’ve mastered a few creative ways to kick off a wall hanging, it’s time to think about how to finish it with flair.
How you end a macrame wall hanging can make or break the design.
Those final knots and details boost your piece, transforming it from "almost there" to "ready to show off."
A well-crafted finish completes the look and gives your creation a polished, professional touch that makes all the difference.
So, let’s dive into some fun ways to tie it all together.
1. Fringe
A fringe finish is the classic, go-to choice that instantly adds a touch of bohemian charm to any macrame wall hanging.
It’s the perfect way to give your piece a free-spirited, relaxed vibe while adding texture and movement.
The beauty of fringe lies in its versatility—you can completely customize the length, thickness, and style to match your aesthetic and vision.
Want a clean, horizontal look?
Trim the fringe evenly across the bottom for a neat finish.
If you're feeling bold, try shaping the fringe diagonally for a dynamic and modern twist.
Layering fringe can add extra depth and dimension to your piece, creating a more intricate, textured design that stands out.
You can even mix up cord colors or thicknesses within the fringe to add pops of color or variety.
You can leave the fringe loose and natural for an organic look or get creative by combing it out, twisting it, or knotting sections for added detail.
It’s a simple way to elevate your wall hanging from ordinary to eye-catching, allowing you to make each piece uniquely your own.
No matter how you choose to style it, fringe gives your macrame design that perfect finishing touch, effortlessly blending into a wide range of styles—from minimalistic to eclectic boho.
It's the final detail that brings your wall hanging to life, making it a true reflection of your creativity.

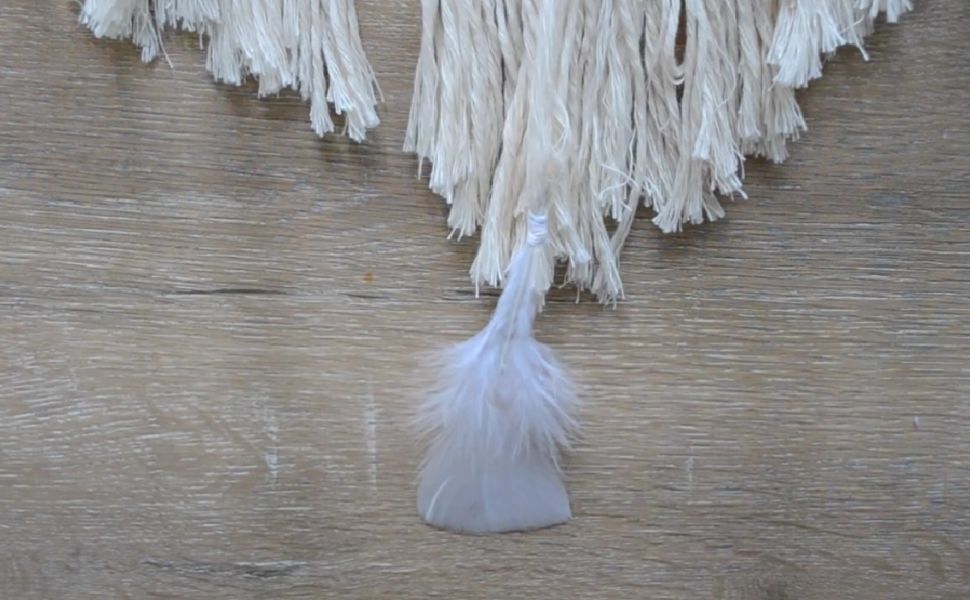
2. Feathers Using a Gathering Knot
Give your macrame wall hanging a fresh, natural vibe by adding feathers with a gathering knot.
This simple yet stunning technique brings an organic, boho touch to your design, adding softness and a whimsical element that will catch the eye.
Feathers instantly create a flowy, earthy feel, making your piece stand out with a touch of the wild.
Using the gathering knot, you can seamlessly secure the feathers to your cords, keeping them firmly in place while adding a decorative, polished look.
It’s not just functional—it’s stylish!
The knot wraps around the feather’s stem and the cords, pulling everything together neatly while highlighting the natural beauty of the feather itself.
The fun part?
You can totally make this your own!
Choose natural feathers for a rustic, grounded look, or go bold with bright, colorful ones that pop.
Layer them for a fuller effect, mix up sizes for playful contrast, or arrange them as a focal point to make your design unique.
Feathers add a free-spirited, nature-inspired vibe to your macrame, balancing the structure of the knots with something more airy and fluid.
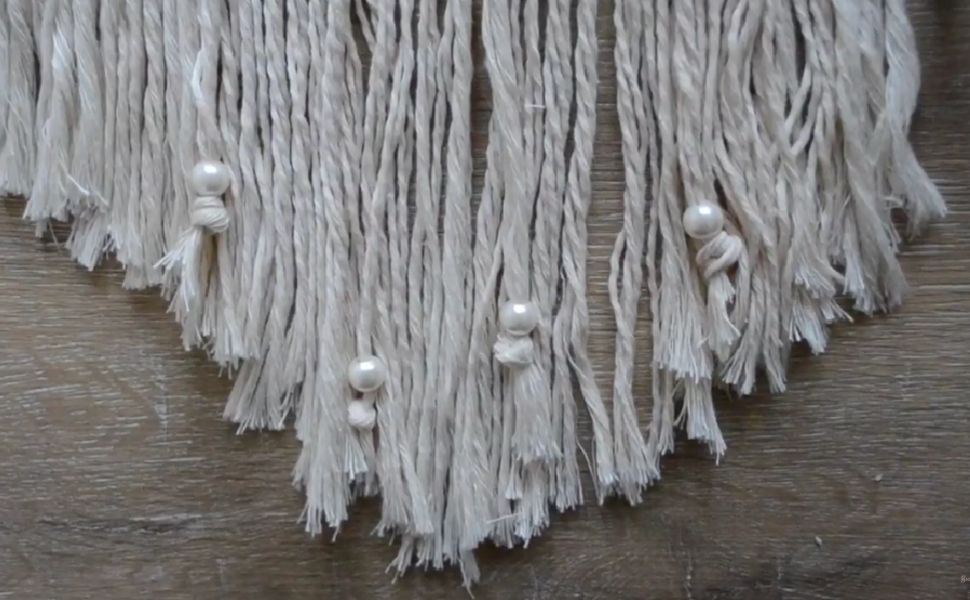
3. Beads Using an Overhand Knot
Want to add a bit of sparkle and personality to your macrame wall hanging?
Beads secured with overhand knots are the perfect way to take your design from simple to stunning!
This easy technique brings a sophisticated touch, instantly elevating your project with extra texture, shine, and dimension.
Using an overhand knot to secure each bead is as simple as it gets—tie a knot before and after it to lock it in place.
Not only does this keep your beads from sliding around, but it also gives them their little spotlight within your design.
Who doesn’t love a little extra flair?
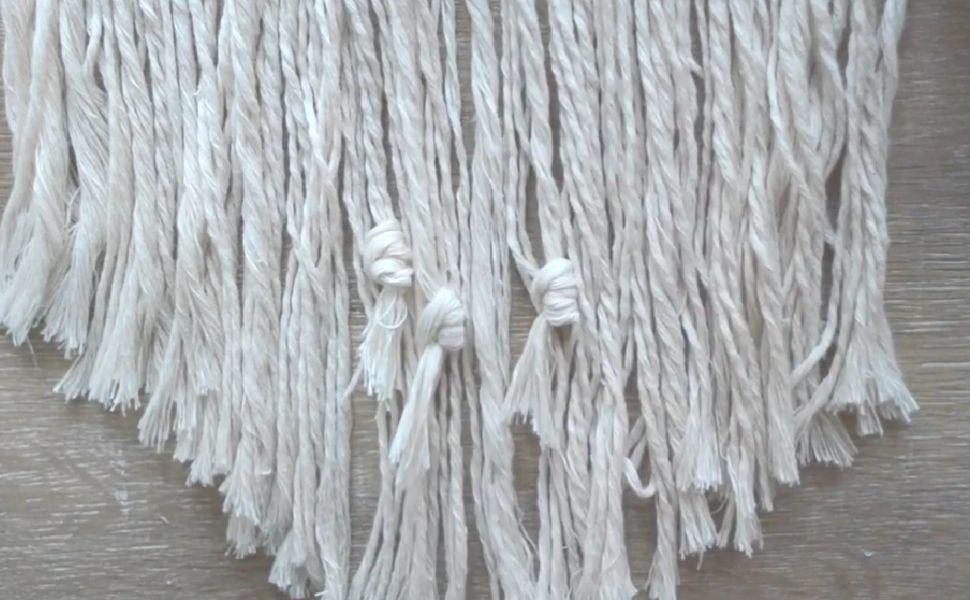
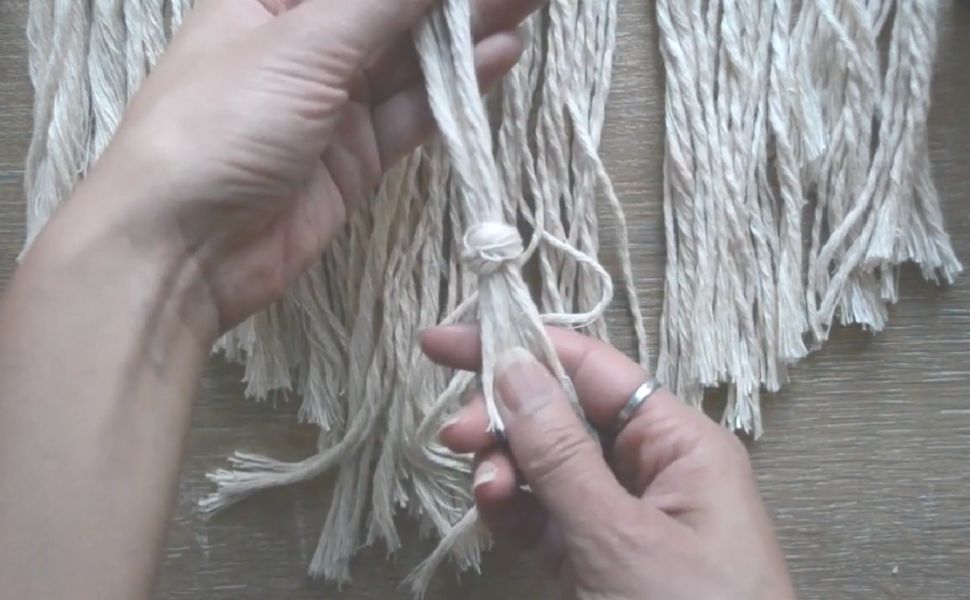
4. Barrel Knot
For a genuinely artistic and polished finish, the Barrel Knot is a perfect choice to wrap up your macrame project.
This knot secures the end of your cords and adds a stylish, decorative touch that elevates your wall hanging from simple to stunning.
Its unique, cylindrical shape brings a sculptural element to the design, making it more than just a functional knot—it’s a finishing flourish that grabs attention.
The Barrel Knot is especially fun because it creates a bold, textured end to your work, almost like a small, coiled bead made of cord.
It’s a great alternative to the more common finishing knots, giving your project a sophisticated, handcrafted look.
Plus, it’s versatile! You can use it as a single, standout knot at the bottom of your wall hanging or incorporate multiple Barrel Knots to create a pattern or add visual interest.
This knot is also fantastic for adding weight and balance to your design, ensuring your wall-hanging drapes beautifully and feel well-composed.
If you want to infuse some personality into your work, the Barrel Knot can be styled in various ways—make it neat and tight for a more structured finish or leave it slightly looser for a casual, organic feel.
Don’t be afraid to experiment with placement.
You can use Barrel Knots at different points throughout your macrame piece, not just at the end.
Try placing them along key areas, like the center or transition points, to create a cohesive and artistic look.
You can even embellish your Barrel Knots with beads or pair them with other decorative elements to make your design pop.
5. Figure 8 Knot
The Figure 8 Knot is a beautifully artistic way to finish off your macrame wall hanging, adding functionality and style to your design.
Its distinct shape—resembling the number 8—creates a visually intriguing element that stands out, giving your project a unique, decorative edge.
This knot is a robust and secure way to conclude your work and doubles as a creative design feature.
What makes the Figure 8 Knot special is its sculptural look, which naturally draws the eye and adds depth to your macrame.
It’s more than just a way to secure your cords—it’s an aesthetic choice that elevates your wall hanging from functional to fabulous.
The looped structure of the knot creates a sense of movement, adding texture and character to your design.
It’s the perfect knot for those looking to add extra flair without overcomplicating things.
Versatile and easy to execute, the Figure 8 Knot can be placed at the ends of your cords to neatly finish your wall hanging, or you can use it throughout your design to add visual interest at various points.
For a bold, eye-catching effect, you can tie multiple Figure 8 Knots together in a row or mix them with other knots to create a dynamic, textured pattern.
You can also experiment with the knot size—make it large and loose for a relaxed, boho vibe, or keep it tight and small for a more polished, minimalistic look.
If you're feeling extra creative, you can embellish the Figure 8 Knot with beads, feathers, or even different-colored cords to make it stand out even more.

6. Rain Knot
The Rain Knot is where functionality meets artistry, offering a decorative twist to finish your macrame wall hanging with a touch of elegance.
Its intricate, cascading design—like drops of rain—adds a refined complexity that instantly elevates your piece, turning a simple project into something extraordinary.
This knot doesn’t just hold your cords in place; it’s a statement.
Its layered, detailed look brings texture and depth to your design, making it the perfect choice if you’re looking to add a bit of flair and sophistication.
The Rain Knot gives your wall hanging that "wow" factor, adding just enough complexity without overwhelming the overall aesthetic.
One of the best things about the Rain Knot is its versatility.
You can use it as a beautiful finishing touch at the bottom of your cords or even scatter a few throughout your design to add dimension and break up the flow.
Want to get really creative?
Try layering multiple Rain Knots for a stunning, cascading effect miming falling rain—hence the name!
It’s a gorgeous way to bring movement and life into your project.
If you’re all about personalizing your macrame, the Rain Knot gives you plenty of room to play.
Add beads, tassels, or even colored cords to make this knot pop and give your piece a one-of-a-kind vibe.
It’s easy to take your design up a notch, making your macrame stand out.
7. Tassels
Tassels are the ultimate way to bring your macrame wall hanging to life.
Adding tassels is like giving your piece a final flourish of creativity and charm, turning even the simplest design into something that feels luxurious and eye-catching.
There’s just something so magical about the way tassels move—they add a soft, playful vibe that gives your wall hanging more depth and personality.
You can go for long, dramatic tassels that make a bold statement or keep them short and sweet for a more minimal look.
And let’s not forget about the fun you can have with color—mix and match shades to create a vibrant, layered effect, or stick to one color for a sleek, modern finish.
Want to add even more flair? You can embellish your tassels with beads, feathers, or extra fringe for a boho-luxe touch.
It’s all about making the piece uniquely yours, and tassels are the perfect way.
So, if you want to elevate your wall hanging from ordinary to extraordinary, don’t overlook the power of tassels.
They’re the perfect finishing touch to add texture, movement, and personality to your design.

As you explore these different ways to start and finish your macrame projects, remember that each technique adds a unique vibe to your creations.
Whether you’re working on a simple plant hanger or an intricate wall hanging, these methods let you put your personal stamp on every piece.
Get creative—mix and match these starting and finishing techniques with the knot patterns we’ve talked about earlier, and watch your macrame art take on endless possibilities!
And guess what’s next in your macrame journey?
It’s time to dive into the exciting world of designing unique macrame projects!
While we get into all the juicy details inside the Bochiknot Macrame Community, here’s a sneak peek for you.
How to Start Designing Your Own Macrame Projects
Do you know what really gets my creative juices flowing in macrame?
I take an existing pattern and give it my own twist.
This is a great transitioning method from beginner to creating your own designs.
Sometimes, it's as simple as repeatedly changing one knot or mixing up a specific section.
It's incredible how a single knot swap or addition can add that touch of uniqueness to your creation.

Here are a few easy ways to switch up knots in your macrame project to create unique variations:
- Square Knots: For a different texture, swap them with half-hitch knots or try Double Half-Hitch knots for more complexity.
- Overhand Knots: Replace them with Figure Eight knots for added detail or Barrel knots for a clean finish.
- Alternating Half-Hitch Knots: Switch these for Half-Knot Spirals to create a spiraling effect.
- Lark’s Head Loops: Try using a Square Knot chain pattern instead for a denser look.
Mixing and matching these knots in your macrame allows you to create new patterns and textures, making your project truly special.
Simple Tweaks, Stunning Results: How to Personalize Macrame Patterns
There’s nothing worse than being told how to do something and thinking, "Have they actually tried this themselves?"
I totally get it!
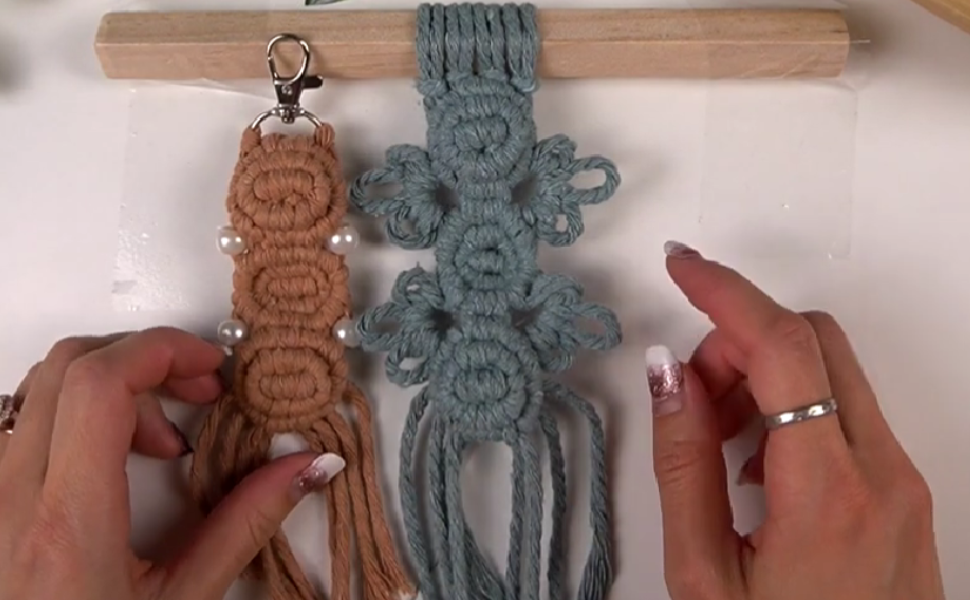
That’s why I will walk you through my creative process using one of my macrame tutorials—the Bobble Keychain—to show you exactly how easy it is to change up a design.
When repeated, the bobble keychain pattern creates charming loops along the sides.
It’s a lovely design on its own, but here’s where the fun comes in—making it your own with a simple twist.
One way to do this is by adding an embellishment like I did here with a bead.
This small addition completely transforms the look and feel of the keychain, giving it a fresh, personal touch.
Adding a bead between sections or swapping out a knot allows you to customize the design to suit your style.
It’s amazing how little tweaks can make a standard pattern unique. Whether adding texture, color, or extra elements, the key is to play around and see what feels right for you.
That’s the magic of macrame—there’s always room to get creative and make it your own!

Here’s the fun part: with a bit of creativity and knotting, you can quickly transform the loops in this simple project into something entirely different.
Let me show you the unique designs I created by giving those loops a fresh twist.
Making the Change
I went through some of my old macrame projects and found a design I loved.
Instead of keeping the loops plain or adding a bead, I decided to try something new—I added a whole knot pattern inspired by another design I had worked on before.
For this new version, I replaced the beads with alternating Half-Hitch knots on both sides, which gave the loops a completely different look.
I loved the idea of keeping the loops, so I decided to leave some sections of the Double Half-Hitch knots loose, creating smaller and larger loops for added texture and dimension.

Important reminder:
When you change an artist’s pattern, it’s essential to consider how much you’ve altered before calling the piece your original design.
If you've only changed about 10% of the original pattern, whether a wall hanging or plant hanger, it’s still primarily based on the original work.
Some artists may feel that small changes don’t make the piece entirely new, so always give credit where it’s due to respect the original designer’s creativity.
If you want a detailed walkthrough of my process or to learn how to create your own macrame designs from scratch, check out my "How to Create Your Own Designs" series inside the Bochiknot Macrame Community.
You'll also find a step-by-step guide in the Intro to Macrame Design tutorial.
The Best Macrame Knot Guide Out There
When learning macrame, having a complete knot guide can be a game-changer. That’s why I’ve created a free ebook: "50 Macrame Knots & Sennit Guide" to help you master the art of knotting.
This guide is your go-to resource, giving you everything you need to turn simple cords into beautiful macrame designs using common knots.

Now, let’s explore why this knot guide is such a valuable tool for any macrame lover.
Why a Knot Guide is Essential
A great knot guide is like a treasure chest filled with macrame secrets, showing you various techniques and patterns you can easily learn with practice.
Inside this guide, you’ll find 50 different knots—from beginner-friendly basics to more intricate techniques. It’s organized into categories like mounting knots, basic knots, vintage knots, sennits, chains, and unique knots that add style to your projects.
Here’s why a knot guide is so important:
-
Knowledge at Your Fingertips: With a wide variety of knots explained, you’ll have the freedom to choose the best one for each project. Knowing more knots opens up endless creative possibilities.
-
Improve Your Skills: The guide includes step-by-step tutorials that make learning each knot easy. The more you practice, the better you’ll get, leading to polished, professional-looking macrame designs.
-
Design Flexibility: Think of the knot guide as your palette. You can mix and match knots to create stunning textures and patterns, making your macrame truly unique.
-
Problem-Solving: If you hit a snag while working on a project, the guide is there to help. Clear instructions and illustrations make it easy to troubleshoot and find solutions.
-
Boost Creativity: As you explore the guide, you’ll find new ideas and techniques that will inspire you to try new designs, pushing your creativity further.
This guide is the key to unlocking your full macrame potential. It enhances your skills, encourages creativity, and helps you craft beautiful macrame pieces that truly stand out.
Get Started With Your Own Macrame Designs

Learning and creativity keep macrame exciting.
As you improve, you’ll move from mastering the basics to exploring more advanced methods, like intricate knots, personalizing your designs, and creating unique pieces.
Joining a macrame community that shares monthly themes and challenges can bring fresh inspiration and keep your creativity flowing, ensuring your macrame journey stays fun and full of new ideas.
We invite you to start or continue your own macrame adventure and explore the endless possibilities this art form offers.
Join a community of macrame lovers, and remember that in macrame—and in life—creativity has no limits.
So, grab your cords and let your artistic spirit take flight, one knot at a time.
-
Inspiration: Sharing your macrame projects can inspire other macrame enthusiasts. Whether a unique knot, a creative color combo, or a beautifully finished piece, your work can spark new ideas and motivate others to create.
- Community Building: When you share your macrame journey, you become part of a supportive and encouraging community. It’s a great way to connect with people who love macrame as much as you do, exchanging tips, tricks, and stories.
- Feedback and Growth: Sharing your work also opens the door to helpful feedback. Others can offer advice that helps you improve your skills and see things from different angles. Constructive feedback is a great way to grow as a macrame artist.
Where to Share Your Macrame Creations

Platforms like Instagram and Facebook are great places to show off your macrame creations.
Using the right hashtags can help more people find your work and connect you with the macrame community.
Don’t forget to engage with others by liking and commenting on their posts—it’s a great way to stay connected and motivated!
If you’re looking for a deeper macrame experience, join our Patreon community. There, you’ll get access to exclusive content, personalized guidance, and a supportive group of fellow macrame lovers.
What You'll Find on Our Patreon Community:

Our Patreon community offers that extra layer of excitement to macrame that you won’t find on YouTube with monthly themes or topics, and up-to-date news.
Each month, we dive into a specific area of macrame that allows you to broaden your horizons and discover new facets of this captivating craft. It's a journey that keeps your macrame experience fresh and inspiring.
Creating 3D Macrame Animal Sculptures
One month, we took macrame to a whole new level by exploring the art of crafting 3D animal sculptures.
Using macrame techniques, we brought creations like seahorses, turtles, and other beautiful animals to life.
This theme truly pushed the limits of what’s possible with macrame, transforming flat designs into detailed, three-dimensional art.
Our Patreon members had the chance to dive deep into sculptural knotwork, mastering the intricate techniques required to create these lifelike forms.
The process involved traditional knots and creative twists and techniques that allowed the cords to shape into complex, realistic figures.
It was a fun and challenging journey, perfect for those ready to advance their macrame skills and experiment with new forms of creativity.

Adding Textures into Your Designs
Texture can completely transform a macrame piece, adding depth, dimension, and character to your creations.
Whether aiming for a tactile feel or a visually striking pattern, textures can bring your macrame to life in ways that flat designs simply can’t.
We dedicated an entire month to exploring the art of adding textures to macrame, showing our Patreon members how to create pieces that truly stand out.
From layering different knot patterns to incorporating varying cord thicknesses and materials, we covered a range of techniques designed to add visual and tactile interest to macrame projects.
Members learned how simple changes, like switching from a tight knot to a loose one or mixing smooth and rough cords, can give their work a new look and feel.
We also dove into advanced techniques like creating raised sections, weaving in materials like wool or raffia, and even using knots to create textured surfaces that are as pleasing to touch as they are to look at.
By the end of the month, our members had mastered the art of texture, turning their macrame projects into truly dynamic, multi-dimensional works of art.

Design Your Own Macrame
While we’ve briefly introduced the idea of designing your own macrame projects here, on Patreon, we take a deep dive into the entire creative process.
We break down everything from concept development to execution, helping you choose the proper knots, patterns, and techniques to bring your vision to life.
You’ll learn how to plan your project, adjust for different sizes and styles, and even how to troubleshoot common design challenges.
You’ll build the confidence to create one-of-a-kind macrame projects that reflect your style through detailed video tutorials, expert tips, and personalized guidance.
Whether crafting intricate wall hangings, functional plant hangers, or experimenting with something entirely new, our Bochiknot Macrame community gives you the tools and support you need to master the art of macrame design.

Ready to Share and Grow?
We encourage you to share your macrame creations on social media, forums, and blogs.
Your unique perspective and creativity can inspire others and foster a sense of belonging within the macrame community.
And if you're eager to dive deeper into the world of macrame, don't hesitate to explore our Patreon community, where exclusive content and a supportive network await.
Together, let's continue to knot, create, and connect through the art of macrame.


Looking for Macrame Patterns and Projects?
I’ve got a fun variety of DIY macrame patterns for you to explore—whether you’re into creating unique wall hangings to spruce up your home or timeless plant hangers, there’s something for every skill level.
Each pattern is super easy to follow with step-by-step photos, clear instructions, and plenty of tips to help you along the way.
Ready to start creating?
Browse DIY macrame patterns on Etsy and dive into your next project.

P.S.
Psst!
We’ve created a dedicated series of blogs to help guide you through every stage of your macrame journey!
You have just completed the "Knots & Knot-Tying Techniques for STUNNING Patterns" of your Bochiknot macrame journey.
To catch up on the other blogs in this series, check them out here:
- START HERE: The Complete Beginner’s Guide to Macrame
- 12 Fun & Easy Macrame Projects to HELP YOU Get Started
- Macrame ESSENTIALS: Everything You Need—Cord, Tools, & Materials
- 9 SECRET Macrame Tips You’ve Likely Never Heard Of
- Turn Ordinary into EXTRAORDINARY: Adding Embellishments to Macrame
Up Next:
- Macrame's GOLDEN Ratio: How to PRECISELY Measure Cord for Projects
- How to Choose the BEST Macrame Cord for Your Next Project
- Introduction to Intricate Macrame Knot Patterns (MADE-EASY)
- INSPIRATION to CREATION: Your Macrame Design Guide
- Transform Your Macrame with EYE-CATCHING Design Elements
Make sure to subscribe to our email newsletter at the bottom of this page to stay updated on all the latest tips, tutorials, and updates. You won’t want to miss out!

Leave a comment