

































12 Macrame Tips for Beginners: Avoid Common Mistakes

LEARN WITH NICOLE WOO · PRACTICAL BEGINNER GUIDE
Your knots look different from the tutorial. One strand is suddenly short. The flat band you planned has become a spiral. Where do you start?
These 12 macrame tips for beginners help you spot what is happening and make one useful adjustment at a time. Start with the checks before cutting, follow the knotting tips while you work, and use the troubleshooting table when something looks off.
A great place to start is our free 50 Macrame Knots & Sennits downloadable PDF. Download it to get your feet wet with macrame and keep a knot reference beside you as you practice. Begin with the lark’s head, square knot, and double half hitch—you can explore the other knots as your confidence grows.
Brand new to the craft? Start with our complete beginner’s guide to macrame for the tools, first knots, and project choices. Use these 12 tips alongside it to troubleshoot your first projects. Our Macrame Journey roadmap shows how those first steps lead to stronger skills and your own designs.
YOUR FIRST PRACTICE SESSION
Start with one short row of square knots
Give yourself one small goal: repeat a knot, recognize it, and know which cord to pick up next. You do not need a finished project in this first session.
- Open the square knot lesson. Read its supplies and mounting instructions before cutting. Use its practice setup and light-colored cotton cord so the crossings are easy to see.
- Mount the cords securely. Use the lark’s head tutorial if that attachment is new. Count four hanging strands for one basic square-knot group.
- Tie a short practice chain. Follow the lesson slowly, completing both mirrored halves of each square knot. Keep the two center fillers in the middle.
- Pause and compare. Do the knots look similar in size? Does the chain lie flat when the loose cords are untwisted? Undo the first inconsistent knot and try again.
- Choose your first project. When the movement feels repeatable, pick a simple keychain from the free patterns below. Read that project’s own cutting list before starting.
Success looks like a repeatable movement and a recognizable knot. Small differences in a first sample are normal.
Your 12 macrame tips at a glance
Before you start
While you knot
BEFORE YOU START
Tips 1–5 · Choose, count, measure, and set up.
1. Choose a small pattern—and read it to the end

A first project should give you a chance to repeat a few knots and finish something useful. Choose a pattern with a clear cutting list, a manageable number of cords, and pictures or video of the tricky parts. A small keychain or practice panel is easier to inspect and undo than a large wall hanging.
Read the finishing steps before cutting. Check whether the pattern needs a ring, a bead with a particular hole size, a separate wrapping cord, or extra length for fringe. Gather those items first so you do not discover a missing part halfway through.
Test bead fit before you start: pass the actual number of cord ends required by the pattern through one bead. The hole diameter matters more than the bead’s outside size. Test with your chosen cord before buying a full set or knotting up to that point.
Try this: Write down the knot types and materials the pattern uses. Practice any unfamiliar knot on spare cord before starting the project.
2. Match the cord to the pattern, not just the color

Cord thickness and construction affect the size of each knot, the finished dimensions, and how much cord you use. Replacing 3mm single-strand cord with 5mm twisted cord changes more than the appearance; the original cutting list may no longer fit.
For a separate practice sample, a light-colored 3mm or 4mm cotton cord makes the crossings easier to see. Single-strand cord opens into a soft fringe. Three-ply cord needs untwisting before brushing. Braided cord does not necessarily brush out into a loose fringe.
Use the specified cord for your first attempt where possible. Our macrame cord guide explains how to compare constructions before substituting.
“Ply” is not a hanging-strand count. Three-ply cord contains three bundles twisted together into one cord. Keep them together for knotting unless the pattern explicitly asks you to separate them. For a side-by-side overview of cord and equipment, use our complete cord, tools, and materials guide.
Try this: Check the thickness, construction, and fiber on the label. Make a sample if any of those differ from the tutorial.
3. Count cut cords and hanging ends separately

A “cord” in a cutting list usually means one length cut from the roll. Once that length is folded over a dowel, it creates two hanging ends. Confusing those counts can leave you with twice as much cord—or only half the strands you need.
For example, eight cords cut to 2m each use 16m of cord. Folded equally, they give you 16 hanging ends, each slightly shorter than 1m after mounting. This is a counting example, not a cutting list for a particular project.
Check the units and the fold: confirm whether a measurement describes the full cut cord or the length hanging after folding. Do not double a listed cut length automatically. Keep your cutting list in one unit; 1 inch equals 2.54cm, and 1m equals 100cm.
Try this: Label each bundle with quantity × cut length. Count the hanging ends again after mounting. Follow any instruction to fold off-center; some patterns deliberately give working ends more length.
4. Test cord use before changing the cutting list

There is no single cord-length multiplier that fits every design. Dense knots, open gaps, mounting methods, cord thickness, and fringe all change the amount needed. In many patterns, working strands use more cord than filler strands.
When following a tutorial, begin with its cutting list and specified materials. If you change the design or cord, knot a small repeat using the same cord and tension. Record the starting length of each strand, its remaining length, and the height of the finished repeat. Undo the sample if you want to reuse the cord.
Use that sample to estimate the repeated section, then account separately for mounting, non-repeating sections, fringe, finishing tails, and a margin for adjustment. Our guide to measuring macrame cord walks through the planning decisions.
Try this: Measure without stretching the cord. Lay each new length beside a tape measure instead of repeatedly copying a cut strand that may have shifted or stretched.
A cord-use example you can follow
Illustrative numbers only: these show the calculation, not a tested cutting list. Measure your own sample with the cord, knot pattern, and tension you will use.
After mounting, imagine each hanging strand has 100cm of free length. You tie one repeat that is 2cm tall and measure what remains:
| Strand role | One 2cm repeat | Ten identical repeats |
|---|---|---|
| One working strand | 100cm − 88cm left = 12cm used | 12cm × 10 = 120cm |
| One filler strand | 100cm − 97cm left = 3cm used | 3cm × 10 = 30cm |
Ten repeats would make about 20cm of knotwork in this example. The 120cm and 30cm figures cover only that repeated section, per strand. The 100cm test strand would not be long enough for all ten repeats.
Before making a cutting list: add the actual allowances for mounting, other sections, fringe, finishing tails, and adjustments. If one cut cord is folded into two hanging ends, combine the requirements for both ends and the mounting allowance. Use an off-center fold only when the pattern or your tested plan calls for it.
Measure each working and filler strand separately. Their use can differ, and their roles may change later in the pattern. Do not apply these example amounts to a different design.
Practice this skill: plan cord lengths from your own sample →
5. Secure the project at a comfortable working height

If the dowel slides or the whole piece lifts when you tighten a knot, consistent tension becomes harder. Secure a small project to a suitable board or stable surface. For hanging work, use a stable rack or support with hooks that fit the dowel or ring.
Keep the section you are knotting within easy reach, with your shoulders relaxed. Adjust the height as the work grows. Place a light where you can see the cord crossings, and pause regularly rather than pushing through tired hands.
Try this: Give the setup a gentle pull before mounting every cord. It should stay steady. Start with a suitable support you already own; a full studio setup is not required.
WHILE YOU KNOT
Tips 6–10 · Understand the cords and check each repeat.
6. Learn what each strand is doing
In a basic four-strand square knot, the two outer working strands move around the two center filler strands. In a double half hitch row, working strands knot around an anchor cord that sets the direction. These roles can change elsewhere in a pattern.
Learning the roles helps you understand an instruction instead of copying a hand movement without knowing which strand to pick up. Begin with the lark’s head attachment, square knot, and double half hitch, using the tutorials below.
Try this: Before each new knot, identify the working strands and the filler or anchor strands. Pause the tutorial after each movement until you can follow the cord path.
Find the four strands before you tie
This is a position map for a basic square knot, viewed from the front before tying.
Working strands move around the two fillers. For a double half hitch row, identify the separate anchor or holding cord that sets the line; see the photographed examples in Tip 9. Strand roles can change as the pattern changes.
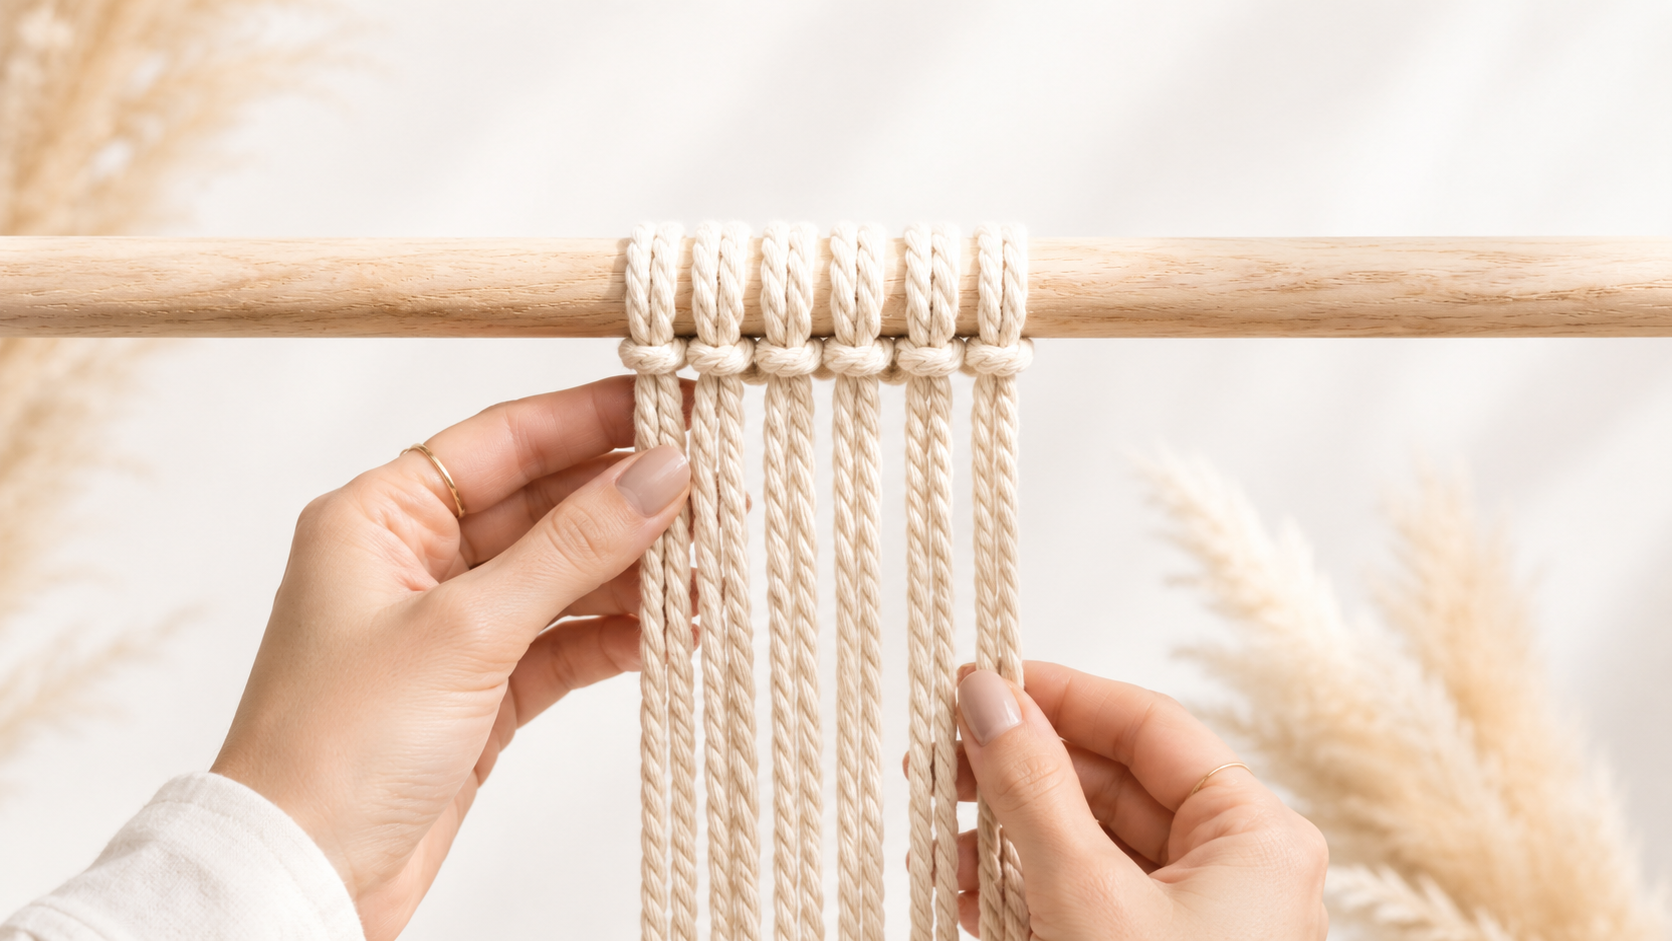
Lark’s head
Attach a folded cord to a dowel or ring. Check whether the pattern calls for the standard or reverse version.
See The Knot Tutorial →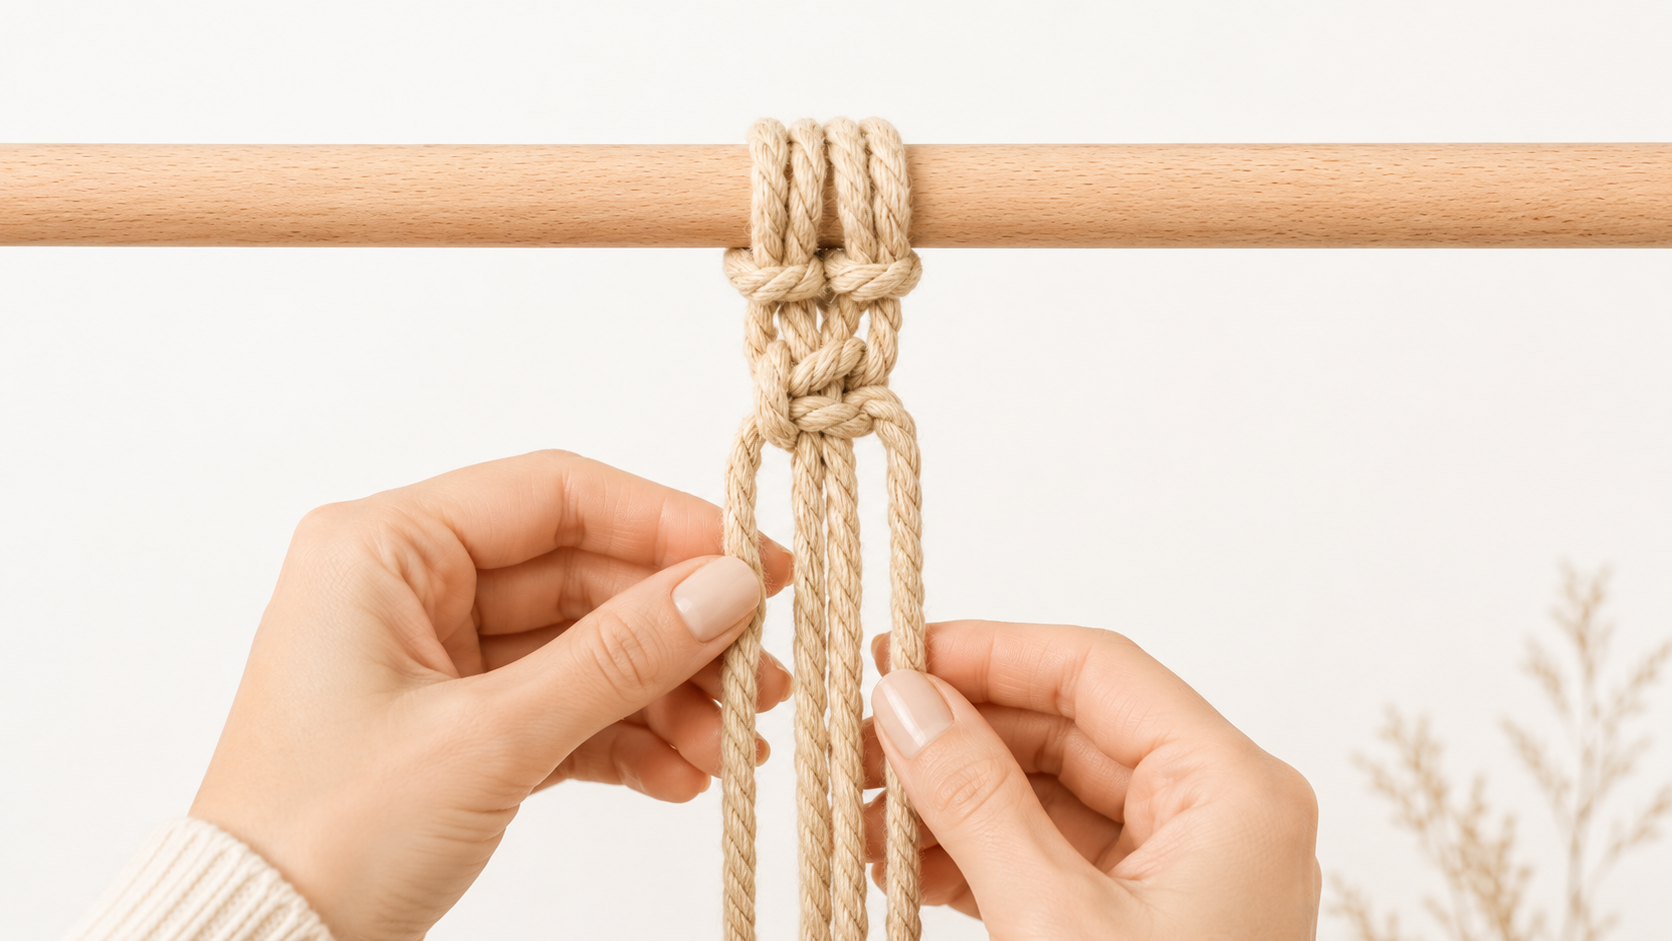
Square knot
Use two working strands around two fillers. A complete knot has two mirrored halves.
See The Knot Tutorial →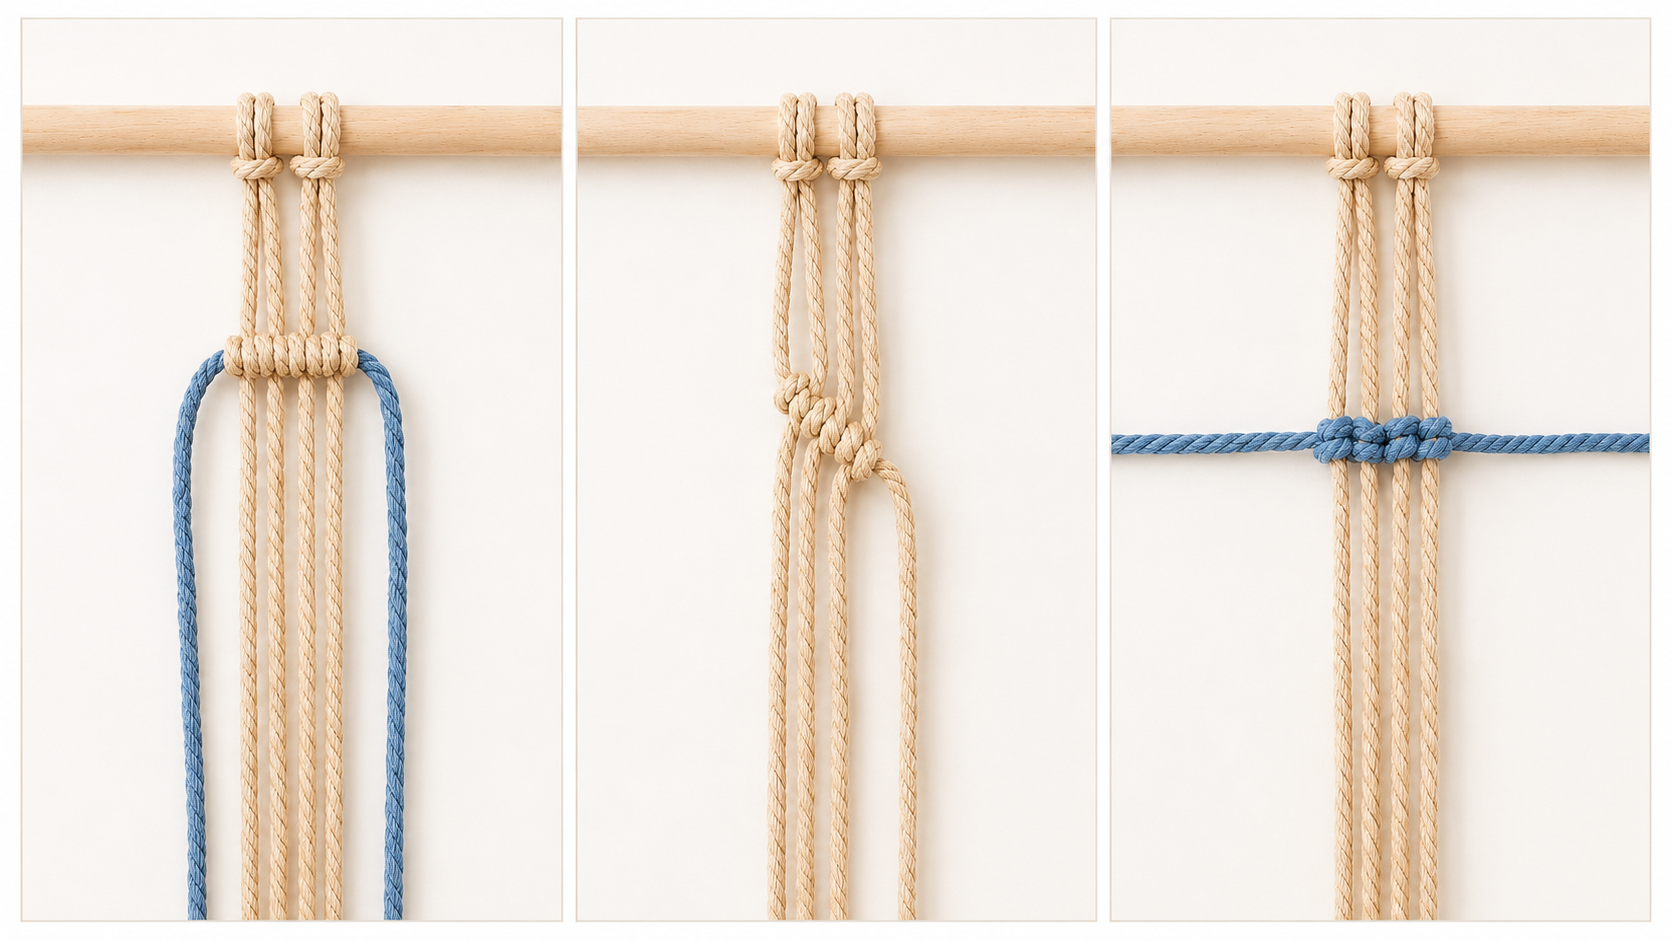
Double half hitch
Make two half hitches with one working strand around the anchor cord.
See The Knot Tutorial →A quick knot abbreviation key
- LH
- Lark’s head: mounts a folded cord to a support.
- RLH
- Reverse lark’s head: the reverse-facing mounting version.
- SK
- Square knot: two mirrored half knots.
- DHH / DHHK
- Double half hitch: two half hitches around an anchor cord.
Always read the pattern’s own key. Abbreviations and the words “cord,” “strand,” “filler,” and “anchor” can be used differently.
7. Aim for even tension, not the tightest knot


Pulling every knot as hard as possible can make the work stiff and difficult to adjust. Very loose knots can leave gaps or slip out of alignment. Aim for the same snugness in comparable knots throughout a section.
Keep the support and your hand position consistent. Bring each knot into place, check its neighbors, and make small adjustments. A row that narrows, widens, or tilts is a reason to stop and compare the cord count, spacing, and tension.
Try this: After a few knots, step back and compare their size. Correct the first uneven knot before adding more rows. Do not pull harder on the whole piece to hide one loose knot.
Once you can repeat the basic knots, our Stage 2 guide to improving your macrame skills takes you further into neat rows, cord repairs, and clean finishes.
8. Alternate the starting side to keep square knots flat

A complete square knot has two half knots that start from opposite sides. Repeating a half knot from the same starting side produces a spiral. That spiral is a useful design when intended, but it is a common surprise when you wanted a flat band.
Follow the cord path slowly: complete the first half, then mirror the movement for the second half. Check the finished pair before repeating it. A physical twist in the hanging cords can also affect how a section sits.
If the band keeps spiraling, compare your movements with the square knot tutorial before tightening the next knot.
Try this: Practice a short chain of complete square knots. If it spirals, check whether you have been repeating just one half rather than alternating sides.
Practice this skill: compare the flat and spiral sequences →
9. Let the anchor cord guide double half hitch rows


For a diagonal double half hitch row, hold the anchor cord along the line you want to create. Each working strand makes two half hitches around that anchor before you move to the next strand. Changing the anchor angle midway changes the row.
Keep the anchor steady while snugging each hitch into place. Bring the second hitch alongside the first so the pair sits together. Avoid swapping the working and anchor cords accidentally.
For a diamond, compare the two sides as you work. These double half hitch tips explain anchor position, spacing, and adjustments in more detail.
Try this: Practice one short diagonal in each direction. Check that every working strand has made two hitches before moving on.
The anchor follows the intended line, and each working strand completes two half hitches.
If the row unexpectedly bends, check whether the anchor angle changed or a working strand became the anchor. Rework that section before continuing.
Practice this skill: follow Nicole’s anchor and tension lesson →
10. Bundle long ends and check each repeat

Loose ends can twist together while you pull working cords through loops. Bundle excess length separately with small clips, clothespins, or cord bobbins, leaving enough free length to form the next knots. Release more cord as needed; do not clip across the section being knotted.
Use a simple card spacer if the pattern calls for repeated open gaps. Count the strands in each group before the next row, especially when alternating square knots. Mark the front discreetly if you keep turning the piece over.
Protect unraveling ends: test a small piece of removable tape around an offcut, then wrap only the loose tips that need it. Leave those tips outside the knotwork and remove the tape before finishing. Avoid repeatedly trimming fuzzy ends while you work; that uses up the length you may need later.
Try this: At the end of a repeat, check strand count, spacing, and left–right alignment. Take a quick progress photo and mark your place in the pattern before a break.
Practice this skill: check groups in alternating square knots →
FIX AND FINISH
Tips 11–12 · Correct small mistakes and finish with care.
11. Undo the first mistake before it spreads

If a row looks wrong, find the last correct knot and compare what came next. Loosen the most recent knots in reverse order until the error is accessible. Ease loops apart rather than tugging hard on a single strand, which can tighten the knot or roughen the fibers.
If a strand is running short, stop before trimming anything. Check whether the wrong strand has been working, whether an unequal fold was missed, or whether a substitution changed cord use. Adding cord is possible in some designs, but the join must suit the location and purpose of the piece.
Try this: Keep tails long while you troubleshoot. For a plant hanger or another item carrying weight, use the pattern’s appropriate structural repair or remake the affected section; do not rely on glue to compensate for a short cord.
12. Finish the fringe last—and save useful notes

Complete and secure the knotwork before deciding the final fringe length. For a brushed finish, separate the cord as its construction requires, support the knotted edge, and comb gently from the ends upward in small sections. Test on an offcut first if you are unsure how the cord opens.
Trim gradually. Check the piece in its intended position—hanging for a wall hanging, flat for a coaster—before the final cut. Fringe can shift as it settles, so leave room for a light final tidy-up.
A macrame fringe comb and sharp macrame scissors are useful here. Save usable scraps for knot practice and record the cord, cut lengths, changes, and finished dimensions. Those notes make your next attempt easier to repeat.
Ready to turn those notes into an original piece? Our Stage 3 guide to designing your own macrame walks you from a first sketch through sampling and a cutting plan, with a free design planner to organize your ideas.
Try this: Before cutting, check both edges and the center. If you plan to use a stiffener or cleaning product, test it on spare cord first and follow its instructions.
WHEN SOMETHING LOOKS OFF
Common macrame mistakes and what to check first
| What you see | Check first | What to do next |
|---|---|---|
| A square-knot band spirals | Are both halves starting from the same side? | Undo to the last correct knot and alternate the starting side for each half. Also check for a physical twist in the hanging cords. |
| A row narrows or slopes | Compare strand count, knot tension, and spacing. | Find where the change begins. Adjust or remake that small section before adding another row. |
| One working end is much shorter | Check the cutting list, fold position, and strand roles. | Pause before cutting. Some length differences are expected; a repair or replacement depends on the pattern and where the strand is used. |
| Double half hitch knots have gaps | Check the anchor angle and the position of both hitches. | Keep the anchor steady and snug each pair together. Rework uneven knots while they are accessible. |
| Fringe stays clumped or will not open | Check the cord construction. | Untwist plied cord if needed and test combing an offcut from its ends upward. Braided cord may not give a brushed finish. |
| The piece differs in size from the tutorial | Compare cord thickness, construction, tension, and mounting. | Measure a sample before remaking it. Changing the cord can change the finished size even when the knot count is identical. |
Choose a few useful supplies
You can start with the cord specified in your pattern, scissors that cut it cleanly, a tape measure, and a stable support. Add a comb when the project calls for brushed fringe. Use what you already own where it does the job.

Single-strand macrame cord
Choose the thickness your pattern specifies. For a separate practice sample, a light 3mm or 4mm cotton cord helps you see the crossings and opens into soft fringe.
Shop Single-Strand Cord →
Rose gold macrame scissors
Make clean cord cuts and trim the final fringe in small passes. Keep the finishing cut until the knotwork is secure and you have checked the outline.
Shop Macrame Scissors →
Macrame fringe comb
Separate suitable cord gently, working from the ends upward while supporting the knots. Try an offcut before combing the entire fringe.
Shop The Fringe Comb →Before your next project: a quick checklist
- I have read the pattern through to the finishing steps.
- My cord thickness and construction match—or I have tested a substitute.
- I have checked the quantity, cut length, units, and fold position for each bundle.
- I have the right ring, dowel, beads, or other pattern-specific materials.
- My support is stable and the knotting area is easy to reach.
- I can identify the working, filler, and anchor strands used in this pattern.
- I will check each repeat and keep finishing tails long until the end.
Put one tip into practice with a free pattern
Choose a project you want to make, read its materials and knot list, and focus on one skill at a time. These free macrame patterns and tutorials give you somewhere to begin.
Your next step: choose one free pattern below and practice one skill from this article. Keep the free knot guide nearby for reminders. When you want ongoing lessons and community support, explore the Patreon options further down.

Macrame keychain patterns
Compare small projects and choose a design with knots you are ready to practice.
Explore Keychain Patterns →
No-ring plant hanger
Follow the pattern’s cord and finishing instructions, and practice keeping repeated sections even.
Open The Plant Hanger →
Flower coaster with beads
Try a compact decorative project, checking bead fit and the final fringe before trimming.
Open The Coaster Pattern →
KEEP A KNOT REFERENCE NEARBY
A little help between tutorial pauses
Revisit a knot before repeating it across your project. Our free 50 Macrame Knots & Sennits guide gives you a reference to return to as you learn.
Get The Free Knot Guide →Beginner macrame questions, answered
What is the easiest macrame project for a beginner?
A small practice panel or simple keychain is a manageable starting point. Choose a tutorial with a clear cutting list and only a few knot types. Project size alone does not determine difficulty; check the techniques before cutting.
What cord should I buy to learn macrame?
For a stand-alone practice sample, light-colored 3mm or 4mm cotton cord is easy to see and handle. For an actual project, match the tutorial’s specified thickness and construction. Compare the options in our macrame cord guide.
How much cord do I need for macrame?
Use the pattern’s cutting list when your materials match. For a changed or original design, measure a sample repeat and account separately for mounting, fringe, finishing, and adjustments. No single multiplier works for every knot pattern. See our cord measurement guide.
Can I use ordinary yarn instead of macrame cord?
You can use yarn for experiments, but it can stretch, separate, or form knots differently. A cutting list written for macrame cord may not give the same result with knitting yarn. Begin with the specified material when learning a pattern.
Why does my macrame look uneven?
Check the strand count, spacing, and tension in the first uneven section. Also check that your support is steady and that the working and anchor strands have not been swapped. Correct a small section before adding more rows.
Can I fix a mistake or add a cord that is too short?
Many accessible knots can be loosened and retied before finishing. Adding cord depends on the design, the join location, and whether it carries weight. Keep the remaining ends long and follow an appropriate repair method; sometimes replacing the affected section is the better choice.
Do I need a macrame board or rack?
No. For a small practice piece or keychain, a sturdy clipboard or a support securely fixed to a stable surface may be enough. Keep the attachment from sliding and protect the surface. A rack with suitable hooks is useful for longer hanging work because you can adjust the working height. Choose the support to fit the project; test it with a gentle pull before starting.
What do SK, DHH, LH, and RLH mean?
SK means square knot; DHH or DHHK means double half hitch; LH means lark’s head; and RLH means reverse lark’s head. See the quick abbreviation key in Tip 6. Always check the tutorial’s own key before you start.
How do I know when I am ready for a first project?
You are ready to try a simple pattern when you can identify the strands, repeat its basic knot with reasonably similar size, and recognize the finished shape. For a square-knot chain, check that both halves are complete and the chain lies flat after untwisting the loose cords. You do not need perfect knots. If you lose your place, return to the short practice session and follow the video one movement at a time.
Do I need glue or fabric stiffener for macrame?
Most basic knot practice needs neither. Use the secure finishing method specified in your pattern. Fabric stiffener is an optional shaping aid for some decorative fringe, leaves, or feathers; it does not replace a secure knot or repair a load-bearing cord. Test it on an offcut and follow the product instructions. For brushed fringe, start with the combing and trimming steps in Tip 12.
Where to go next in your Macrame Journey
Choose the stage that matches what you want to do next. You can return to an earlier lesson whenever you need a refresher.
- Build confidence: explore Stage 1: Embrace the Joy of Knotting for foundations and manageable first projects.
- Make your work more consistent: continue with Stage 2: Elevate Your Macrame to refine technique and explore patterns and textures.
- Make a design your own: visit Stage 3: Unleash Your Creativity when you are ready to plan original pieces.
A LITTLE SUPPORT FOR YOUR NEXT PROJECT
Keep learning with the Bochiknot Patreon community
If you would like a regular reason to pick up your cord, explore the Bochiknot community on Patreon. Choose the level of guidance that fits the projects you want to make.
TIER 1
Mini-Macrame Creations
Explore smaller projects with patterns and video guidance.
TIER 2
Mastering Macrame Skills
Build your technique through guided projects, lessons, and creative challenges.
TIER 3
Macrame Masterpiece
Explore a learning and materials-kit option. Compare the kit schedule and shipping details on Patreon.
Tier 3 also has Macrame Masterpiece Lite (S2) and Macrame Masterpiece Bundle (S1) options. See Patreon for the current inclusions, availability, and pricing.

NICOLE WOO · BOCHIKNOT
You do not need a perfect first project to make progress. Pick one tip, try it on a small section, and keep the notes that will help you next time. There is always another knot to learn.
A little inspiration between projects
Follow Bochiknot for tutorials, new ideas, and more ways to keep knotting.

Leave a comment